
A Community-driven project #
21ideas is a Bitcoin-only educational project managed by the community. Its concept revolves around having active Bitcoiners monitor the repository, ensuring that the list of moderators remains flexible, much like the keys to the Bitcoin kingdom are transferred to new maintainers as the project evolves. We envision this approach allowing the project to live eternally and remain forever relevant. Similar to Bitcoin itself, the project doesn’t require quick changes or updates. From the beginning, its purpose was to curate fundamental materials and essential information, catering both to beginners and seasoned Bitcoin enthusiasts alike.
This aspect is crucial when considering the addition of materials to the platform. Therefore, when deciding to add content to the library, consider asking yourself the following questions:
- Making Sure the Material Isn’t Already Presented
An obvious but important question – check if the article you wish to add to the library hasn’t been previously included. On the website, you can find a built-in search located in the upper left corner. Try different ways of phrasing the headline when searching. Note that the search extends beyond just titles, covering the entire body of articles too. Thus, locating the material (assuming it exists) shouldn’t present difficulties.
- Assessing Relevance
Is the article still relevant today? Some pieces remain informative even decades later. A prime example is Trace Mayer’s article titled “Seven Network Effects of Bitcoin,” written in 2015. Although certain examples he cites have become outdated (such as Amazon no longer offering a 20% discount on items purchased with bitcoin), a simple footnote can correct those instances. Meanwhile, the core thoughts presented in the article largely hold true, likely retaining their significance not only for the next five to ten years but possibly even for the upcoming century.
- Ensuring Long-Term Value
Will the material stay relevant for years to come? While predicting the future lies outside anyone’s capabilities, attempting to answer this question remains vital. Our goal is to share knowledge that serves as a foundation: basics of storing bitcoin, recommended practices for purchasing coins and preserving privacy, essential properties of Bitcoin, historically significant documents, etc. Crucially, the material should possess high potential to retain its value over time.
Having answered the above questions with a “yes”, proceed to the following steps:
- Formatting the Article
A guide detailing proper formatting for articles can be found here. Before submitting your article for review, familiarize yourself with the guidelines. Minor errors or suggestions for improvement will receive recommendations and advice. However, if the article appears hastily put together, it won’t be considered due to the effort and time involved in formatting. Distributing the burden of managing the project is among the primary reasons behind opening it to the community. Gratitude goes towards members willing to contribute to promoting Bitcoin, and rewards are offered for publishing articles in the library. We’ve put together a dedicated fund to boost the platform development. Nevertheless, material quality and presentation must meet high standards.
- Categorizing the Article
Proper categorization plays a crucial role in the structure of the website. Initial discussions about transitioning 21ideas to a new location began primarily because of navigation issues. Users, particularly novices, had difficulty finding necessary materials and grasping where to begin learning about complex phenomena like Bitcoin. Correct classification ensures new content finds its rightful place, enhancing usability. If defining the appropriate category proves challenging, contact a project maintainer, whose details are accessible in the Feedback section.
- Choosing a Suitable Text Editor
Once you have decided upon an article, select a preferred text editor. Concerning material formatting, refer to this guide. For working with project materials, we suggest VSCode or Obsidian, although you are welcome to choose any alternative that suits your taste.
- Submitting the Ready Article
Upload the finished article to GitHub. Below, I present two methods for proposing materials to the library. By following these guides, you will learn the fundamentals of operating GitHub. Such skills prove beneficial regardless of wether you are planning to contribute to 21ideas project.
Methods for Contributing to 21ideas #
Interacting with the 21ideas website involves choosing from two major approaches: direct browser access (simpler) or launching the repository locally (on your computer). The second method allows contributors to submit materials or adjustments using their local copy of the project (more intricate initially but significantly more convenient afterward).
I encourage everyone to utilize the second approach, especially when crafting extensive articles, yet understand that not every community member feels comfortable with required technical instruments. That being said, I shall introduce a streamlined submission technique. This simplified approach benefits small corrections, such as fixing missing commas, avoiding the need to run an extensive copy of a project locally.
On the other hand, keeping a project repository copy is good practice: first, if you work on an article, real-time change previews enable you to visualize results immediately, observing your article’s appearance on the website. Additionally, maintaining a repository secures the most comprehensive Bitcoin database, remaining yours regardless of what happens with the project, GitHub, or GitLab.
Proposing materials via browser #
Let’s explore the simpler approach first:
- Register on GitHub
- Visit the repository.
- Press the “Fork” button in the top-right corner of the page
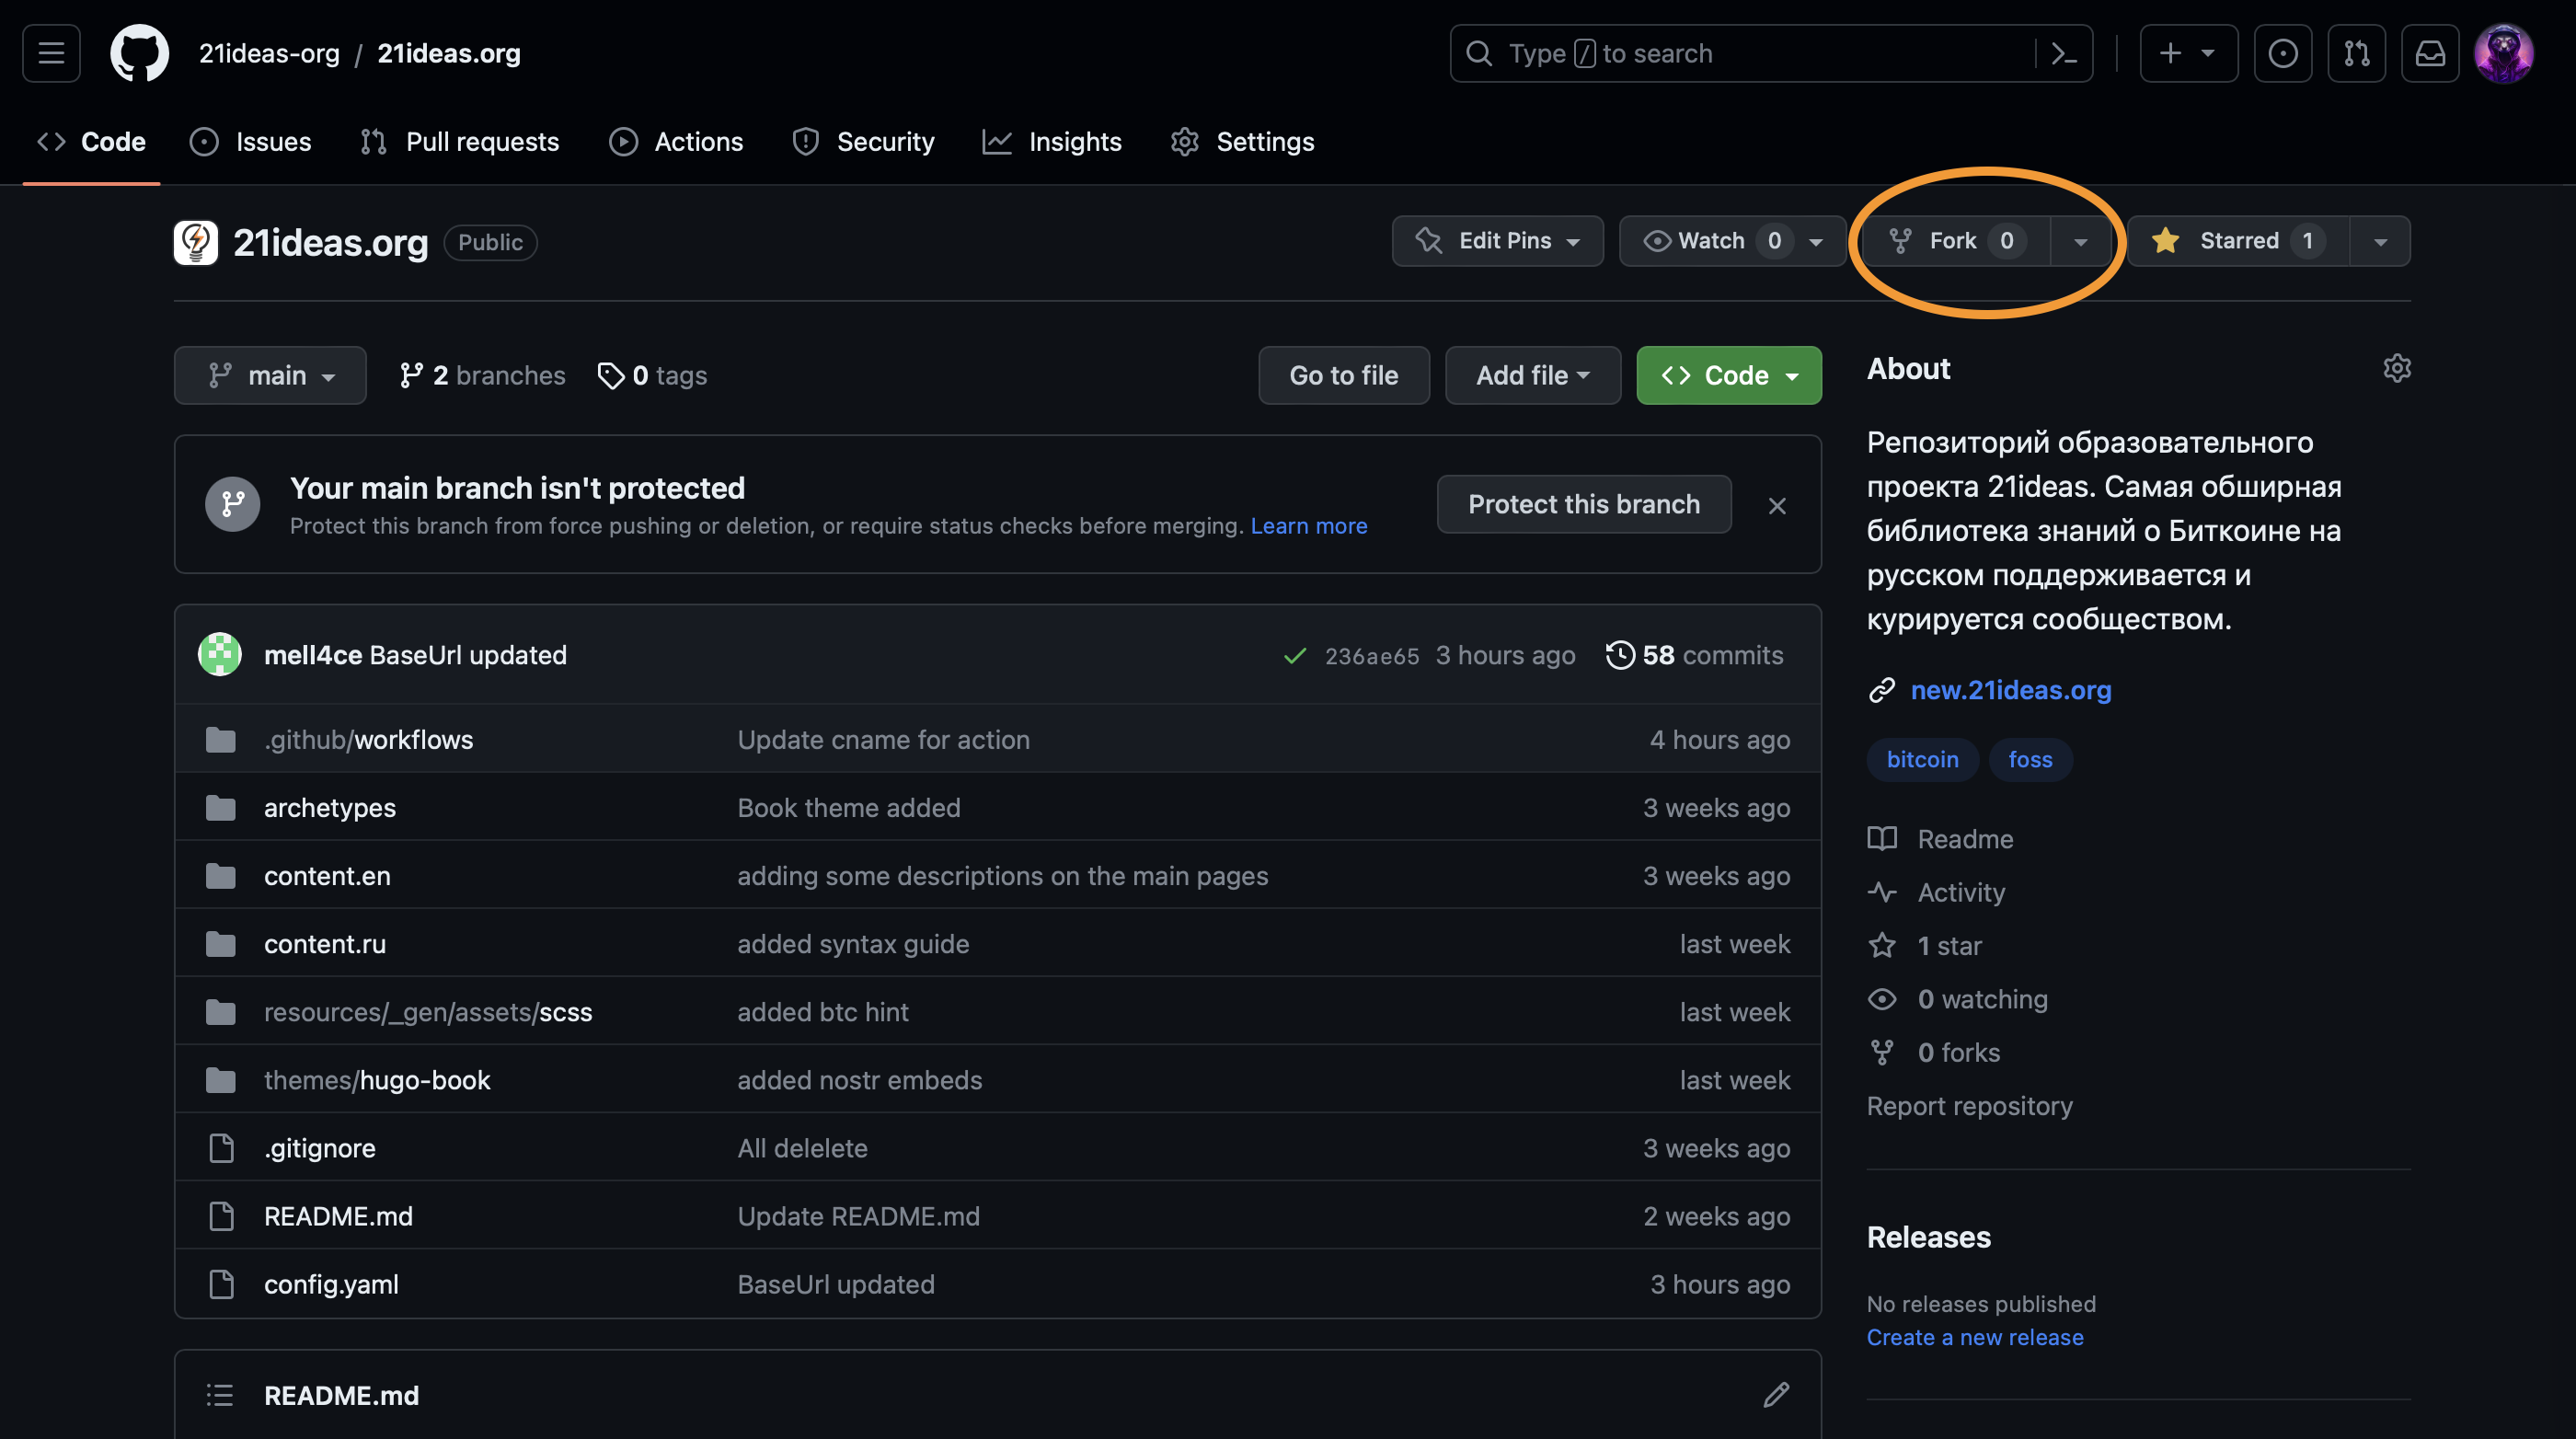
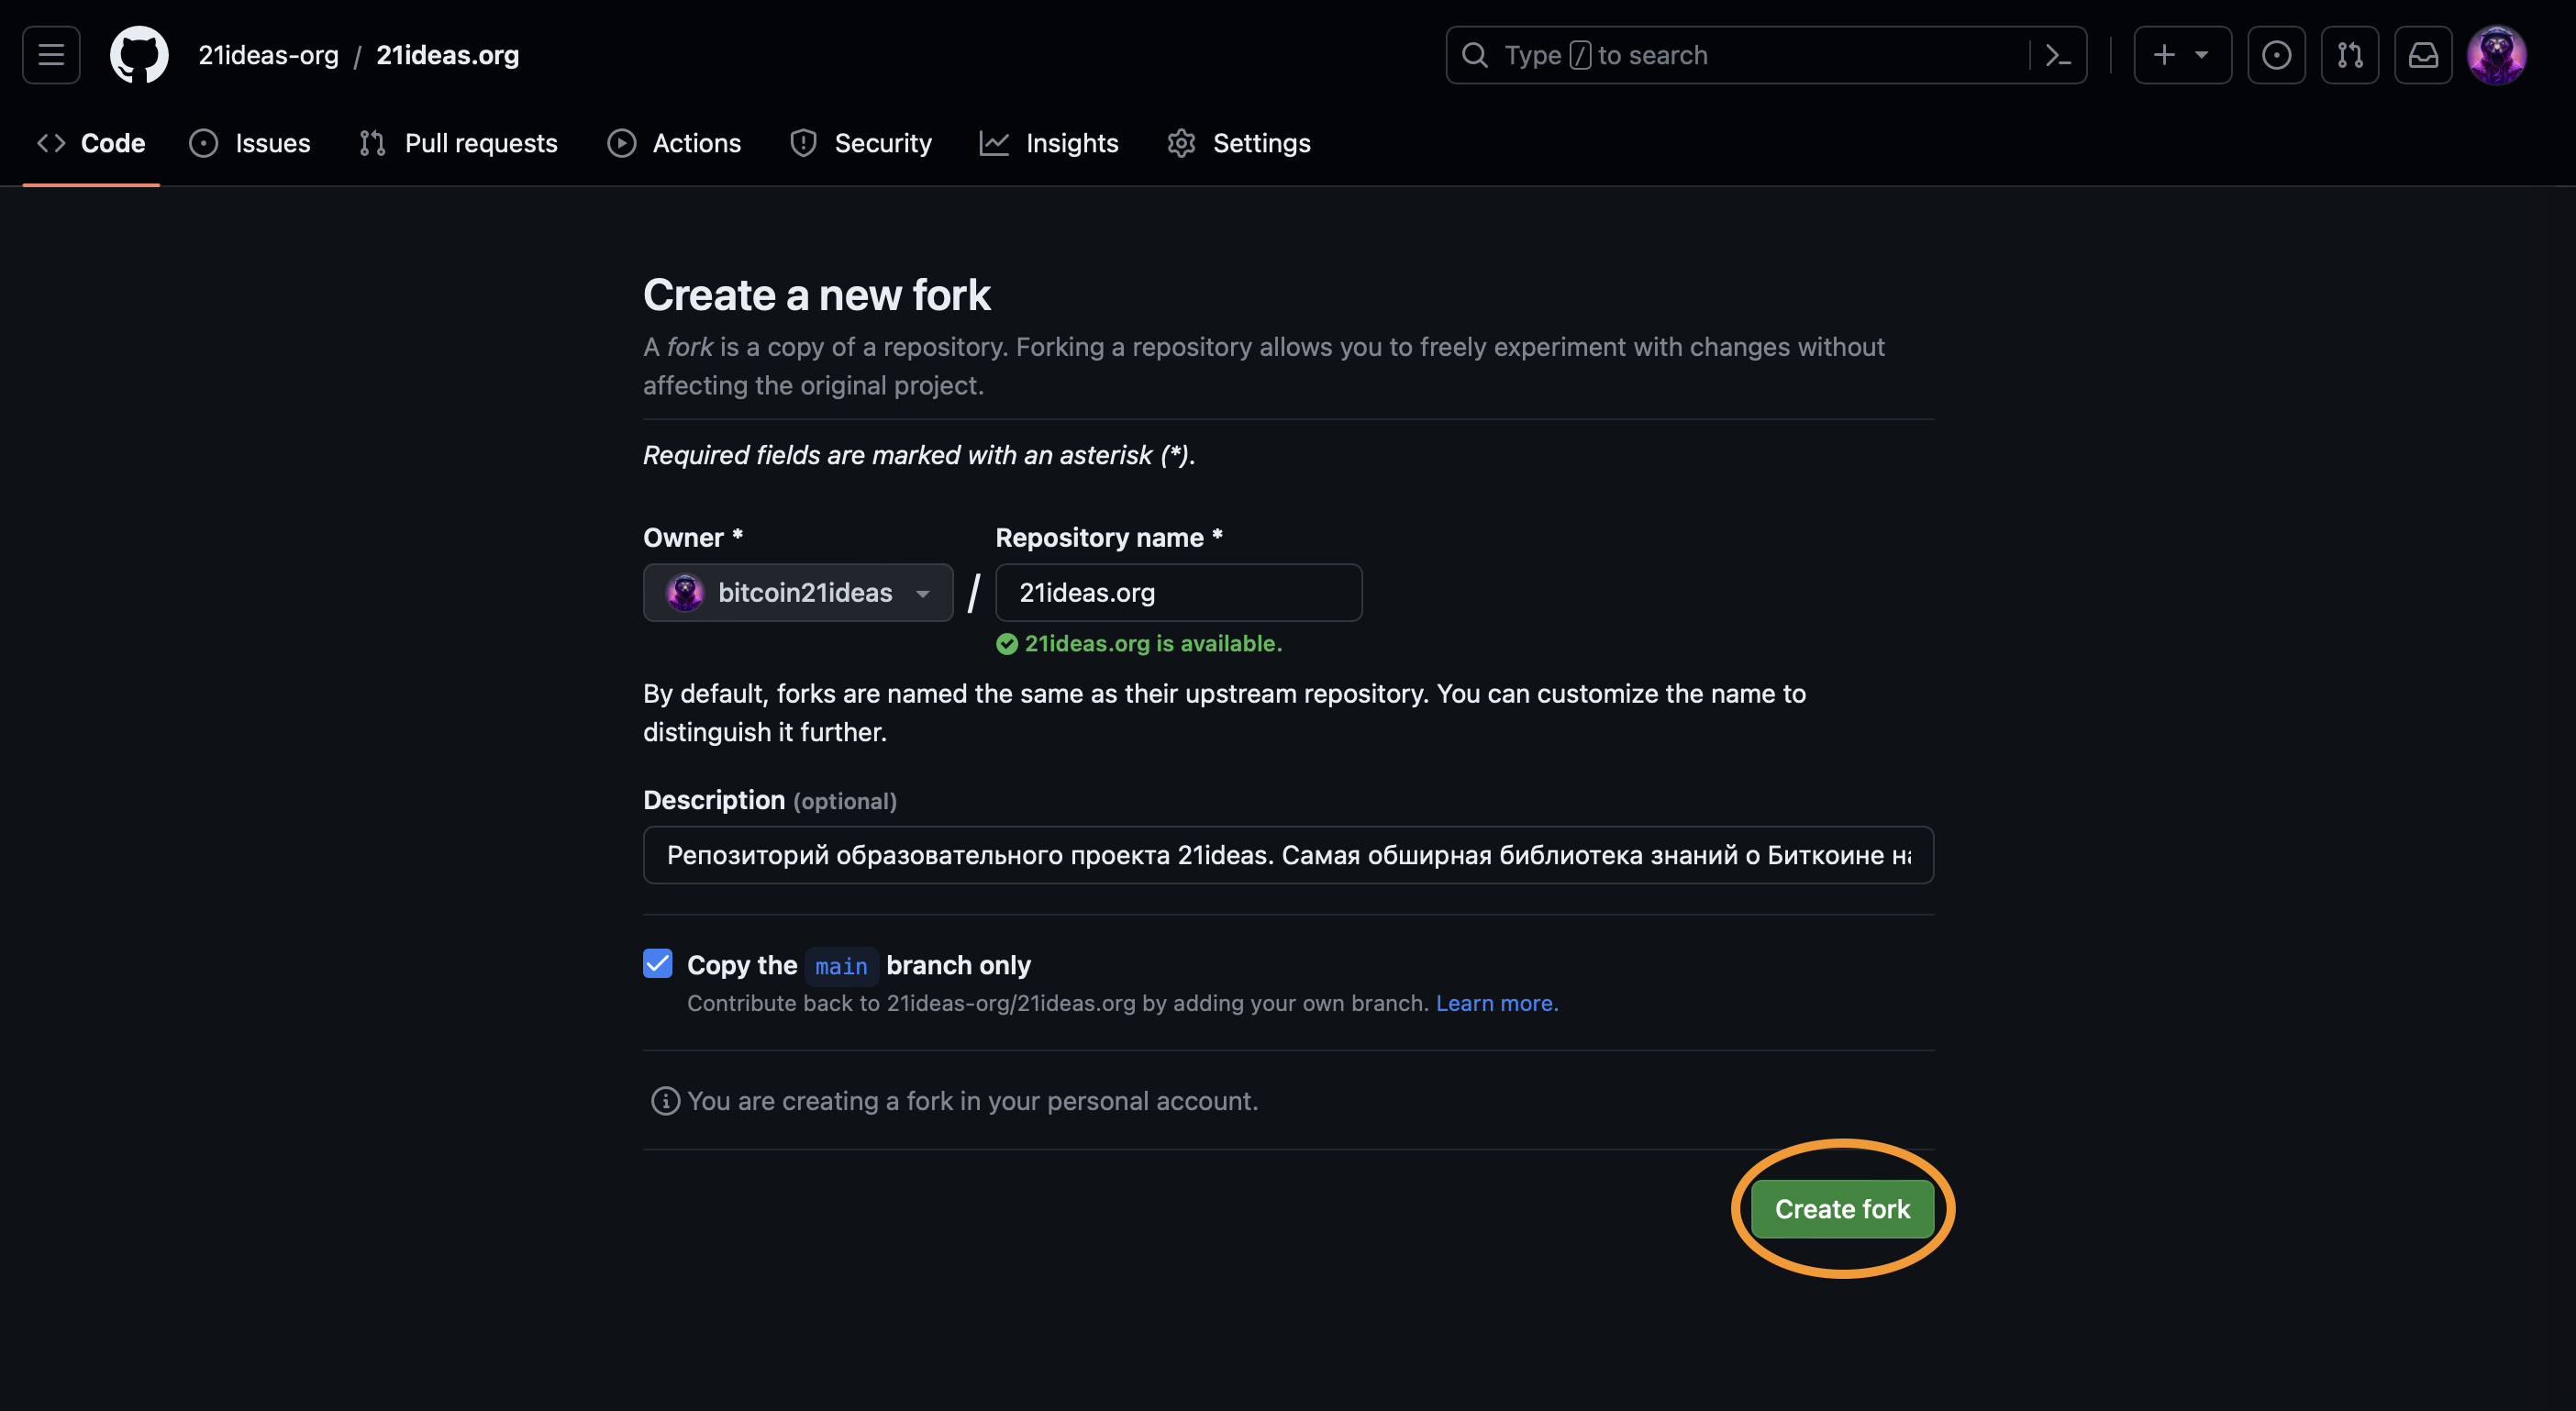
- Press “Create Fork” on the subsequent page. Now you have a copy of the main 21ideas repository under your account.
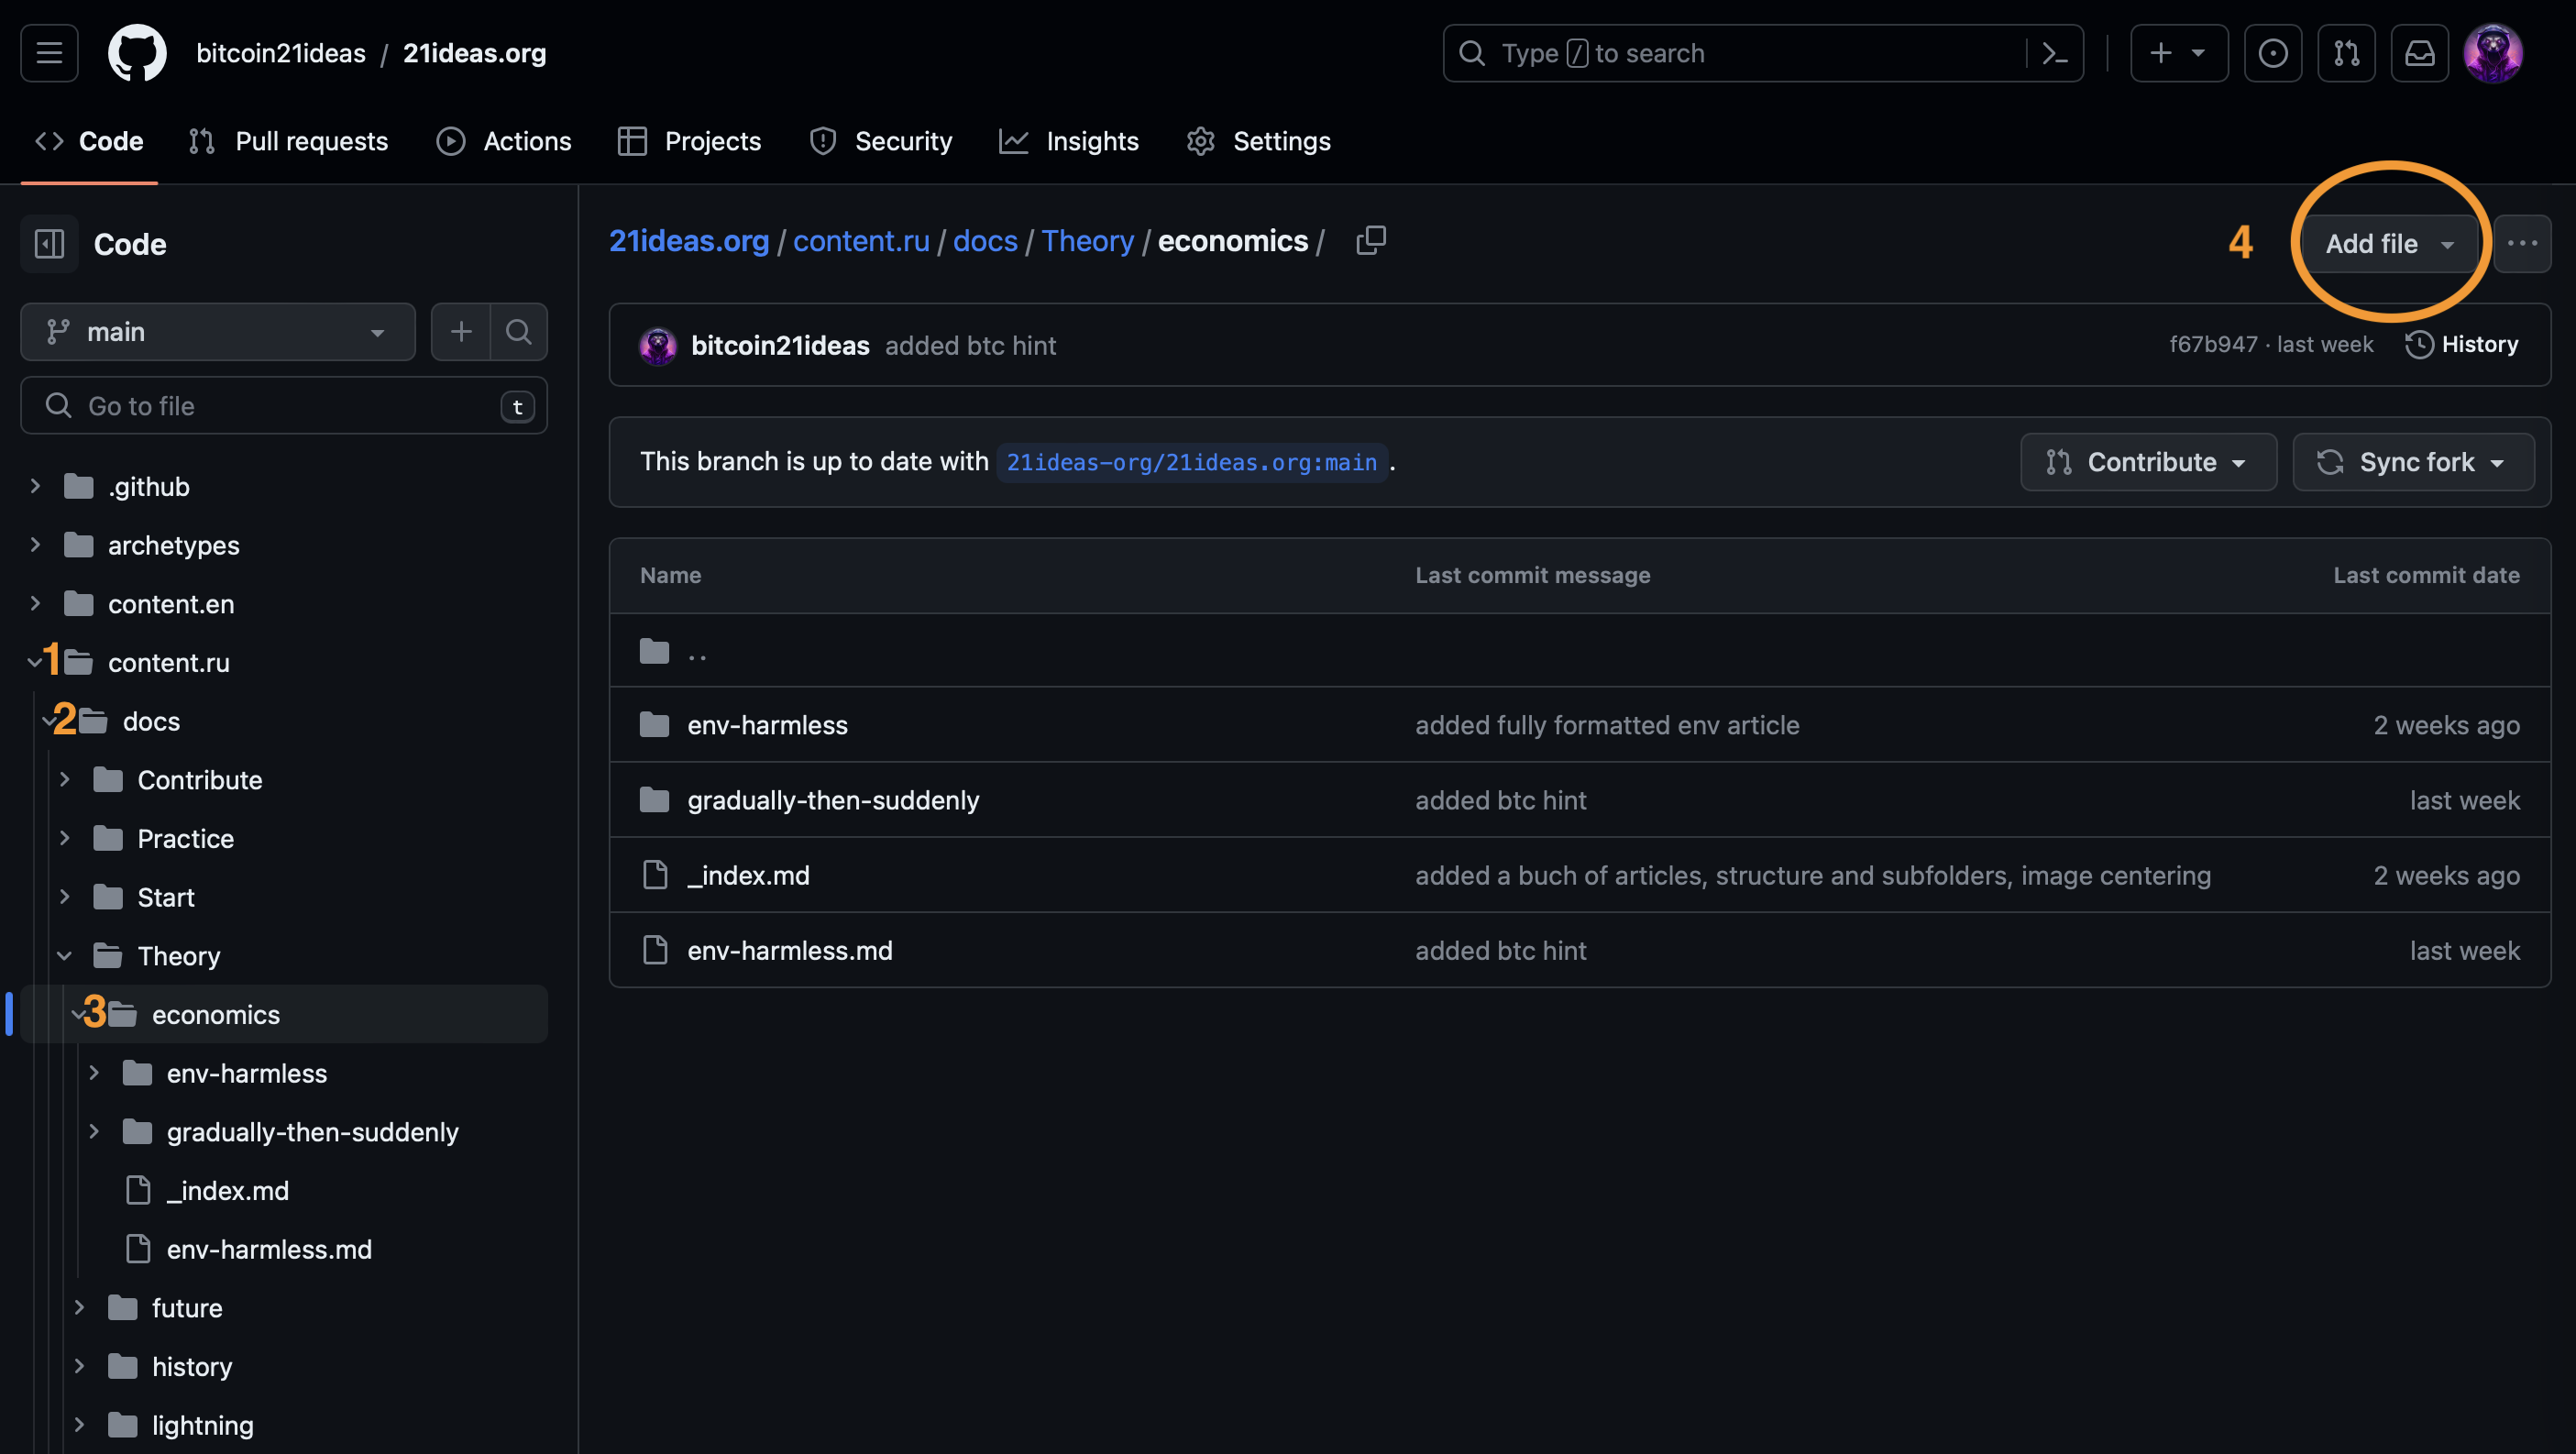
- Navigate to the subcategory you desire (for instance, take the Economics category).
Structure inside the repository reflects that of the website. All English content resides in content.en/docs folder.- Upon entering the folder, press “+ Create new file”.
- In the new window enter the file name. Do not forget to add the
.mdextension after the file name. The result should look similar to this:example.md
Don’t forget to specify the .md extension at the end of the header – it indicates the file format. If you don’t specify the extension, the platform won’t know how to read the file and will generate an error when trying to open the article on the site.
File names should be specified in English. The name must be spelled correctly (check for typos). Perhaps the easiest way is to copy it from the URL of the original article. If there is no title in the web address, copy the title from the original article and replace spaces with dashes (-).- Duplicate the tab and open a neighboring article – any of the articles located in the same folder where you put yours (except for the
_index.mdfile). - Click the “raw” button to open the raw version of the document.
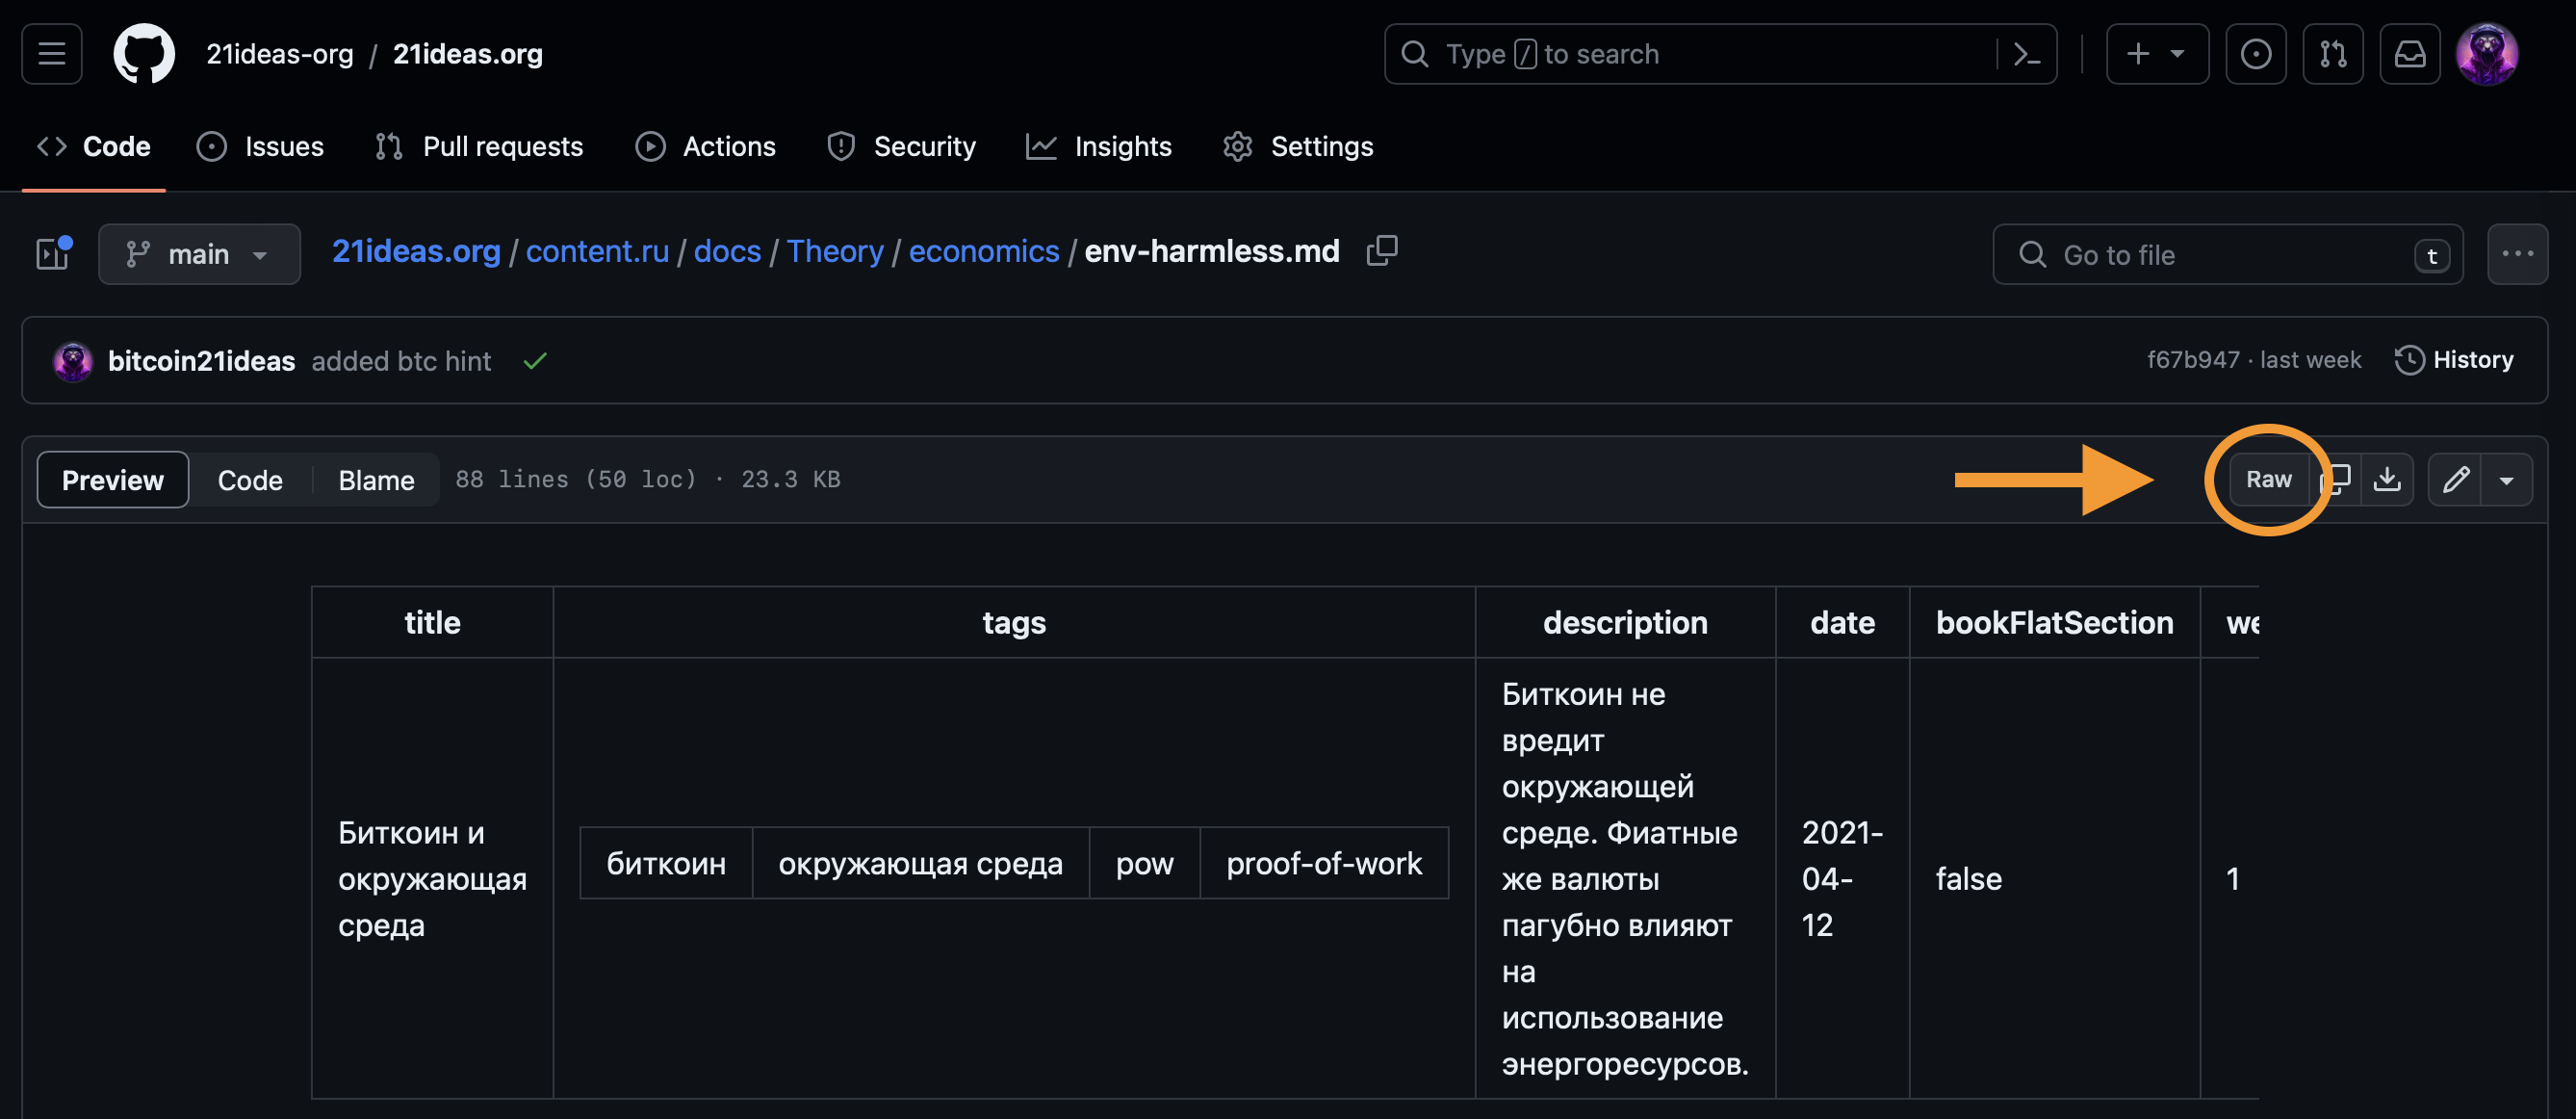
Copy the so-called “head” of the file – the initial part of the text, framed in
---. It contains the title of the article, metadata and all the elements necessary for both the site and search engine bots to understand the details of the material, display and index the page. You can learn more about this element here.Replace the title, description, cover image and all other important elements with information that is relevant to your article.
Insert the text of the prepared material below the head.
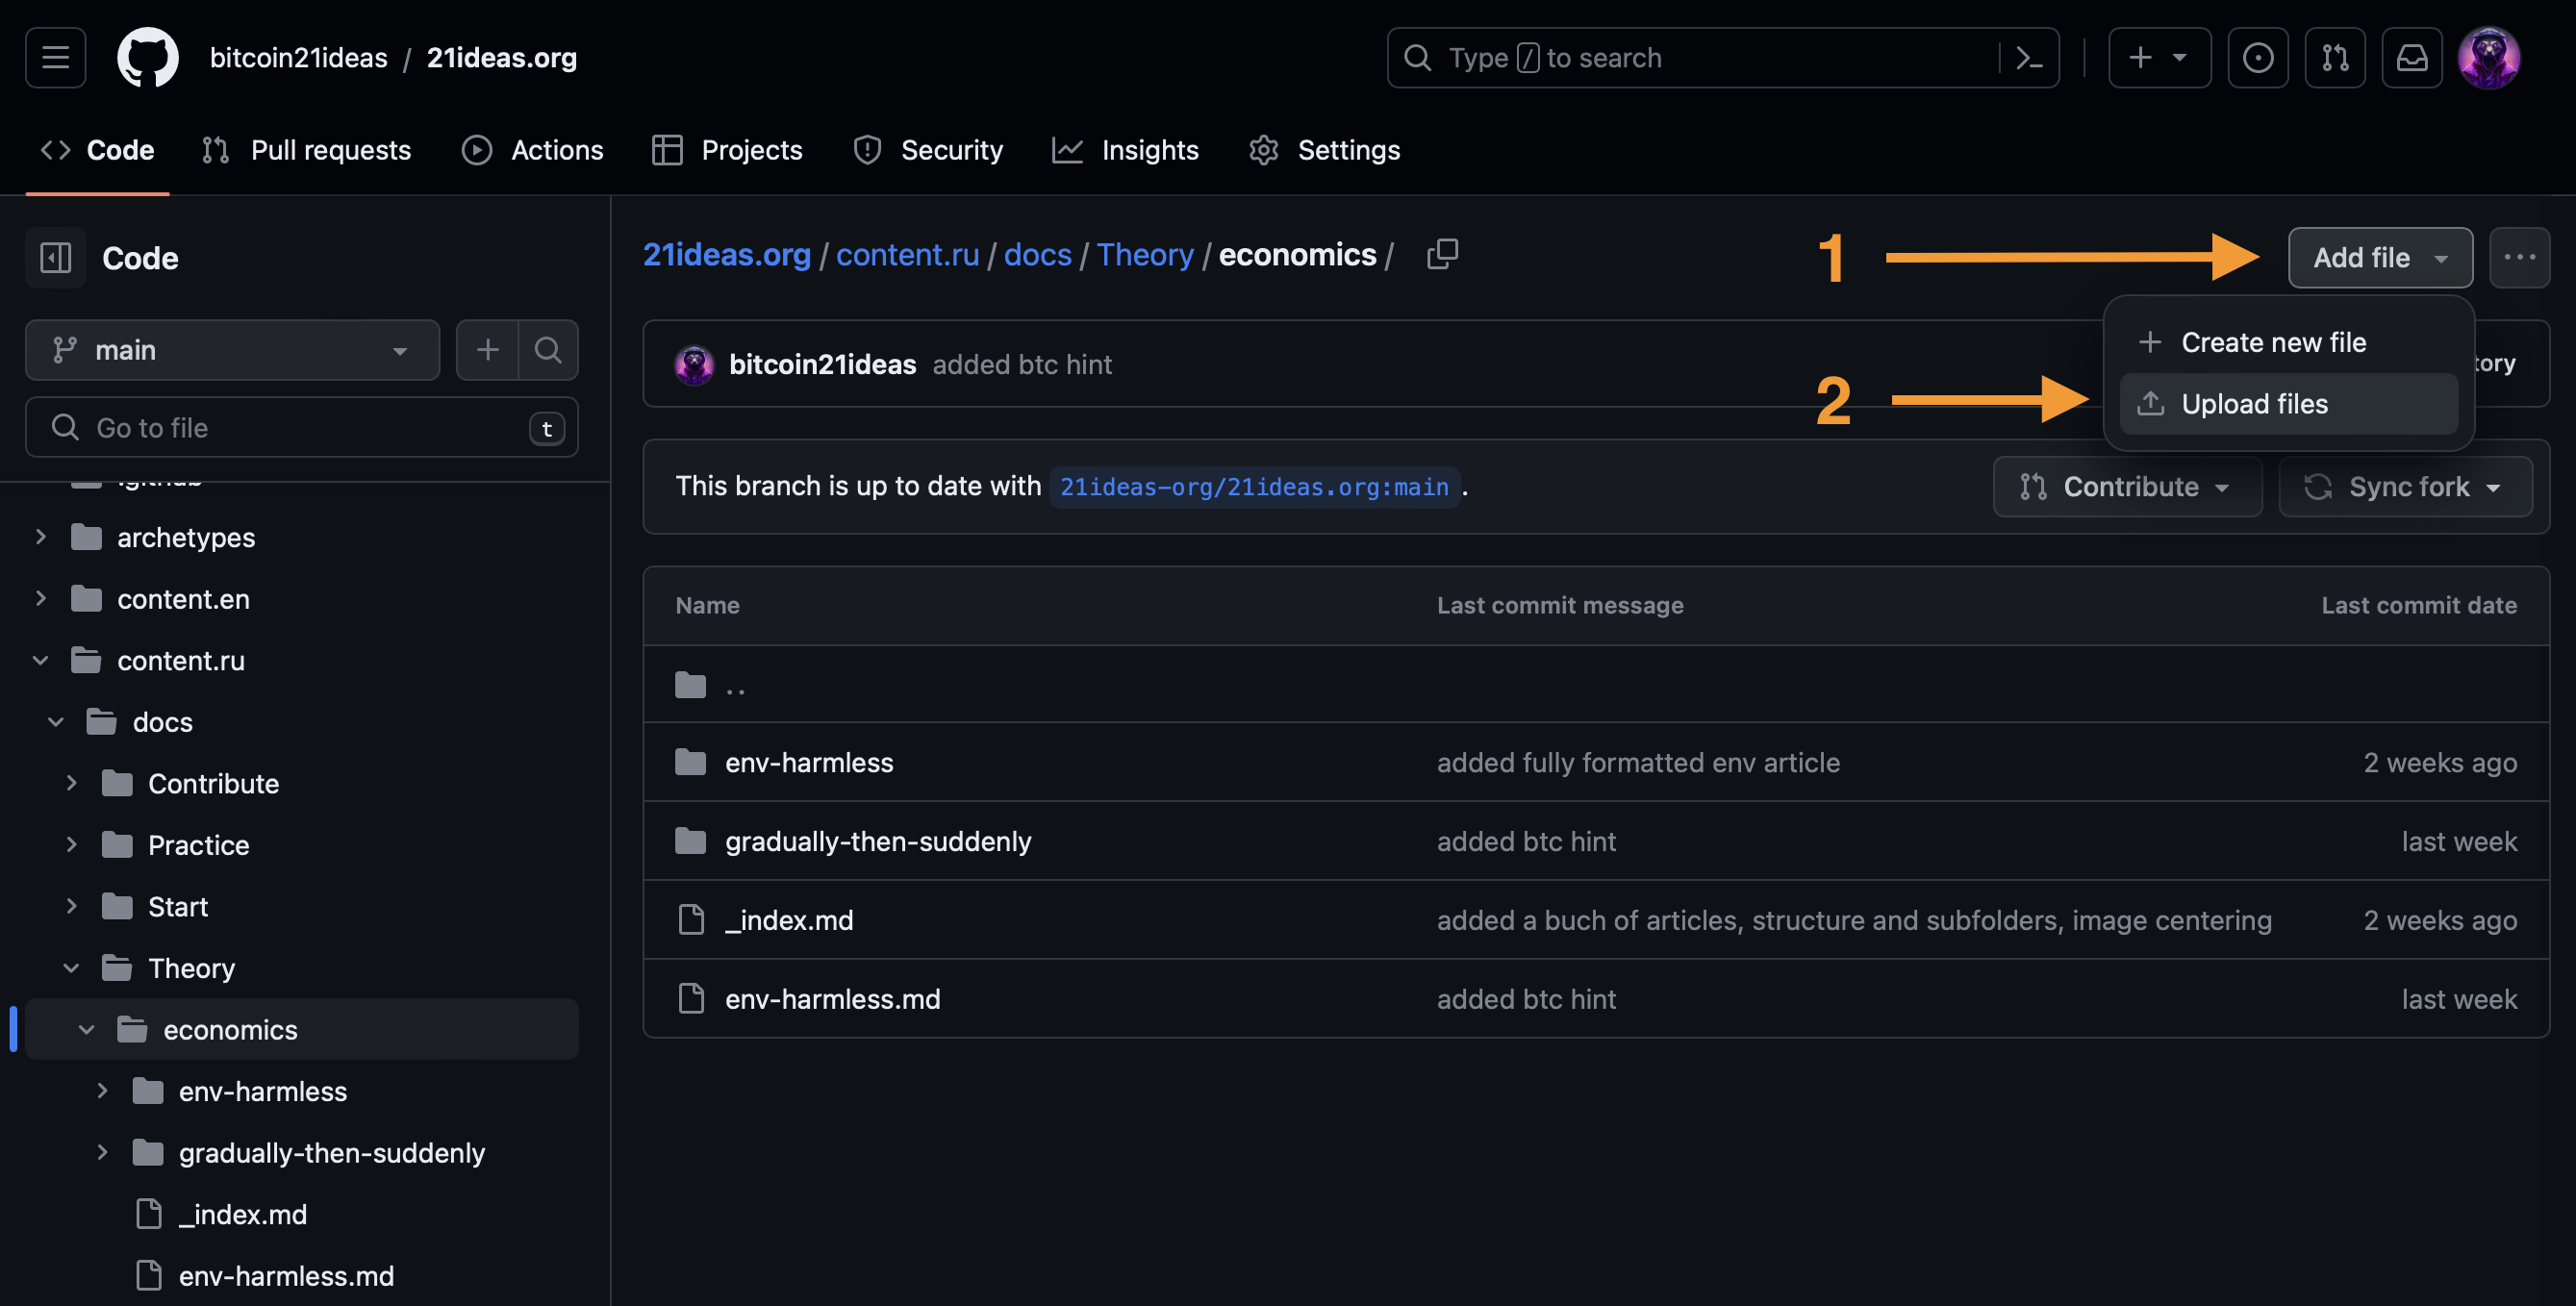
To add images to the article you need to upload them to the repository. To do this:
- navigate to the
/21ideas.org/themes/hugo-book/static/imgfolder - create a new folder for your article’s images and give it the name of your article
- save images in the newly created folder
- navigate to the
To create a folder in GitHub (the platform does not allow you to create empty folders), prepare the necessary images, open the
imgfolder and click “Add file” -> “Create new file”. Next, create a random file, placing it in the new folder oyou want to create, for example,new-article/images.md. This will create a file (which is basically a placeholder to create a folder) inside the folder you need.
You should delete the placeholder file after you’re done.
- To add images to the folder, simply click “Add file” -> “Upload files”, and drag-and-drop necessary images into the newly created folder.
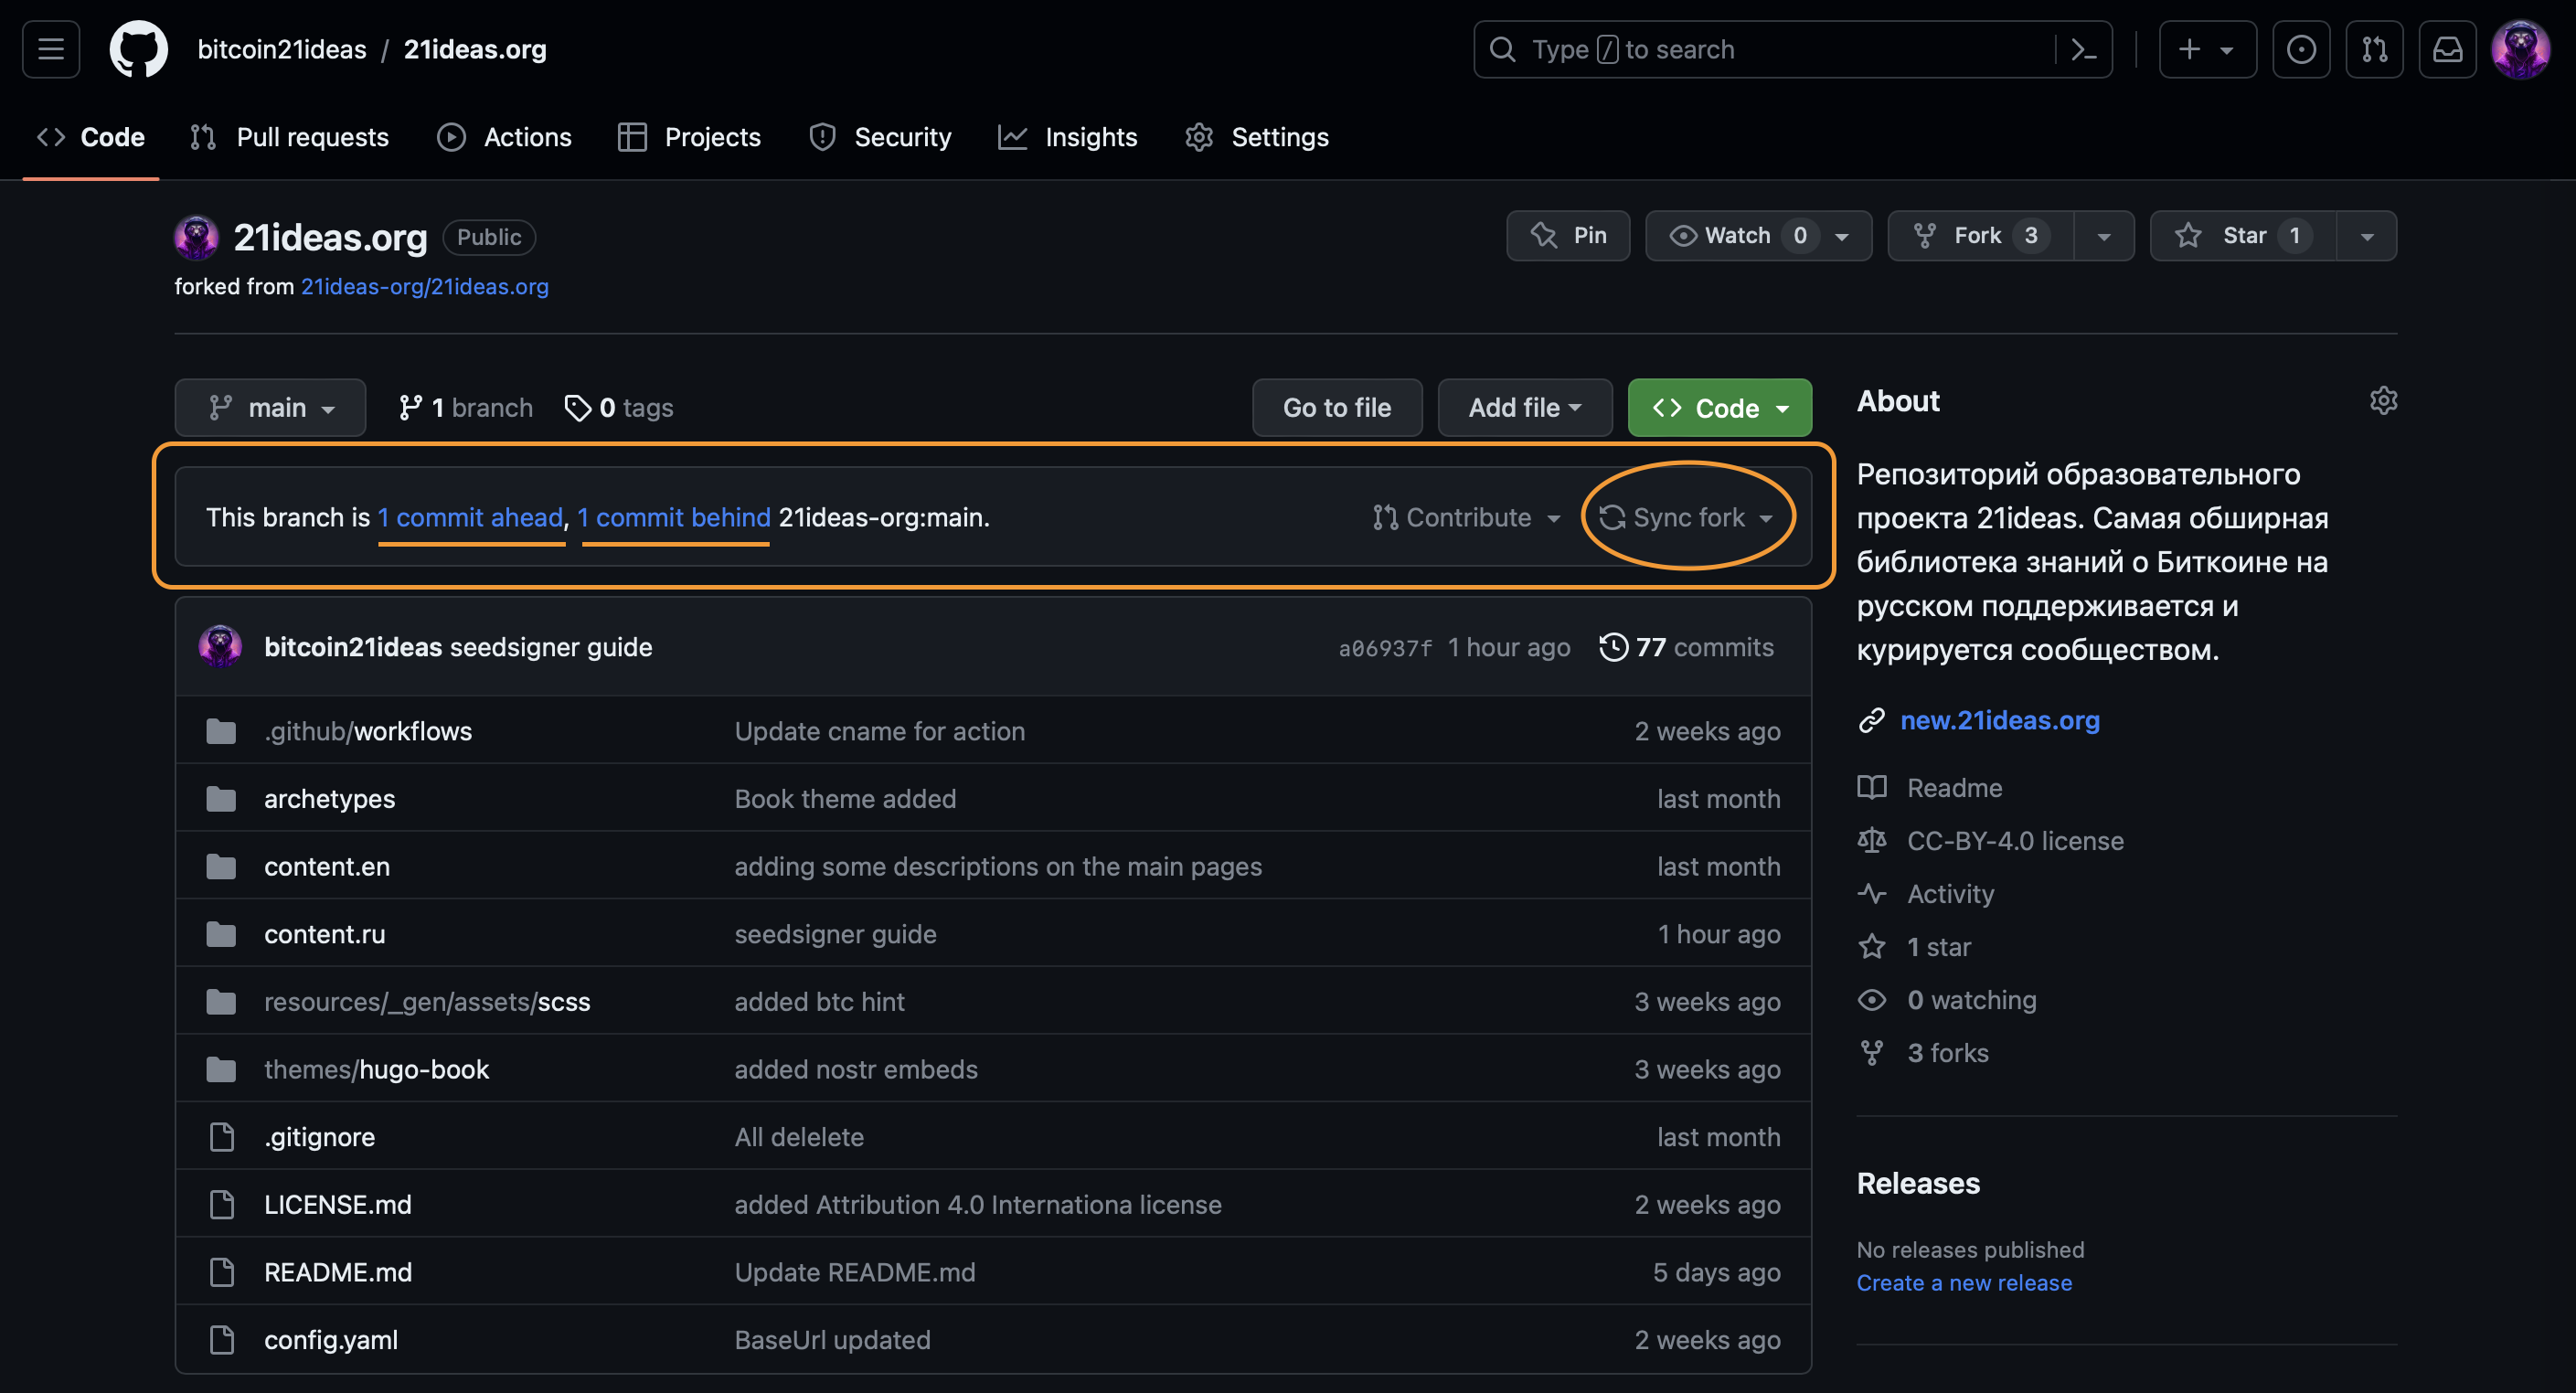
- When the article (and images) are ready, you should check if any changes have been made to the main repository while you were working on the the article. To do this, pay attention to the line just above the main repository file folder:
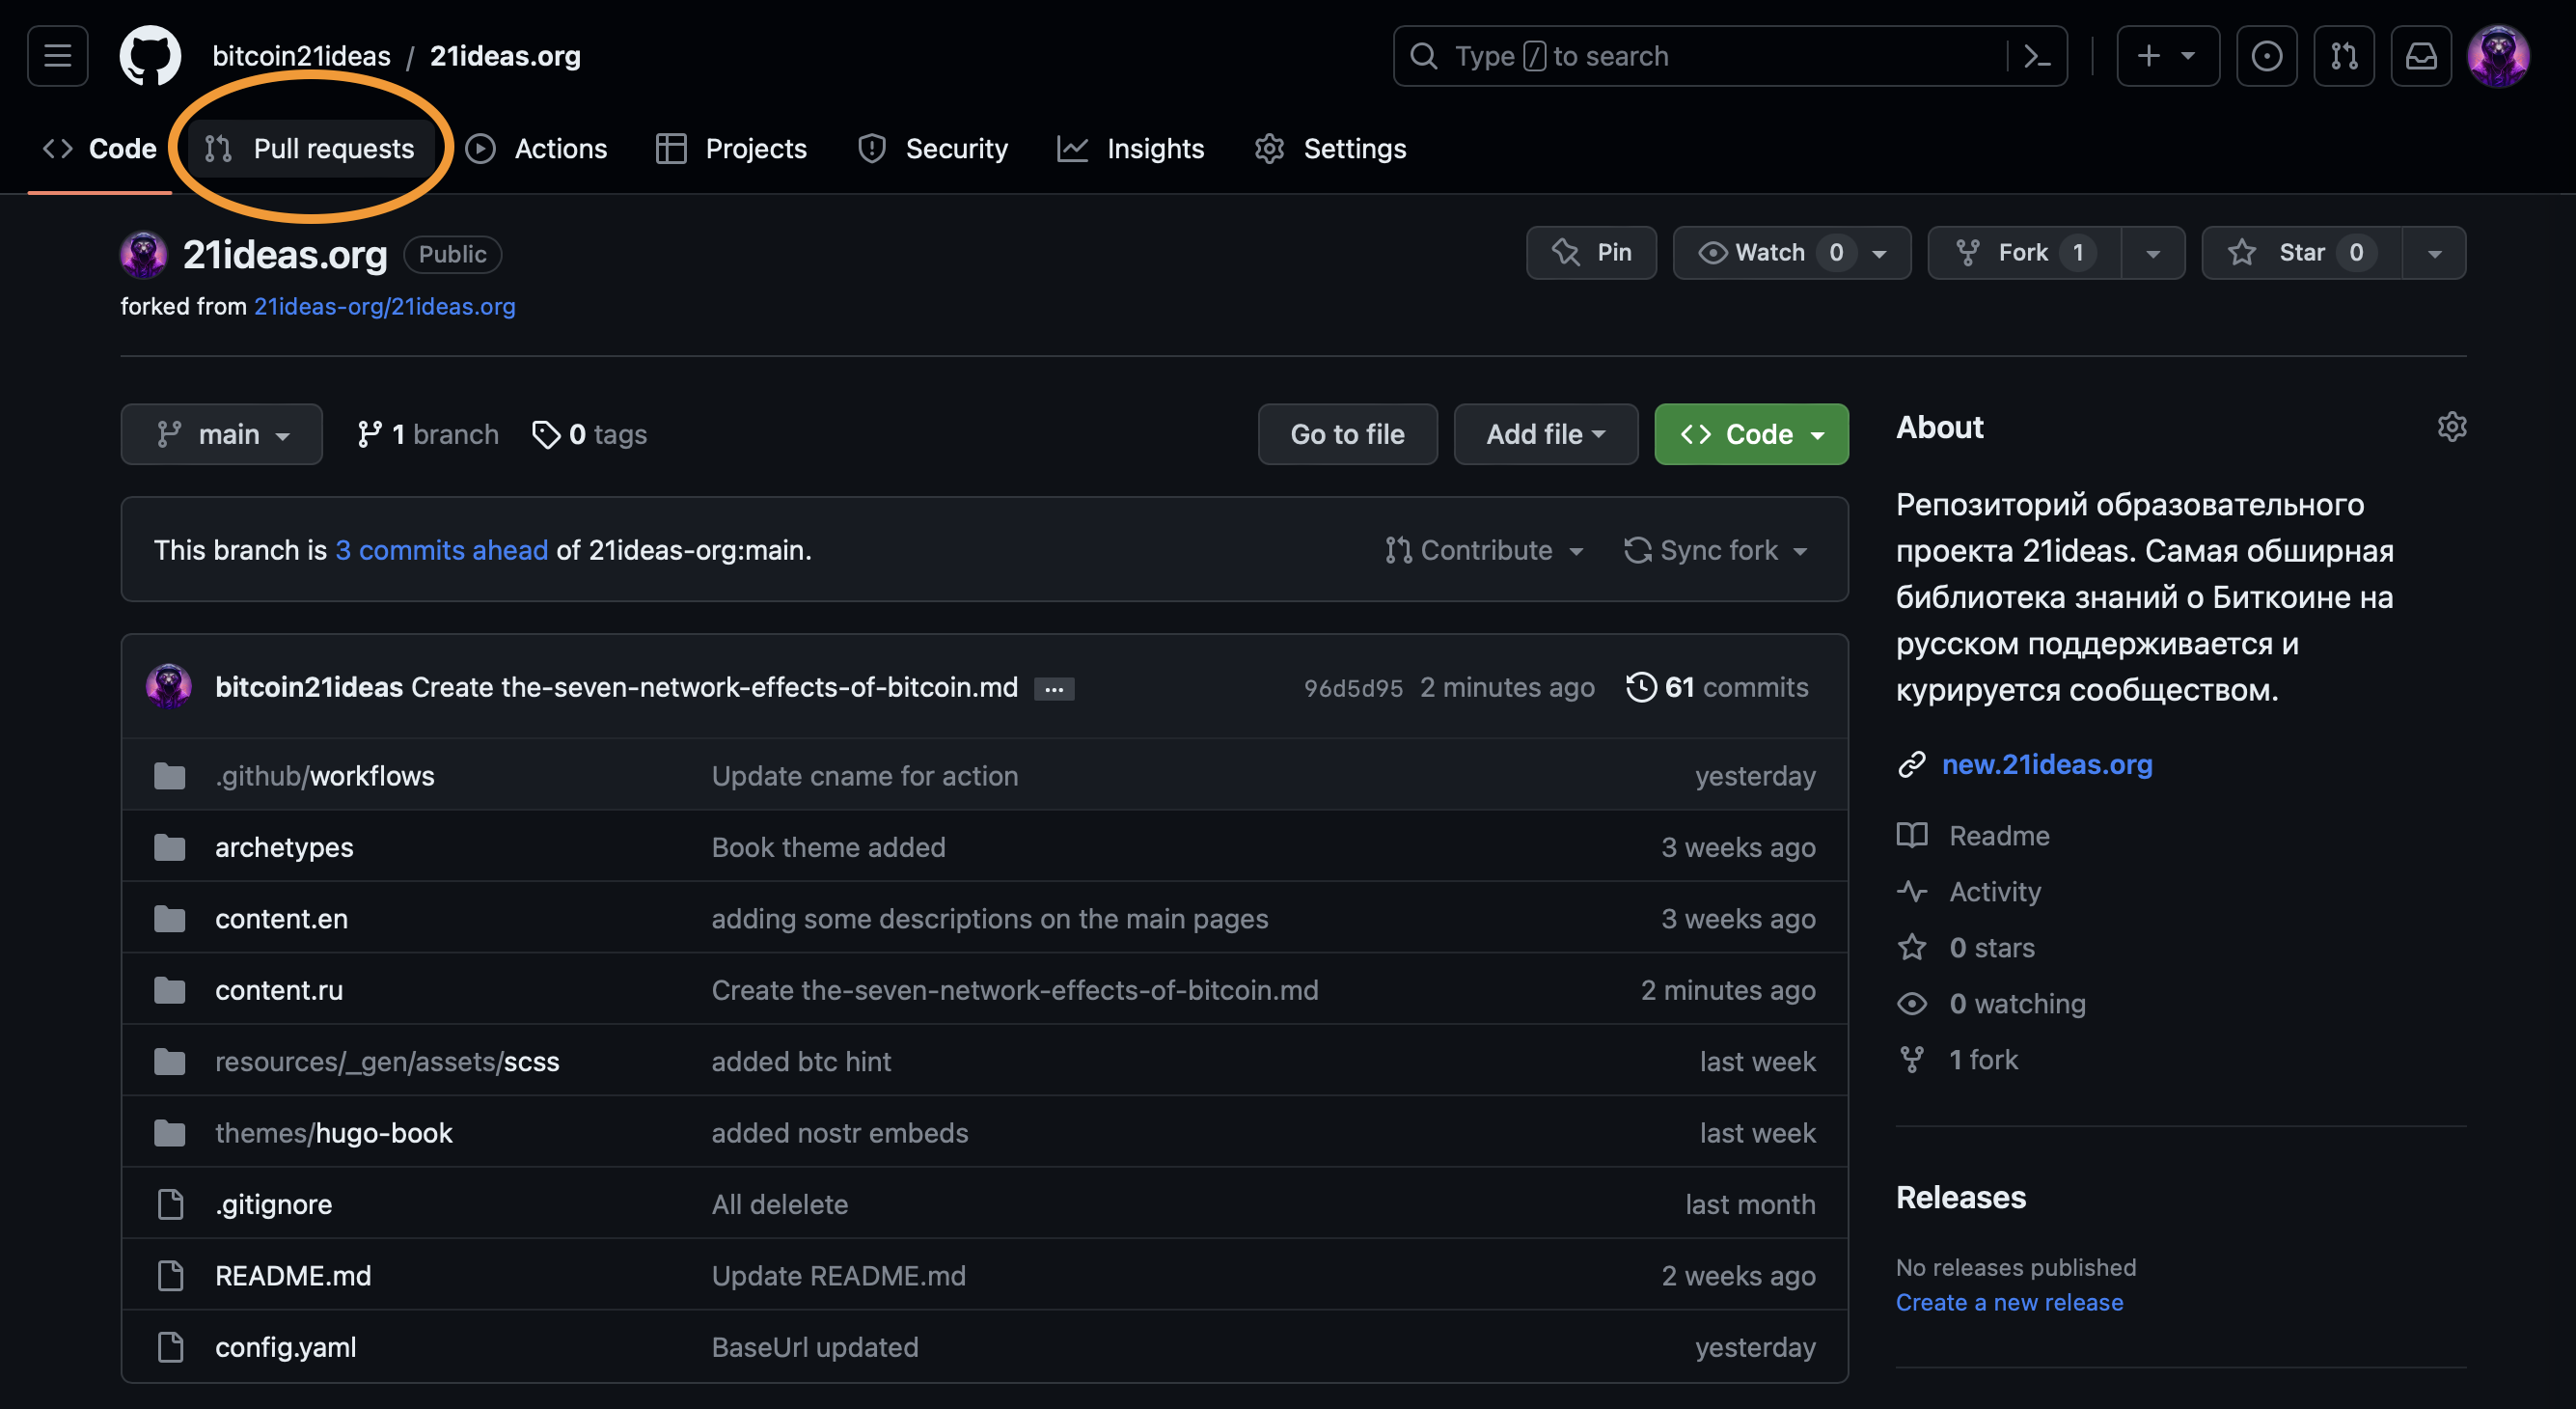
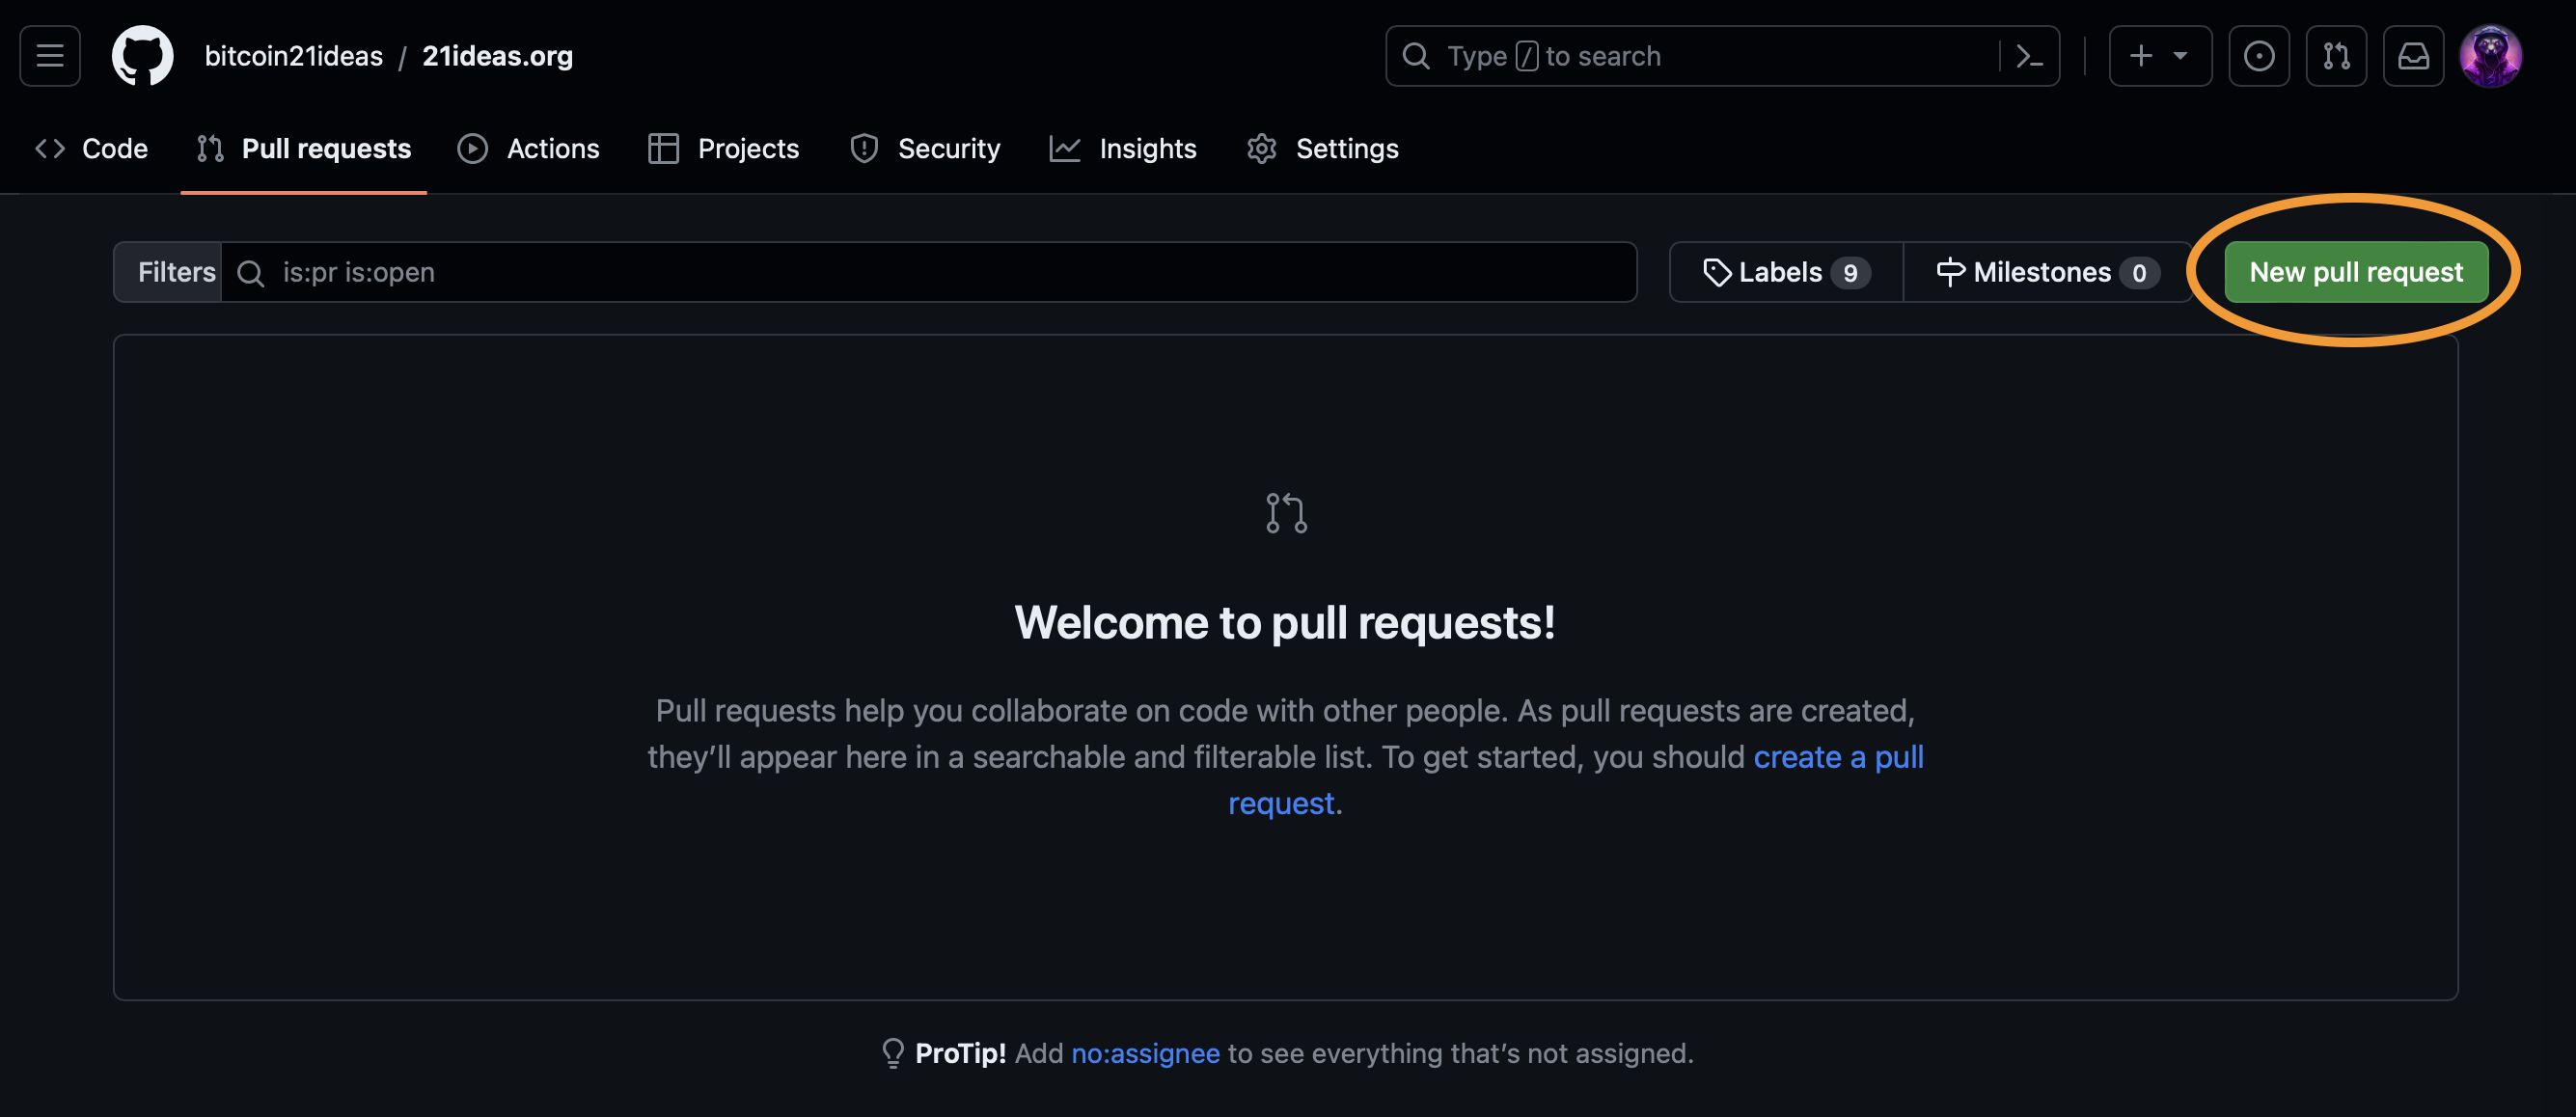
- Next, click “Pull requests” -> “New pull request” (you may need to confirm your intentions several times, it’s intuitive here).
- In the pop-up window, specify the title of the pull-request and a description of the work done. This is an important step, without which it will be more difficult for moderators to understand what exactly needs to be checked. It is also necessary for further auditing of the project code.

- By pushing a pull-request, you can notify the moderators that there is a new article waiting for them. This step is not mandatory - we regularly check the repository for new requests.
That’s it. In fact, there is nothing complicated in this process, the main thing is to follow the instructions and avoid cutting corners – the slightest changes in the process of adding new articles, formatting or adding images can lead to a critical error on the site, which in turn will not only make the display of your article impossible, but also “put” the whole site at risk.
Running the Repository Locally #
The second and recommended way of working with materials is to launch the project repository locally. As I’ve already mentioned, this approach has a lot of advantages over working in a browser – from ease of interaction to the possibility of previewing the uploaded article, which helps to make sure that there are no formatting errors. Moreover, as scary and technically complex as it sounds, the whole process is actually very straightforward and simple. Follow the steps listed below and in a few minutes you’ll be able to rightfully call yourself a true cypherpunk 😁.
To run the website locally, we will need special software the will help us run the repository and manage tasks such as adding materials to the remote (main) repository on GitHub, and perform editing of materials. The best contender for this role, in my opinion, is Visual Studio Code, also known as VS Code. You can download it here. Having installed the application, we can start launching the site on our device.
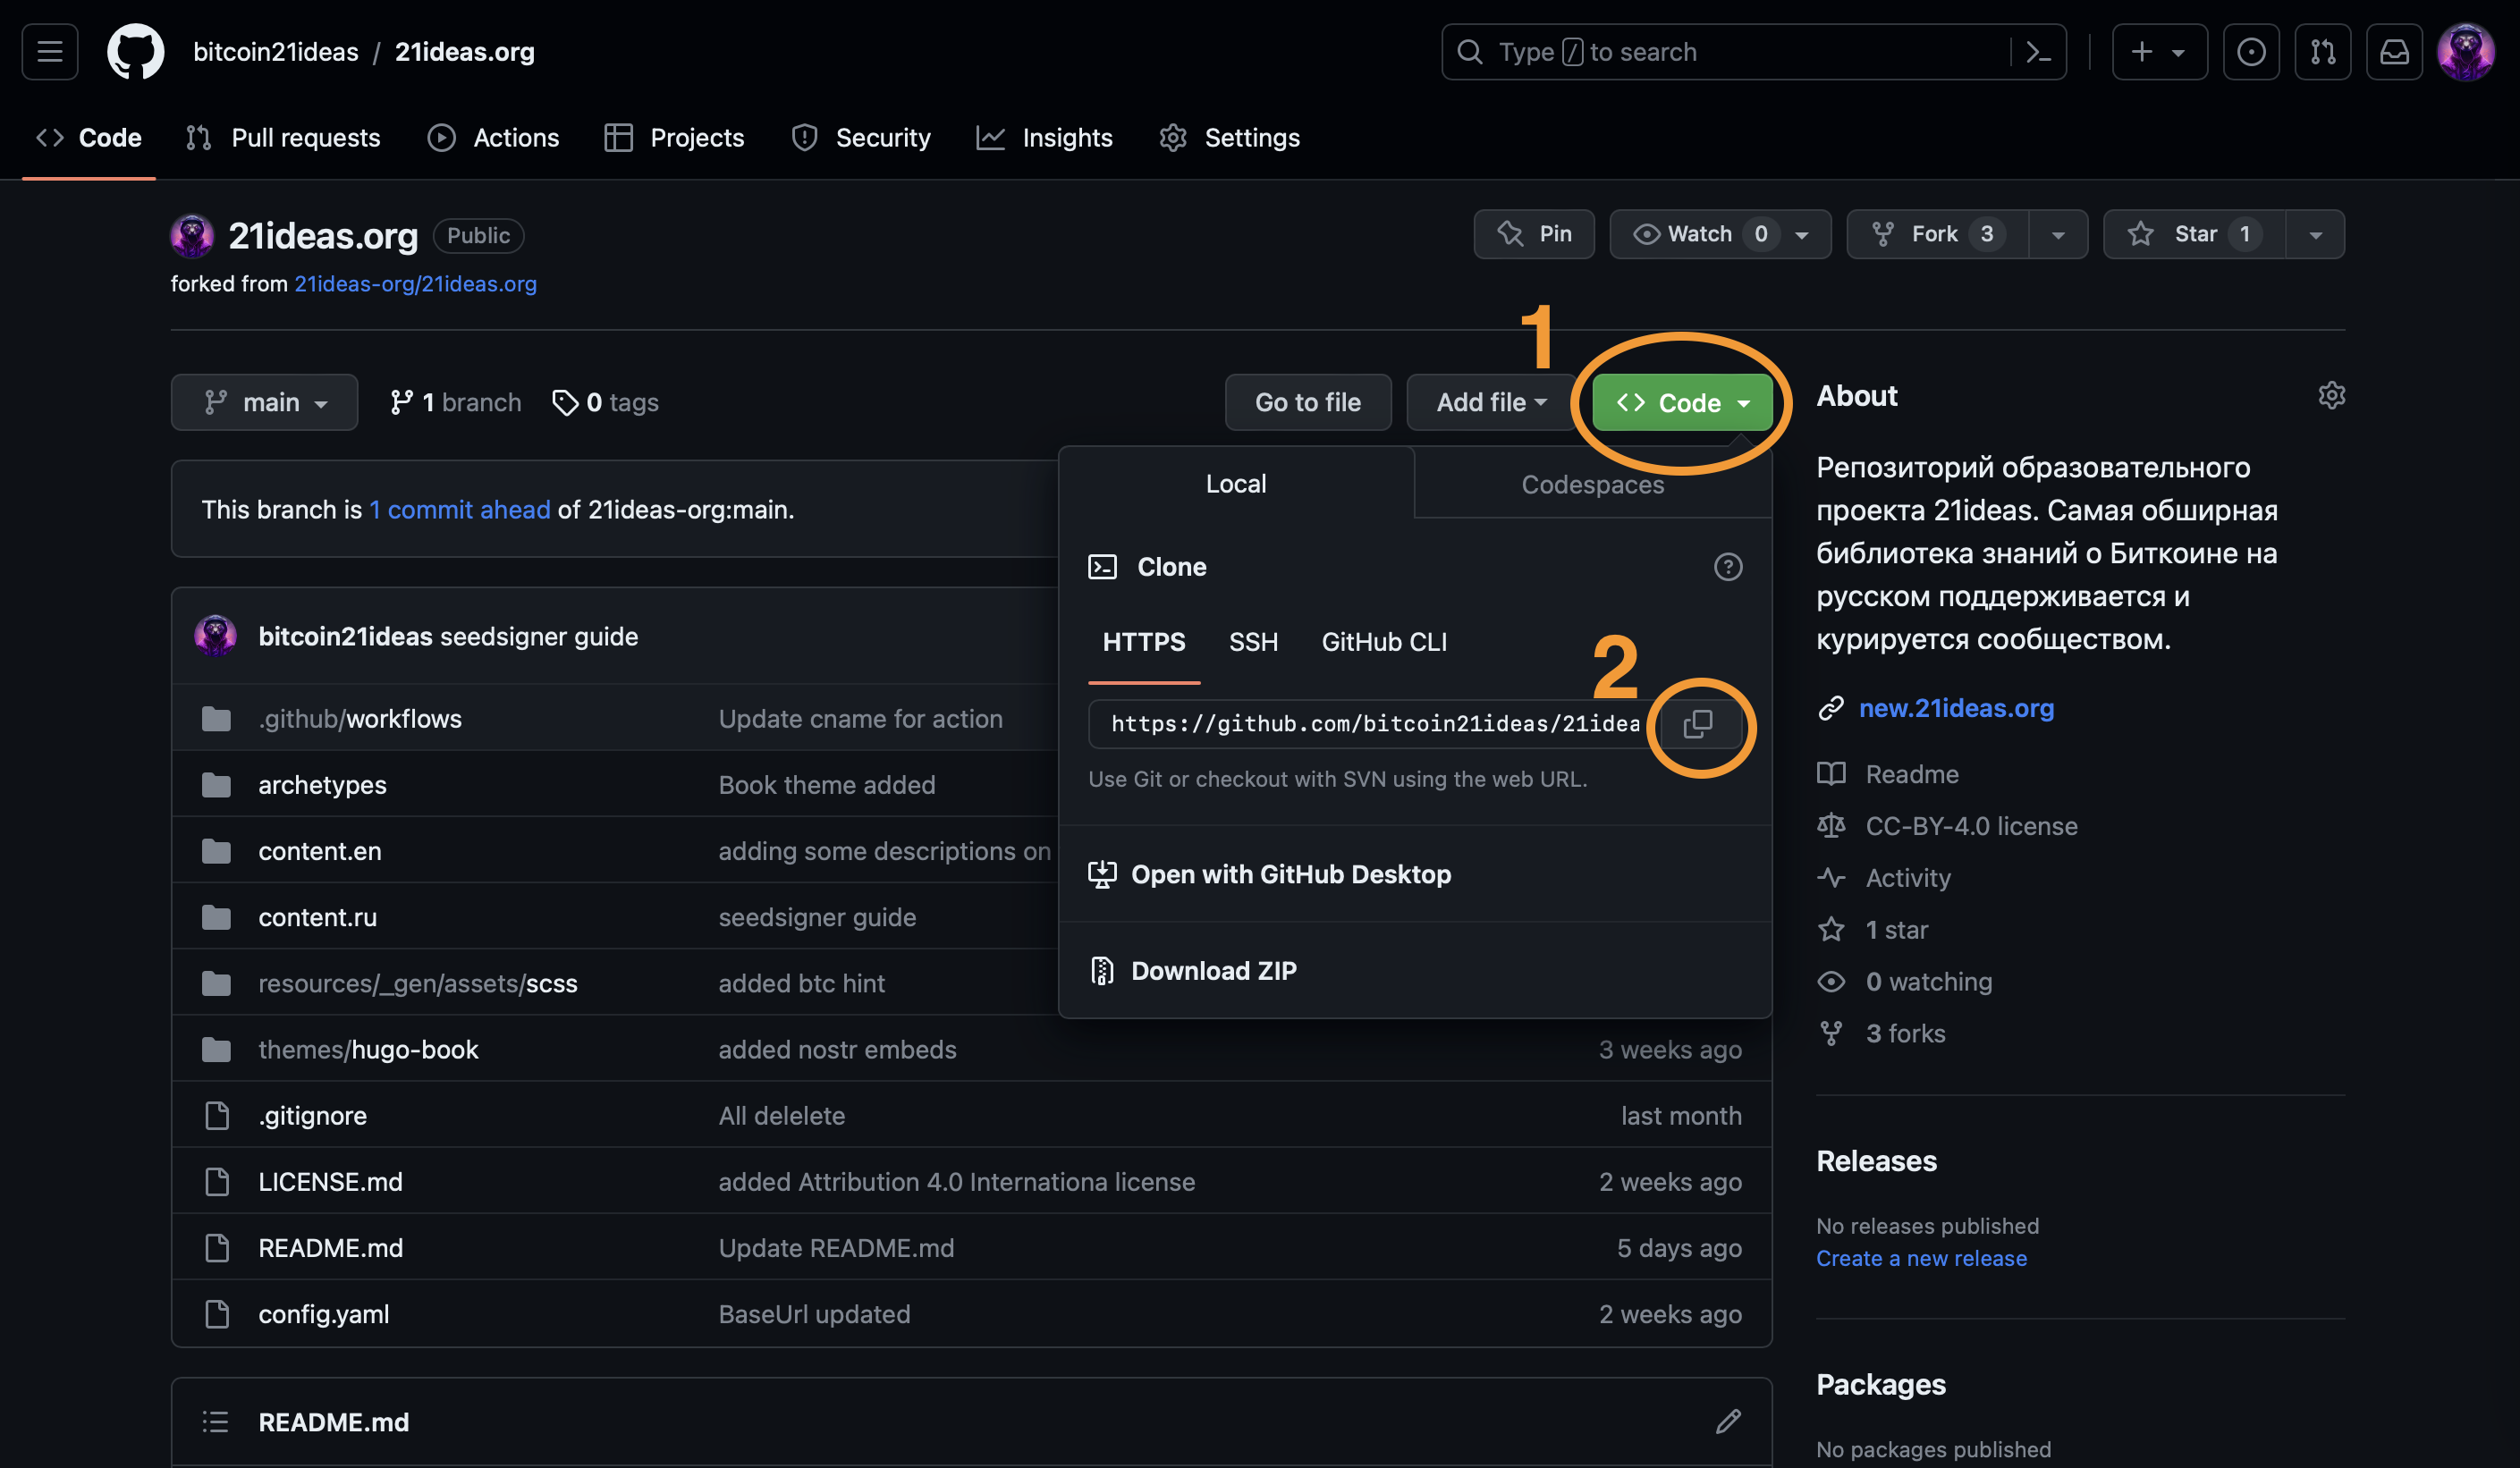
- Open the 21ideas repository on GitHub, click the “Code” button followed by the “copy” icon that appears in the drop-down window.
- Create a folder on your computer where you plan to store the repository.
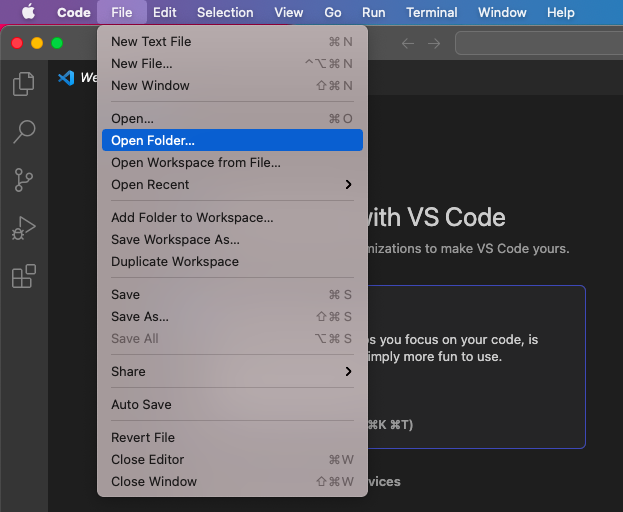
- Open VS Code and select “Open New Folder” in the “File” menu section.
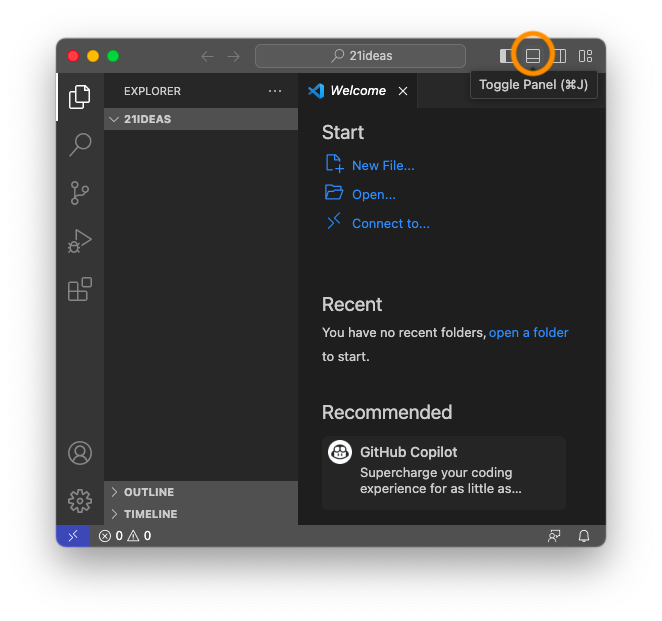
- In the upper right corner, click the icon as shown in the screenshot below. This brings up the terminal window – a working field where you can later issue commands to the program. The terminal can also be invoked by pressing “Ctrl+J” on Windows or “Cmd+J” on MacOS.
- Check whether git is installed on your computer. To do this, enter
git versionin the terminal, if you get the software version in response, you don’t need to install anything. If you see an error, visit this link and download git for your operating system. After installation you may need to reboot VS Code or the whole system. - In the terminal, type the following command:
git clone https://github.com/21ideas-org/21ideas.org
Here git clone is the command that initiates copying the repository to your device, and the link we use is the same one we copied from the original repository. You can copy link for cloning a repository by clicking “Code”, followed by the “Copy” icon like so:
This way you can locally run any other project available on GitHub (keep in mind that many of them may require additional software to be installed).
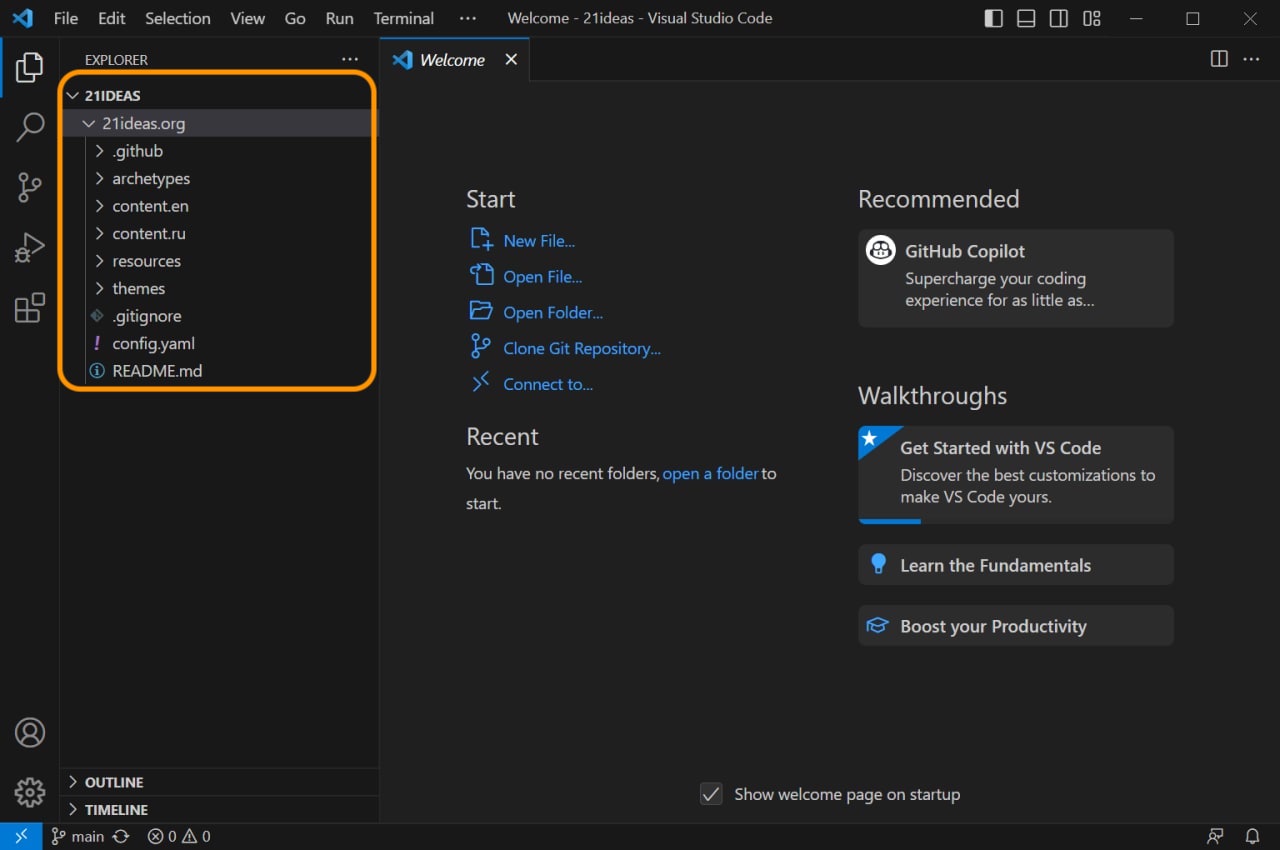
- As a result, you should see a new folder and all its contents (similar to what is presented on GitHub) in your VS Code editor, as well as in a folder on your computer.
- Next we need to install Hugo. Hugo is the static website generator underlying the 21ideas website.
Windows #
If you are using Windows, open VS Code’s terminal window and paste the following:
Set-ExecutionPolicy RemoteSigned -Scope CurrentUser
… and:
Invoke-RestMethod -Uri https://get.scoop.sh | Invoke-Expression
This will install the Scoop manager. Alternatively, you can use any other software such as Chocolatey or any other you prefer.
- Now you can finally install Hugo. In VS Code’s terminal write:
scoop install hugo-extended
MacOS #
MacOS users’ lives are much simpler. You just need to install the Homebrew utility, which will allow you to install Hugo. You can use either VS Code’s terminal or MacOS built-in Terminal app:
/bin/bash -c "$(curl -fsSL https://raw.githubusercontent.com/Homebrew/install/HEAD/install.sh)"
Next install Hugo:
brew install hugo
Working with Hugo and GitHub #
Once the installation is complete, you can run the site locally, make changes and view them in real time. To do this, use the following command:
hugo server -D
This command will start a web server (typically at http://localhost:1313/).
You can stop the server by pressing the Ctrl+C keyboard shortcut, regardless of your operating system.We’ve already talked about how the site is structured and how to format and modify articles here and in the dedicated guide. All we have to do is touch upon the process of directly adding content to the remote (main) GitHub repository.
Submitting an Article #
After making changes / adding a new article, be sure to check if the changes were made by someone else while you were working on your improvements. To do this, enter the following command in the terminal window:
git status
The terminal will display a message telling you if there have been any changes to the main - remote - repository. If there have been updates, you should update your local repository by pulling updates from the main repository:
git pull
You can now add your changes to what’s called a “commit” – a package of updates that will be offered as an addendum to the site:
git add .
Committing:
git commit -m "[give your commit a name]"
Instead of the [give your commit a name] phrase, describe your proposal, for example “Seven Network Effects of Bitcoin”. The description is written in quotation marks.
Finally push the proposal to the main repository:
git push
That’s it. Your commit (contribution) has been sent to the maintainers for review. If everything is done correctly, after a minute you can visit this link and see that the commit has been added for review.
A lot of useful additional information is available in the GitHub documentation here.