LNbits is the Swiss knife among lightning apps – invoices, tips, paywalls, onchain wallet monitoring, event ticketing and more.
The guide written by Tony⚡️.
LNbits #
Today, we’re going to take a look at a wallet app accessible right from the browser that boasts so many features that it’s the envy of any software. This is LNbits.
It is worth starting with the fact that this service is still in the phase of active development, and some functionality is yet to be implemented. The most expected innovation is the possibility to enter the service via login and password. So far, LNbits is a web page that requires only a clearnet address to log in. Some may find this approach unacceptable, but in this guide we’ll look at approaches that completely negate any danger. Nevertheless, it’s worth remembering that this is not a tool for long-term savings, but rather a layer designed to facilitate interaction with other users and make everyone’s experience pleasant and seamless.
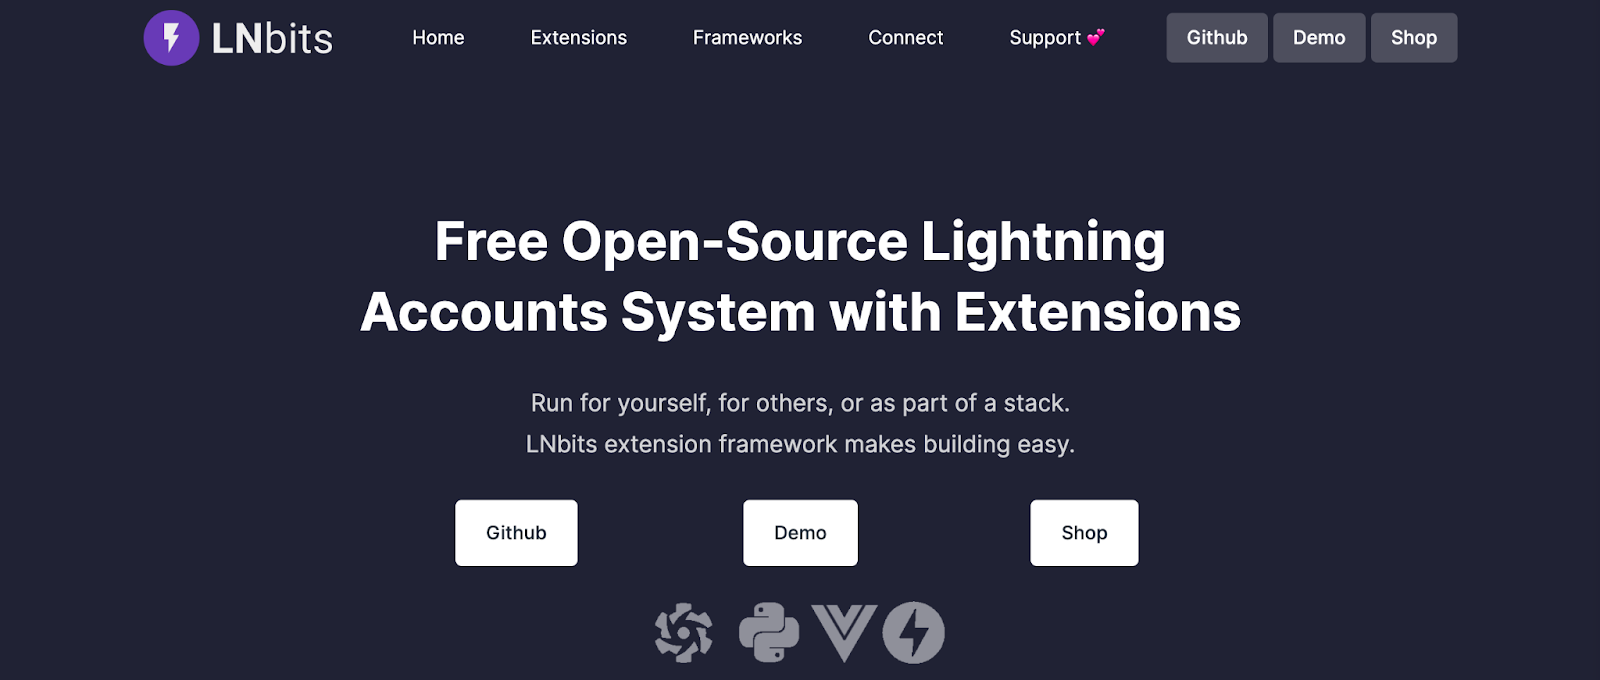
So, let’s start by going to the official LNbits website – https://lnbits.com/.
LNbits offers several approaches to using the shell:
- The non-custodial approach involves running your own node and connecting LNbits directly to your Bitcoin and Lightning node. We will not go into this approach – it is quite complex and requires additional hardware and difficult steps. In addition to hardware or renting a node, you’ll have to rent a domain and set up reverse ssh, which lies well beyond the scope of this guide. This approach will be of interest to enthusiasts who like to dig into complex network settings and is important for private business owners who want to establish a stable flow of sats and promote a serious service that accepts payments in Lightning and Bitcoin networks. If you want to try your hand at this endeavor but don’t have the hardware to run your own Lightning node, check out the Voltage service where you can rent a node from $12 per month.
- The custodial approach involves setting up the service in a few simple steps and is the best option for beginners. Moreover, a couple of additional simple steps will help you eventually gain full control over your own funds. This is what we will focus on in this guide.
So, with the above in mind, select the “Demo” option, and proceed to the page https://legend.lnbits.com/:

Enter the desired wallet name and click ADD A NEW WALLET. You can also visit the project page on GitHub or support the project devs by clicking on “Donate”🍩.
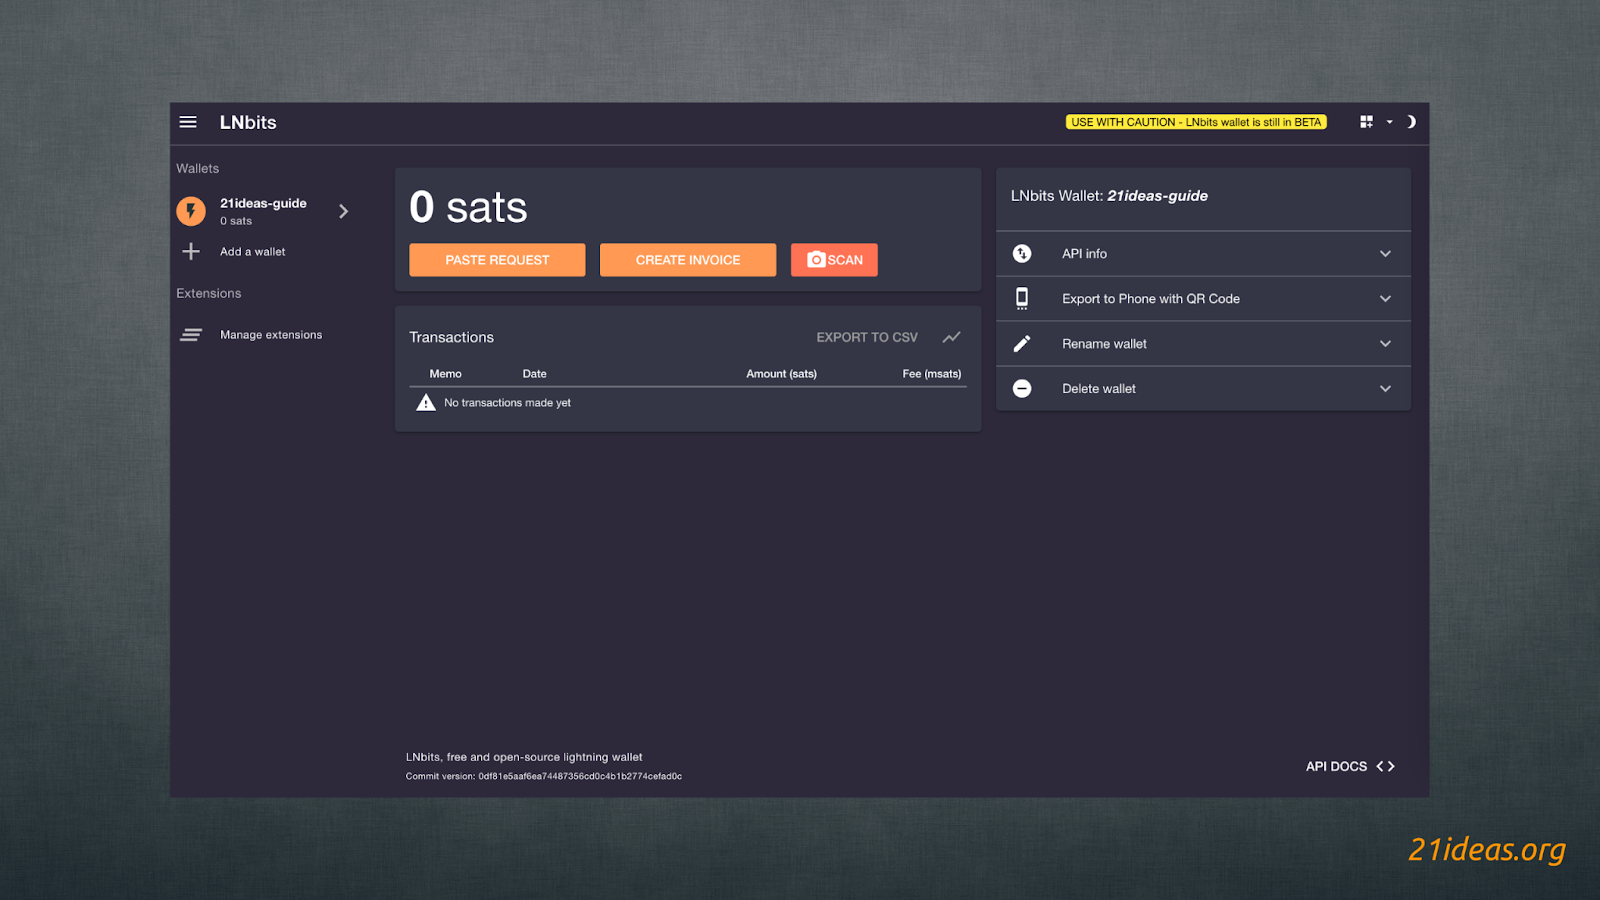
Let’s create a wallet “21ideas-guide” and confirm the choice. Clicking on the button will move us to the wallet page:
The address bar will display a long address starting with https://legend.lnbits.com/wallet?usr=, followed by a long string of characters. It’s worth adding this page to your browser bookmarks and perhaps saving a copy on another medium. This address is the only way to open your wallet. Don’t share this address with anyone you don’t trust – anyone who has this address will be able to access all the funds stored on this wallet. Let me remind you that the developers are currently working on the login system and something like a personal profile. But for now we will work with what we have, and I will tell you how to secure your funds with the help of the LNbits extension later in this guide.
You can create as many wallets as you like, and each of them will have its own clearnet address. But today we will work with one wallet.
So, from this screen, we can already receive funds. This is where we will start. Let me remind you that LNbits is a shell, the main priority of which is interaction with the Lightning Network and by default it will be assumed this network, not the Bitcoin mainnet.
In order to deposit funds we can paste an existing LNURL, create an invoice or scan a QR code. When creating an invoice, the default currency will be sats, but you can choose any fiat currency, for example Russian ruble.
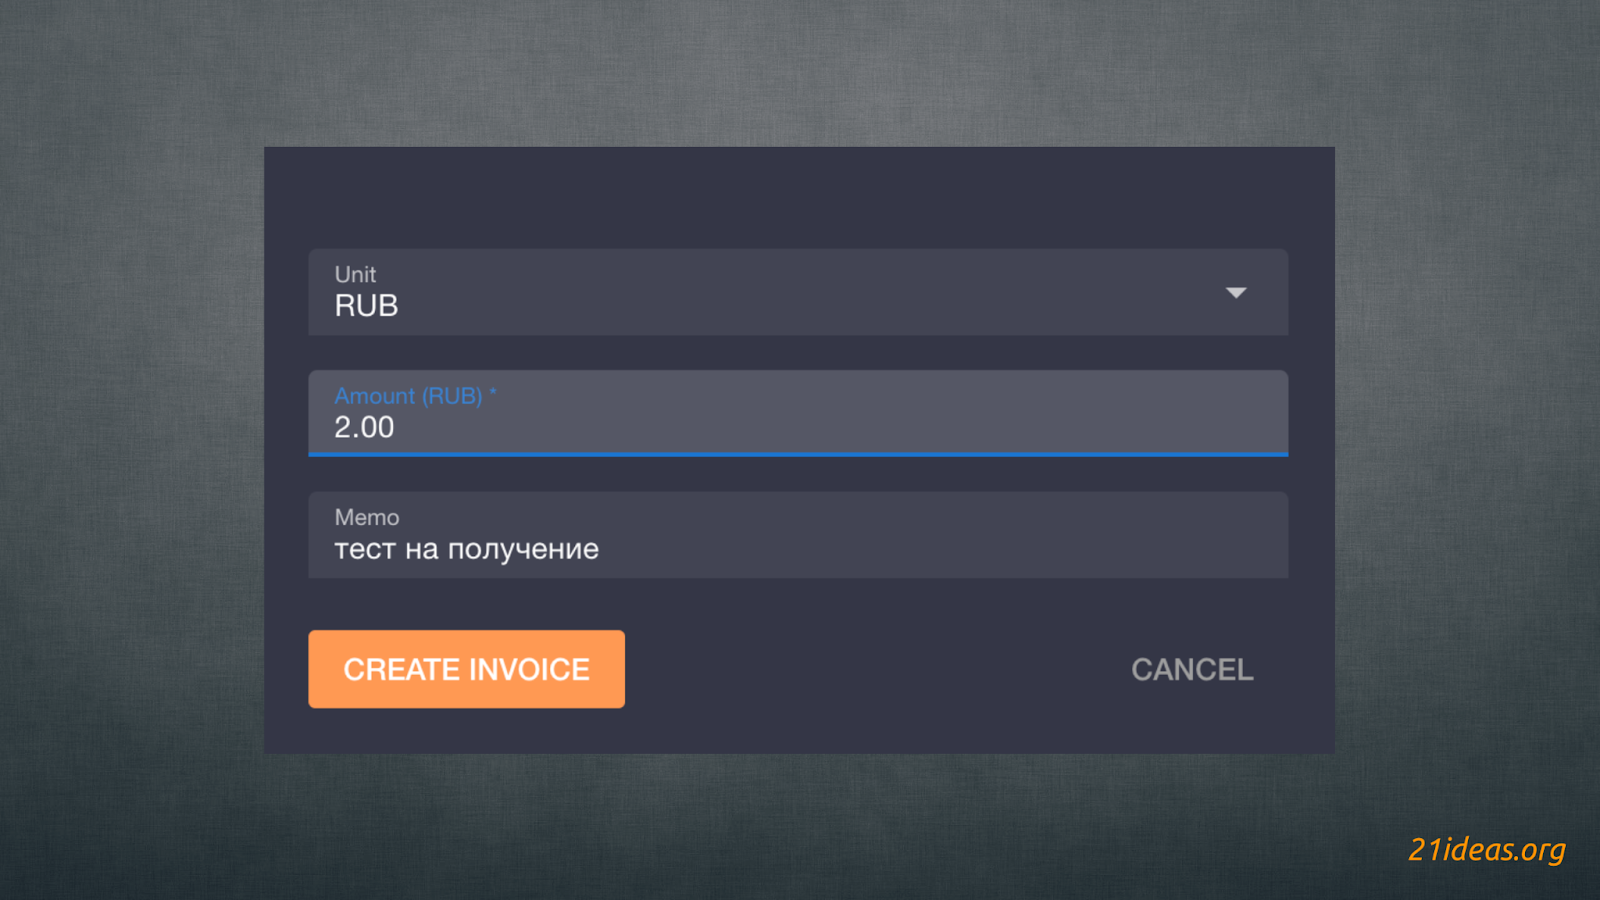
The service automatically converts dirty fiat into sats at the current exchange rate. At the time of preparing the guide, 2 rubles = 165 sats.
Well, having received some sats on the account / wallet, you can move on to interesting extensions of the LNbits, for the sake of which we are actually here.
LNbits extensions #
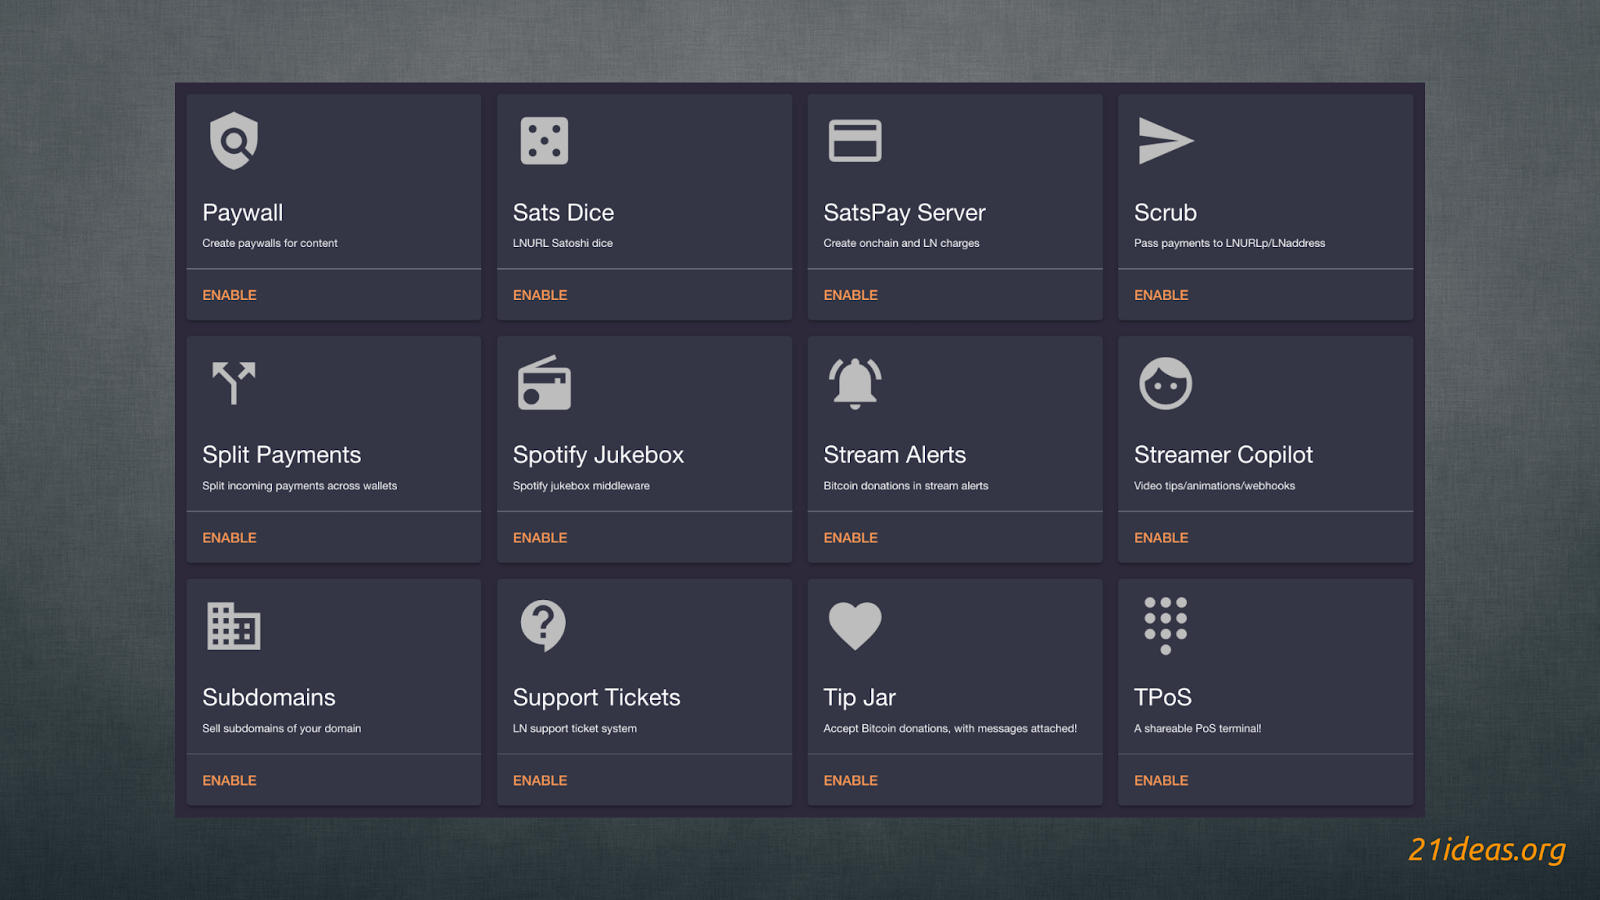
LNbits includes dozens of extensions created by Lightning and Bitcoin enthusiasts. They allow you to run faucets, paywalls, offline selling points (vending terminals), links to pay for goods and services, collect payments for event tickets, dice game, payments for services provided by your server, a paid jukebox, and much, much more.
To open the LNbits “extension store” you need to click on the Manage Extensions button located on the left side of the screen below the list of your wallet(s):
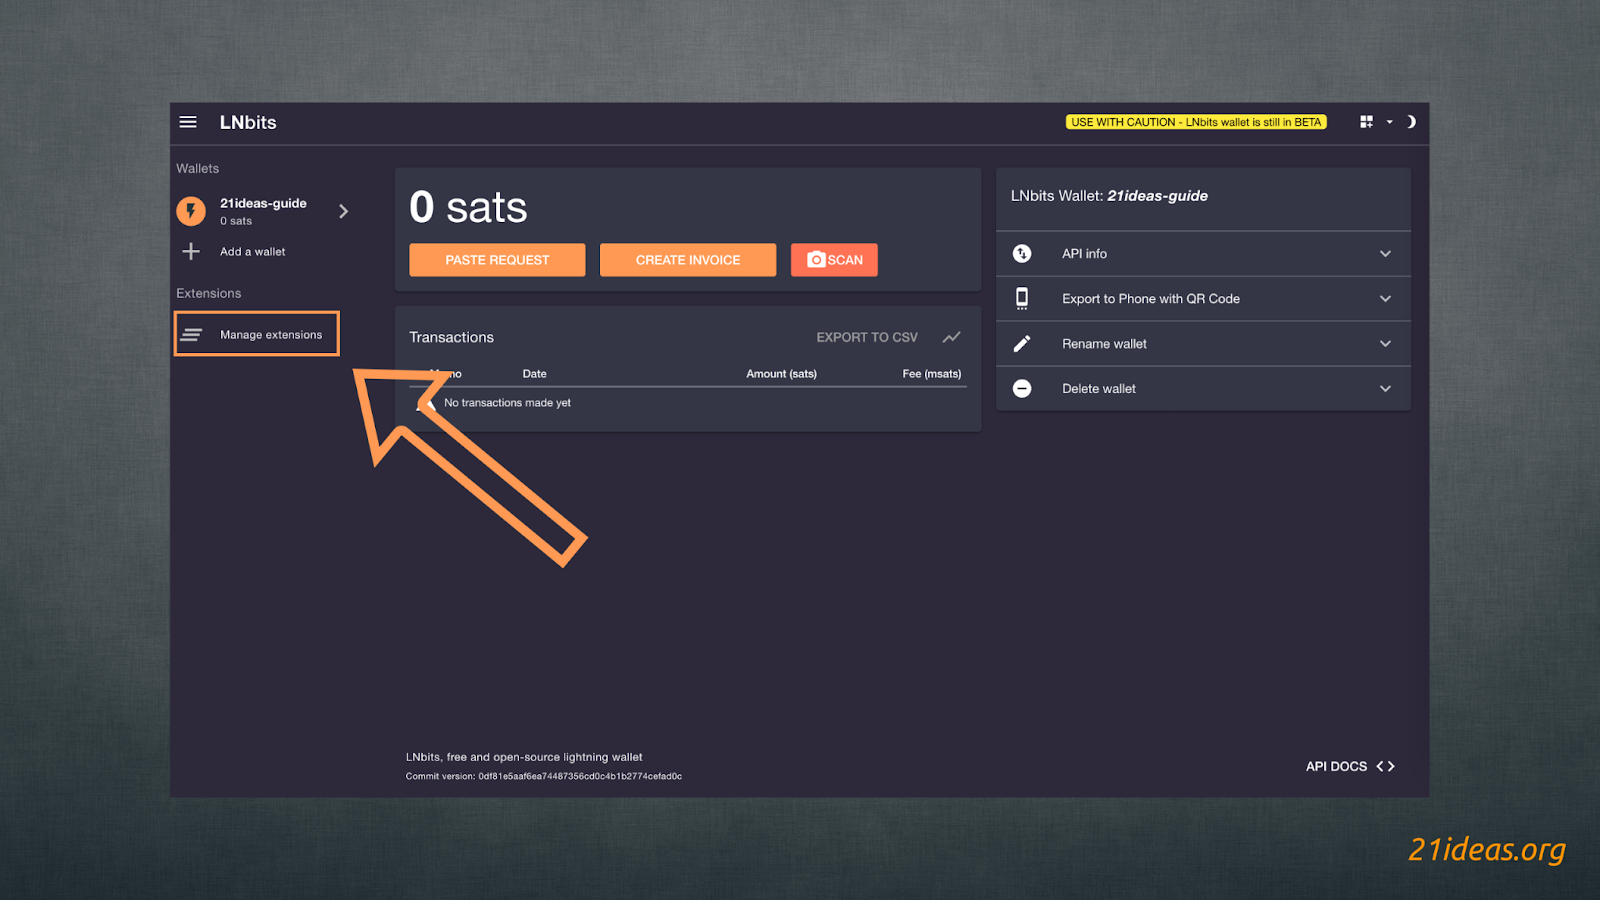
Next, select the extensions you are interested in and add them by clicking the ENABLE button. The extensions will appear on the main wallet page on the left side of the screen, right below the list of your wallets.

Extend your LNbits setup in any direction you want, and even create and distribute your own extensions.
LNURLp #
LNURL-pay – is a standard that allows you to create a static QR code that can be paid multiple times. More about it in this article. I recommend checking it out to better understand the mechanics of this tool, but in this guide we will focus on the practical part of the extensions. So, this extension will allow you to create static QR codes and, for example, place them on your webpage or print them out and place them in your organization so that guests leave tips using the Lightning Network. But we will come back to the tips a little later. A cool feature of LNURLp is the ability to set up “flexible” invoices, i.e. the sender can enter the desired amount himself. All you have to do is to initially specify a suitable interval. I do not advise you to set the lower limit too low and set it to at least 100 satoshis. This will help you reduce the probability of getting hit by a DDoS attack. With a small value, someone can flood you with 1 sat invoice payments, breaking the payment acceptance server. Let’s look at all the options offered by LNURLp:

The first step to create a new QR code is to click NEW PAY LINK (1). A pop-up window will appear where you can:
(2) choose a wallet to which the sats will be sent
(3) add a description displayed for the sender before payment
(4) by unchecking the box to create a flexible invoice where the user will choose the amount from the range you specify (5).
(6) select the currency displayed to the sender (fiat currencies or sat/BTC)
(7) set the character limit in the message that the sender can attach
(8) add a webhook, for example, to receive alerts to the remote server when a payment is received
(9) add a message shown to the user in case of successful payment
(10) add a link shown to the user in case of successful payment
After filling in all the desired fields (only 1,2 and 5 are required), click CREATE PAY LINK (11)
As a result, when each new LNURLp is created, a line with basic parameters and options appears in this extension:
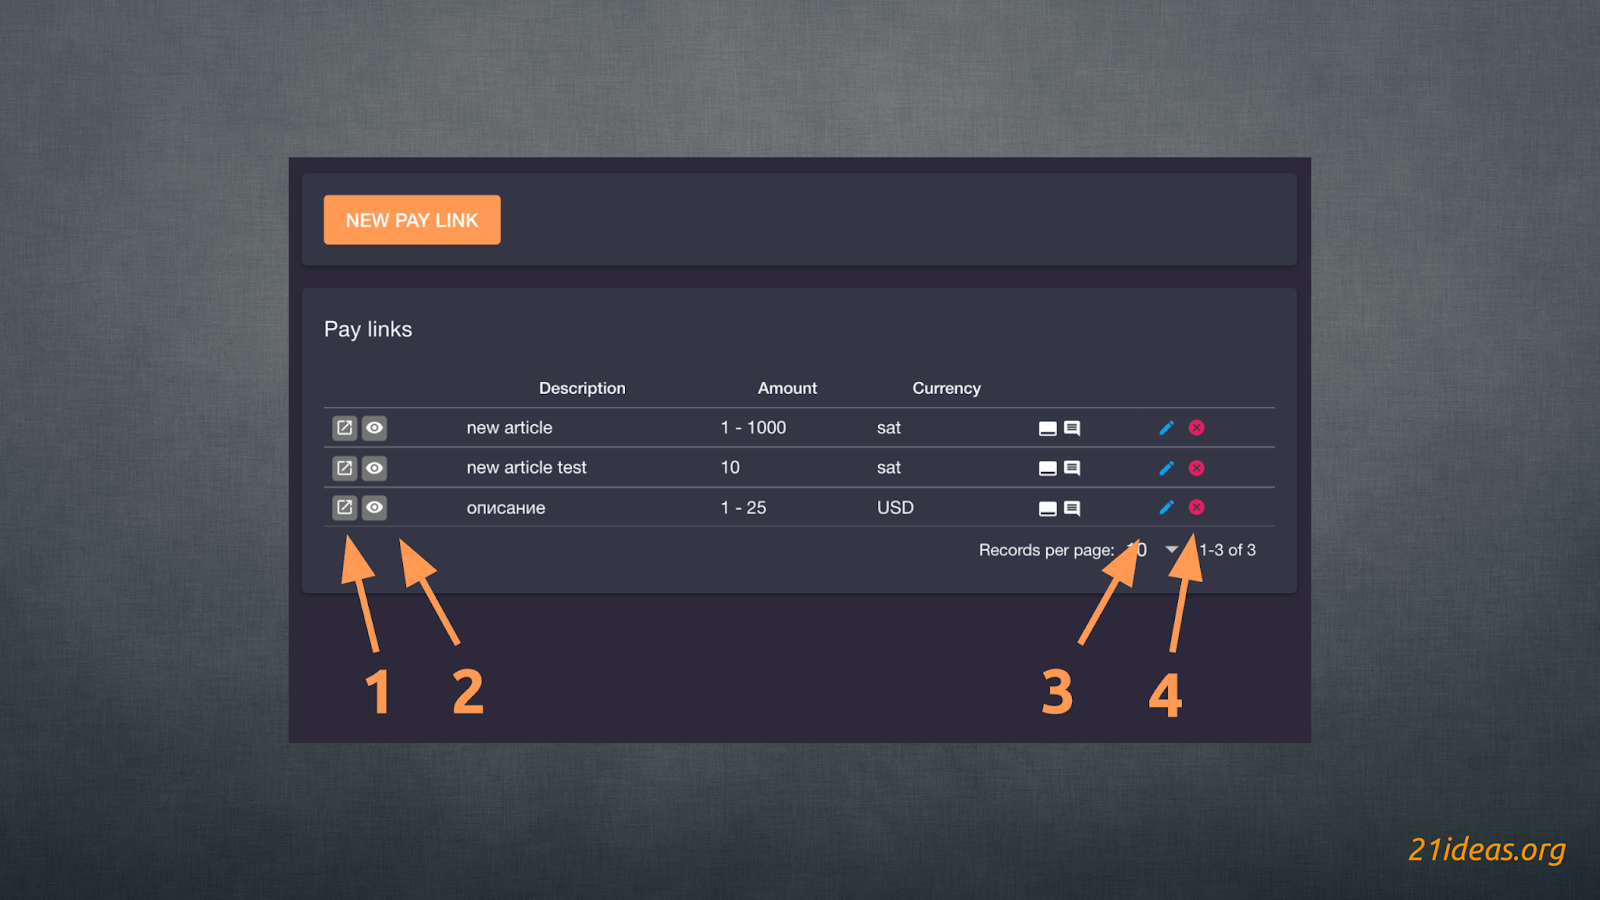
From here you can:
- open LNURL web page
- open a quick view of the QR code
- edit LNURL
- remove LNURL
This is what the web page of the LNURL we just created looks like:
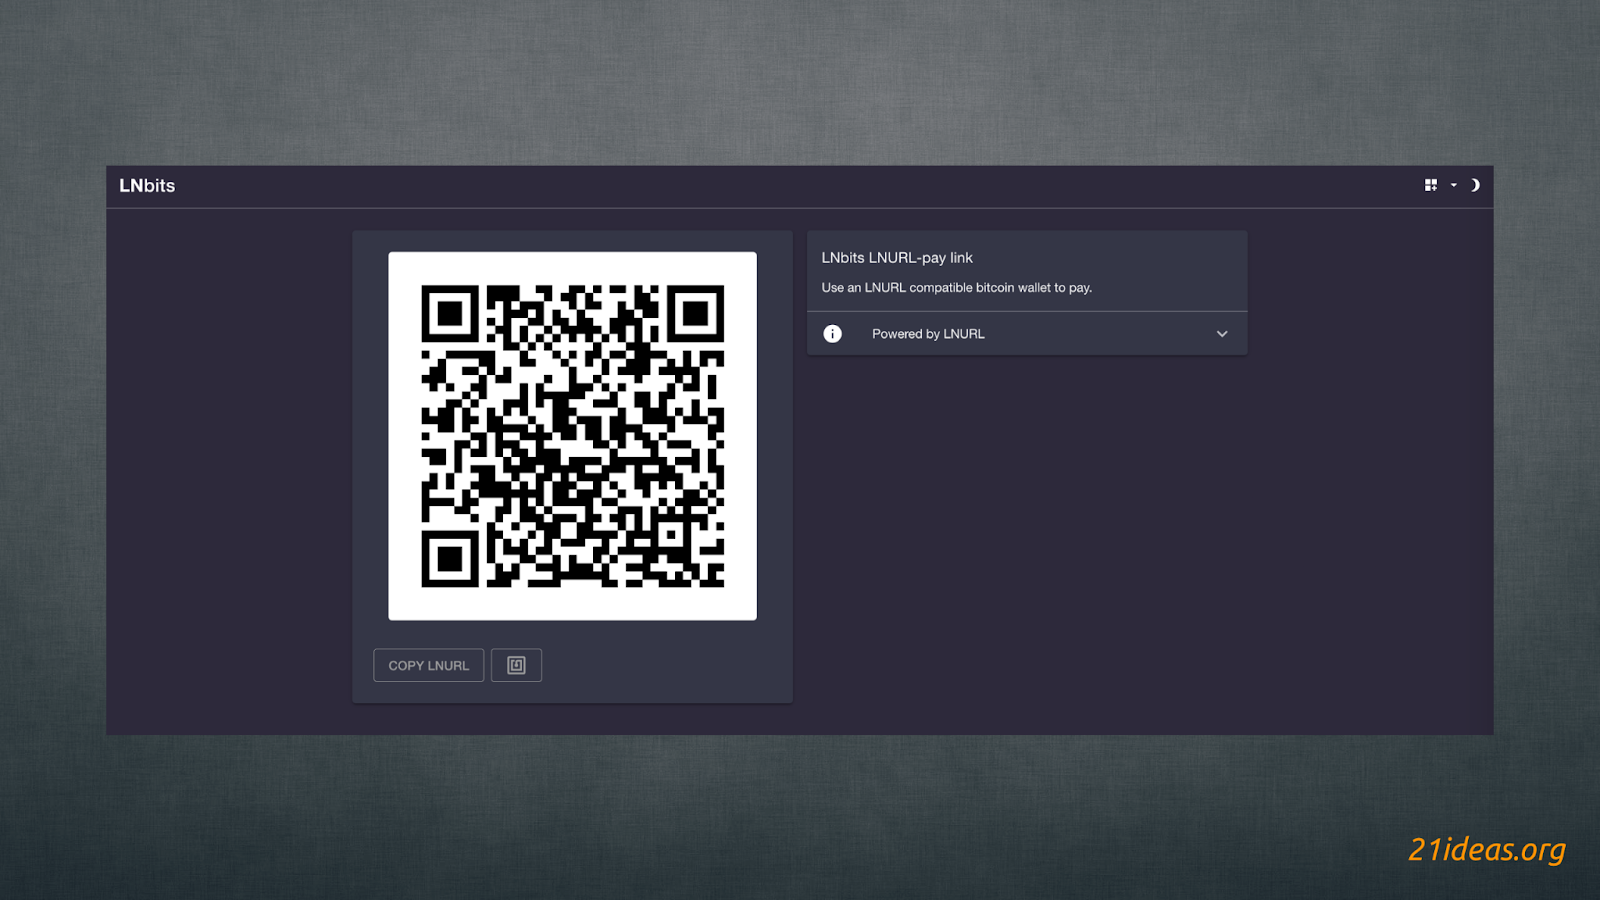
And this is what a user who has scanned a QR code sees:
Onchain wallet #
I will share the purpose of this extension later in this guide, but for now I just want to show you how to import an onchain wallet into LNbits. Let’s consider this case on the example of Blue Wallet.
- Create a new or open an existing onchain wallet in Blue Wallet
- Go to the wallet settings and tap on Show Wallet XPUB
- Copy the line starting with zpub / xpub / ypub
- Go into the extension Onchain Wallet
- Click on ADD WALLET ACCOUNT
- Choose a name and paste xpub into the appropriate field

The displayed wallet is watch-only. LNbits’ capabilities are limited to providing new addresses for receiving funds. Neither the service nor you can spend bitcoins from the wallet. This is only possible from the app in which you created the wallet, in this example from Blue Wallet.
Tips #
Tip Jar – a convenient way to receive tips both via the Lightning Network and in onchain bitcoins. To fully activate this extension, we added watch-only wallet. So, if the sender wants to use the Lightning Network to transfer funds, the LNbits Lightning wallet will be used, but if someone wants to send you onchain tips, your imported watch-only wallet will generate addresses to receive donations. This method is much better in terms of privacy than using a single address, because address reuse is a bad practice.
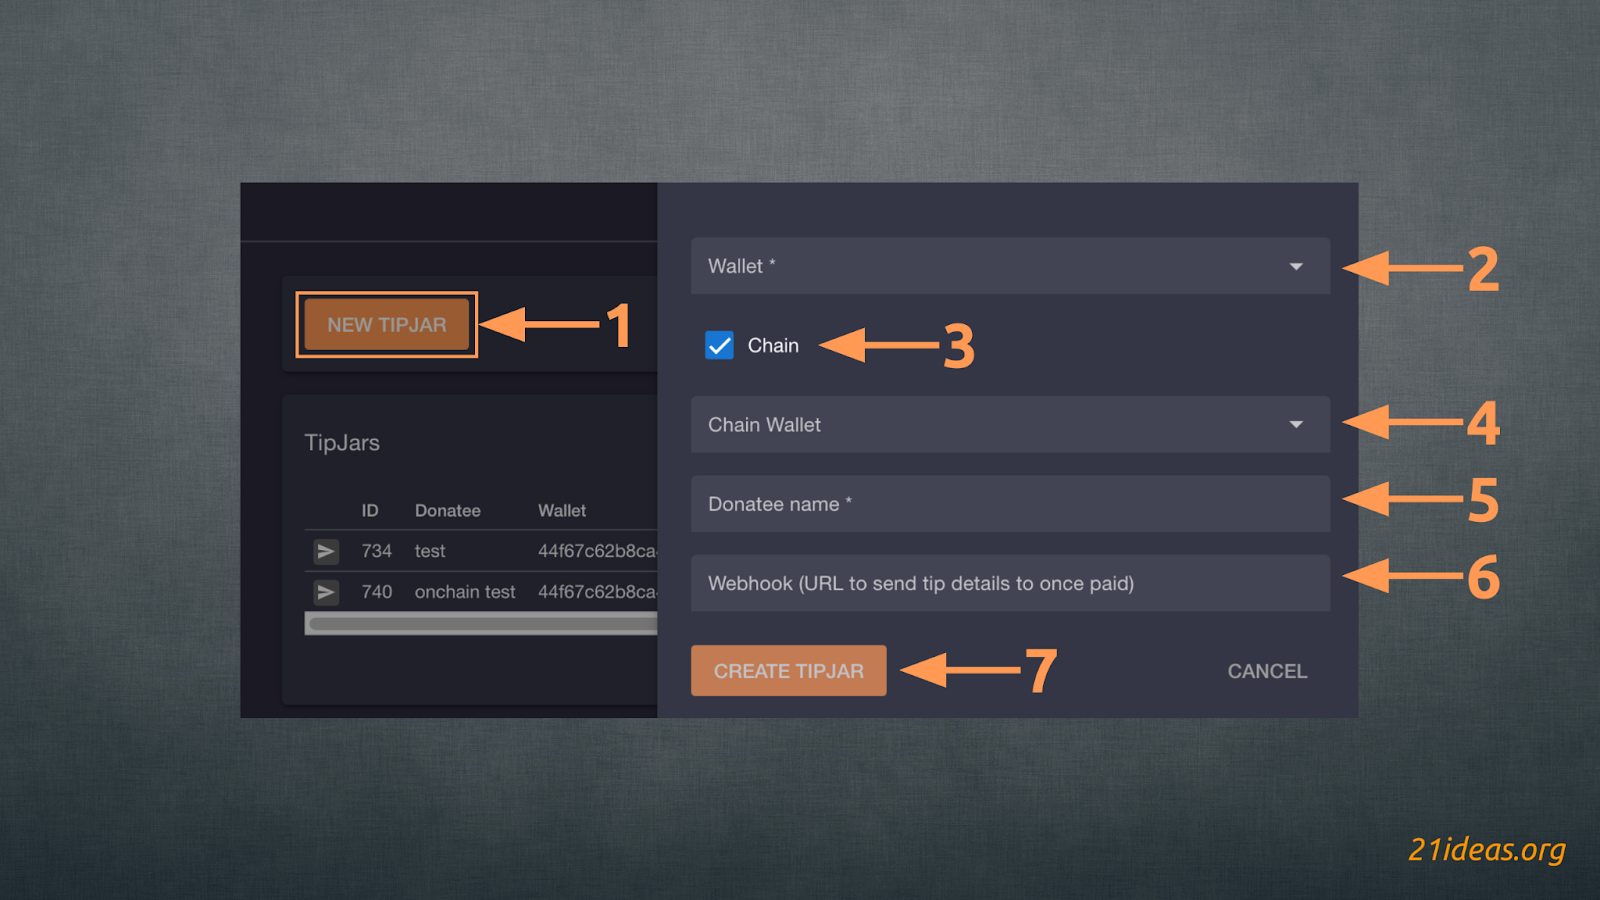
To set up this extension click NEW TIPJAR (1) and select the desired Lightning wallet (2). If you have already imported an onchain wallet, item #3 will be available – you will be able to check this box and select the onchain wallet that will receive funds when sending onchain (4). Next, you need to select a recipient name that will be displayed to the sender when clicking on the link (5). Again, there is the option of adding a webhook to set up notifications when funds are received (6). Done, click on CREATE TIPJAR (7).
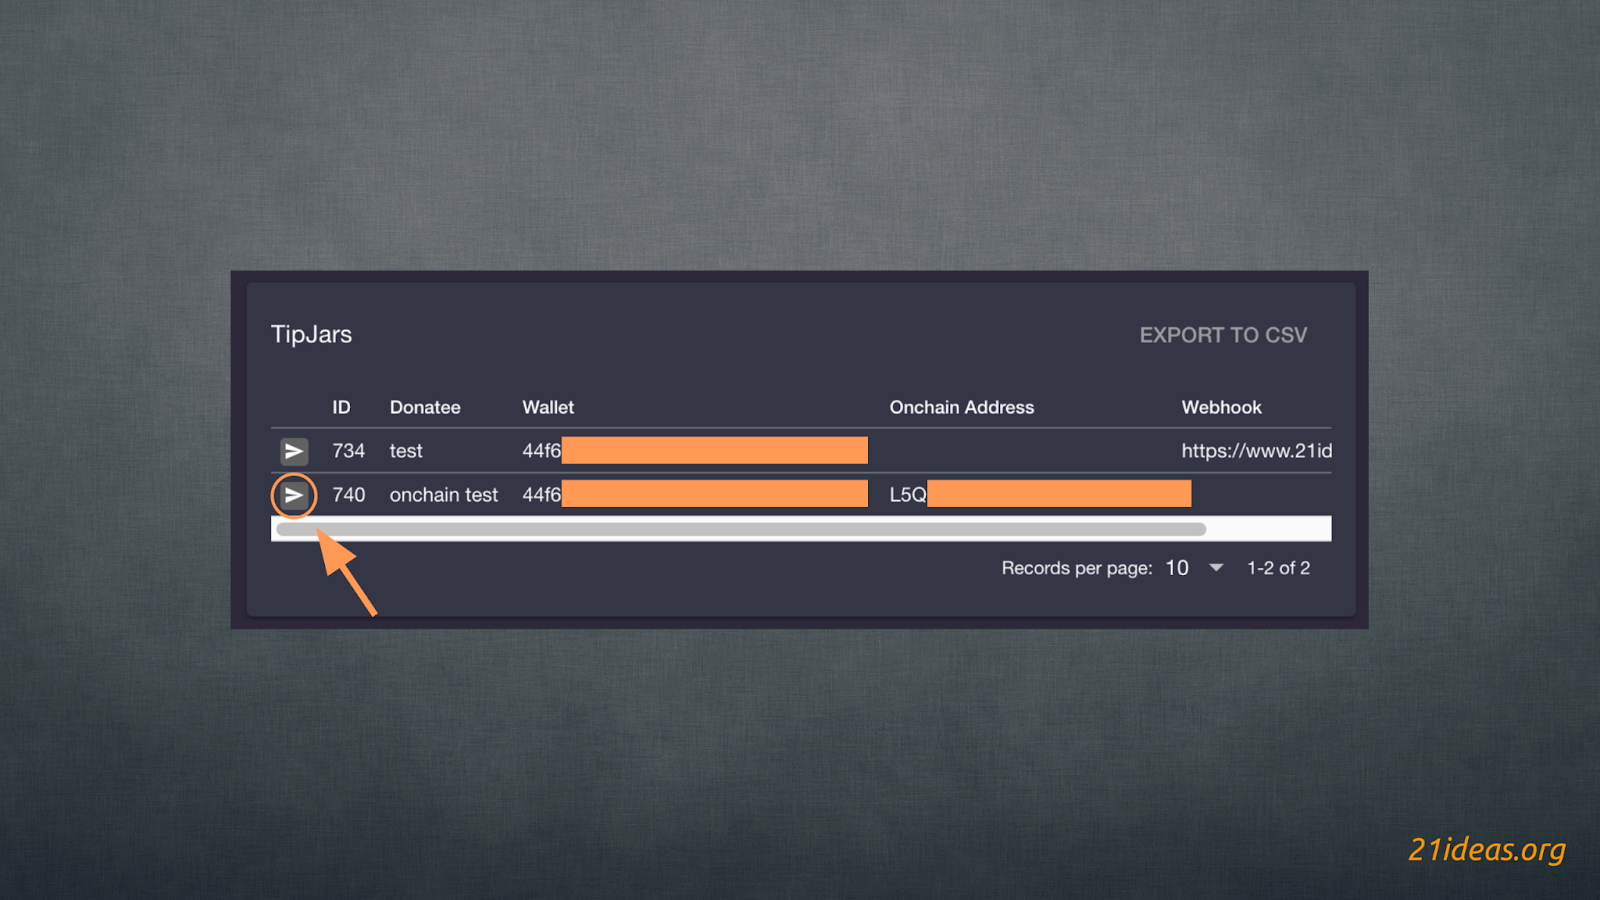
The link to the web page, as in other cases, will be located in the left part of the created line. It can be shared as usual or converted into a QR code using, for example, the service qr-code-generator.org and saved as an image on your phone or printed in any convenient format.
When the user clicks on the link, the following page will open:
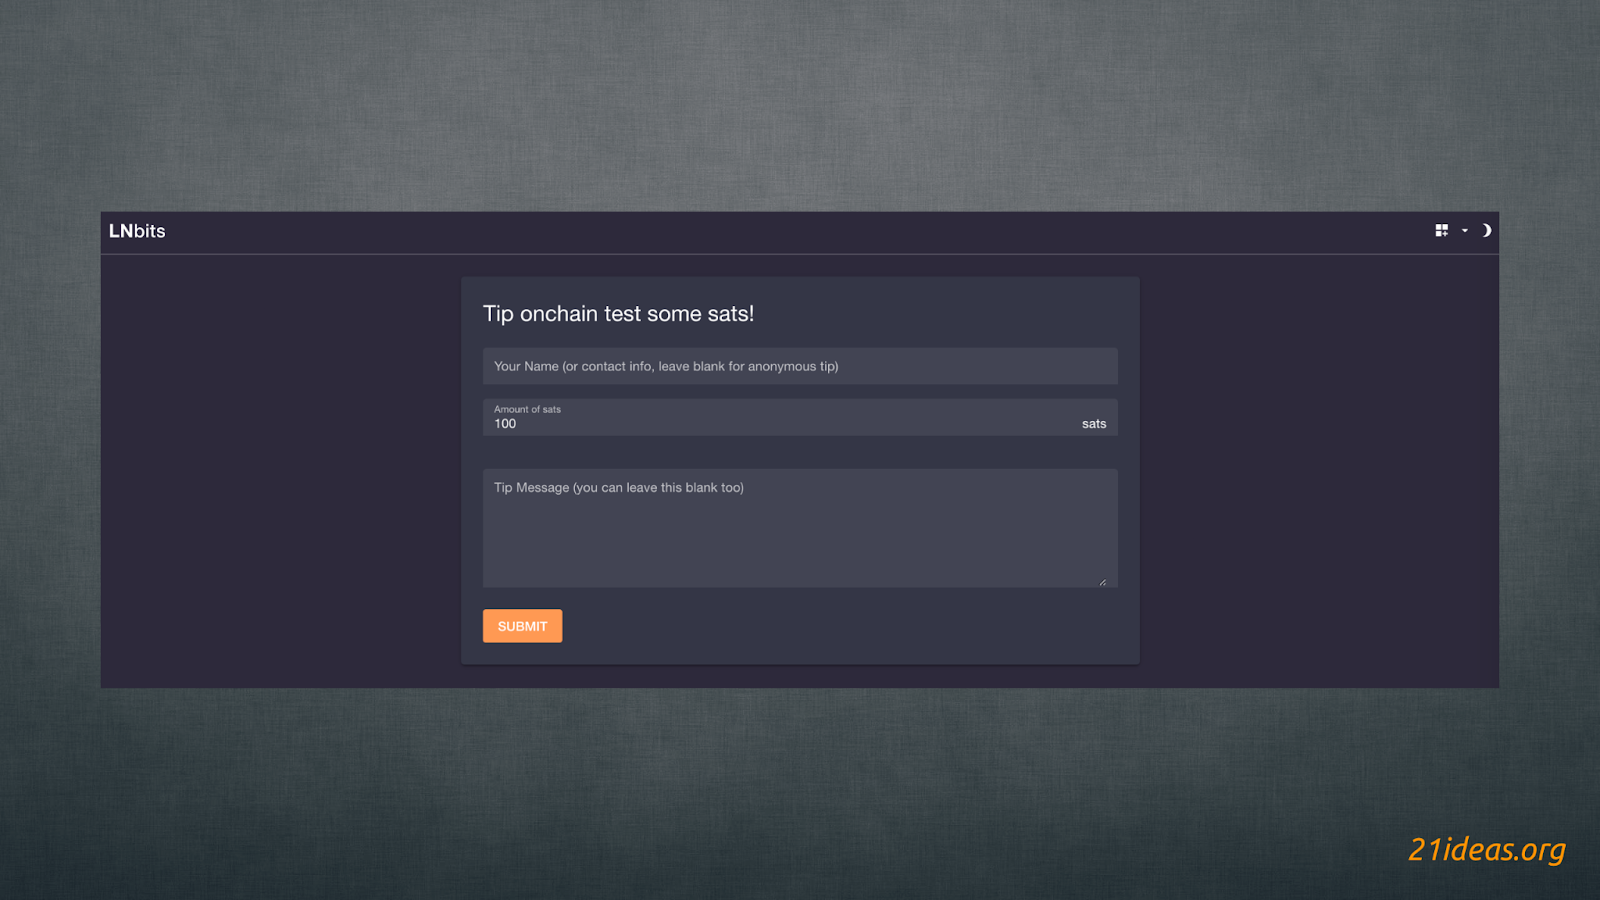
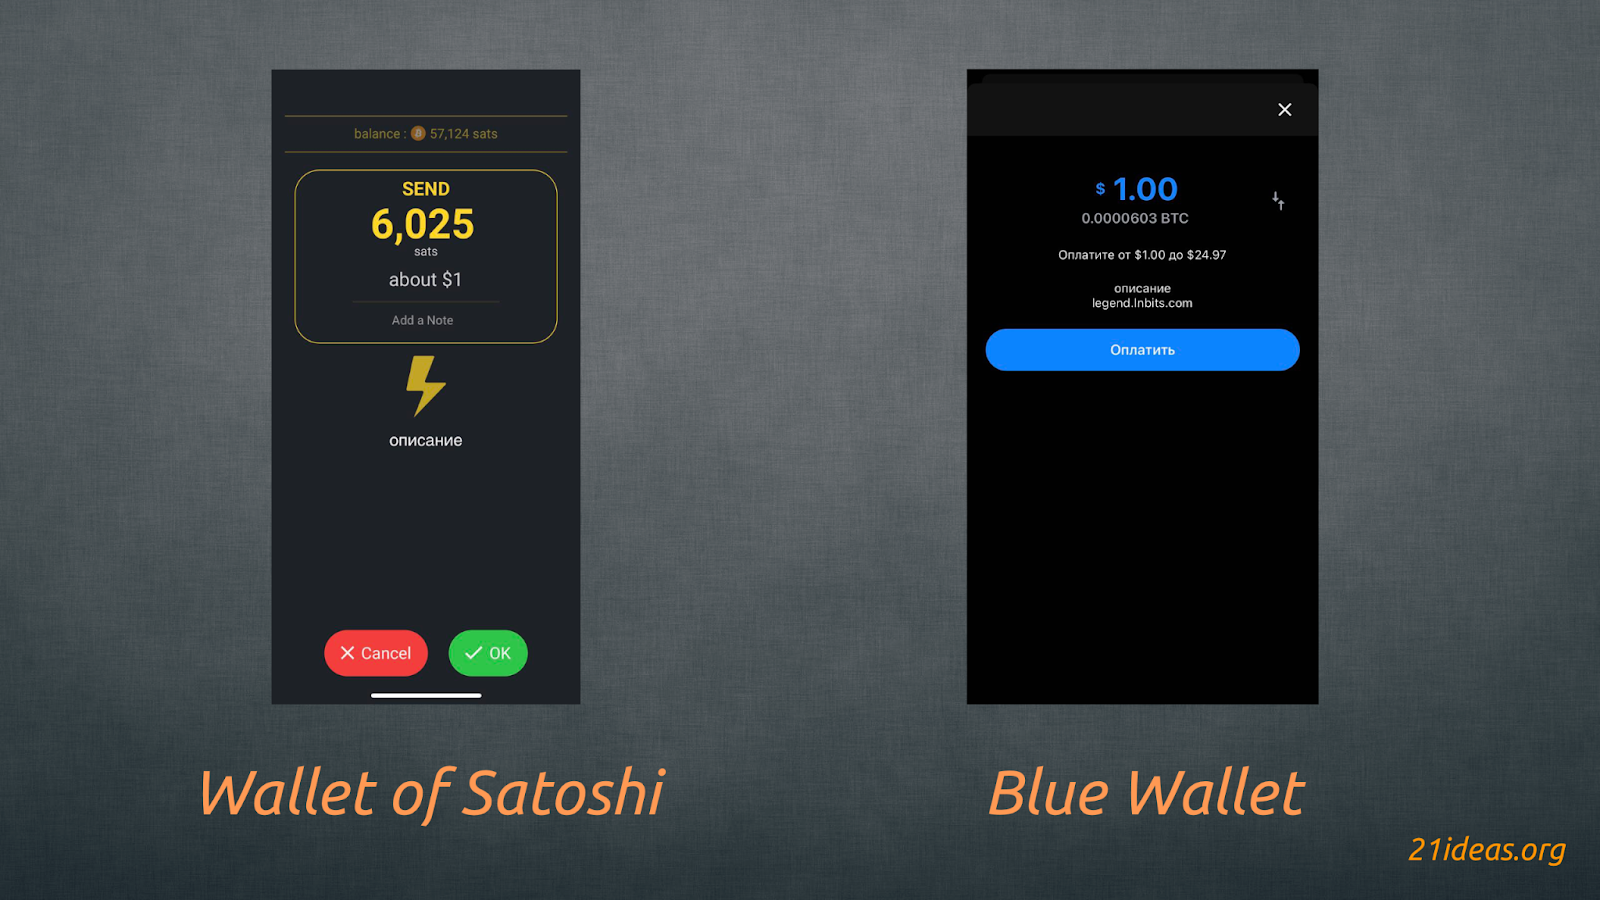
Here the sender can (optionally) specify his name / nickname. In the second field he will need to select the amount to be paid. The third field allows to attach a message to the payment; this field is also optional. By clicking SUBMIT the user will be directed to the payment page:
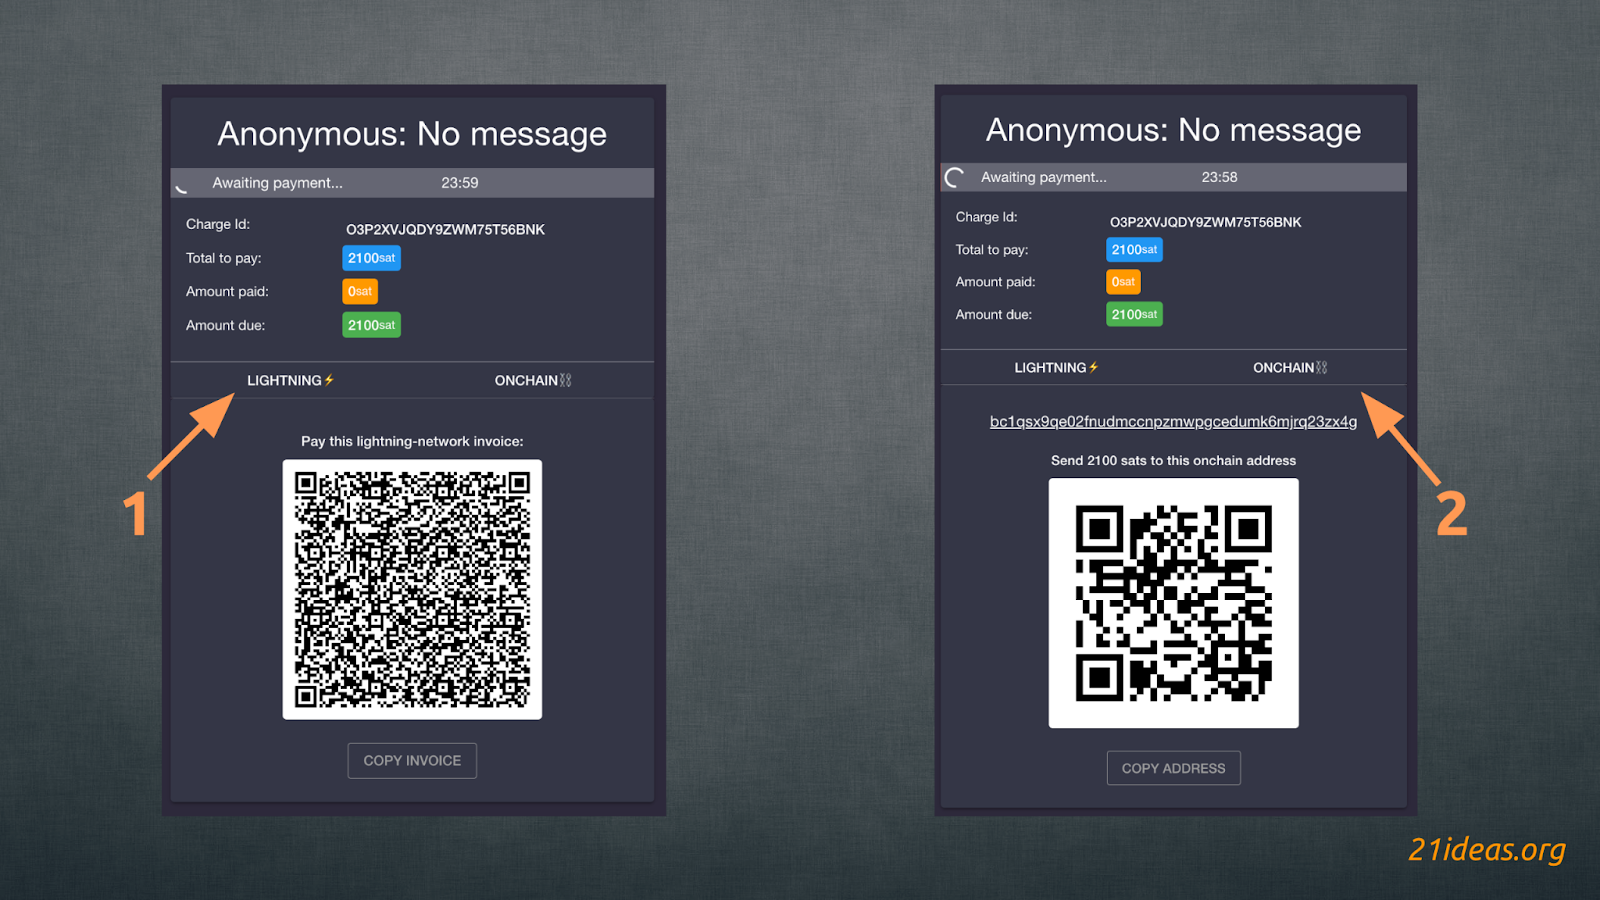
Above the QR code is the Lightning (1) - Onchain (2) switch. The sender can either scan the QR code or copy the invoice (in case of using the Lightning Network) or the address (for onchain payments) to insert them into the wallet. Funds sent in the Lightning Network will forward to the LNbits wallet, while onchain transactions will go to the wallet you imported, which means you will own your keys and will not have to trust third parties. Next, I would like to show you the following extension that will allow you to get more control over your sats in the Lightning Network.
Scrub #
The Scrub extension automatically “scrubs” all sats received on LNbits, sending them to the Lightning wallet of your choice. This solution is hard to overestimate, considering that LNbits is a browser-based wallet under development. The ability to automate withdrawals at the moment they are received deprives users of headaches and worries about the funds received, and saves them time.
To create a scrub, click NEW SCRUB LINK (1).
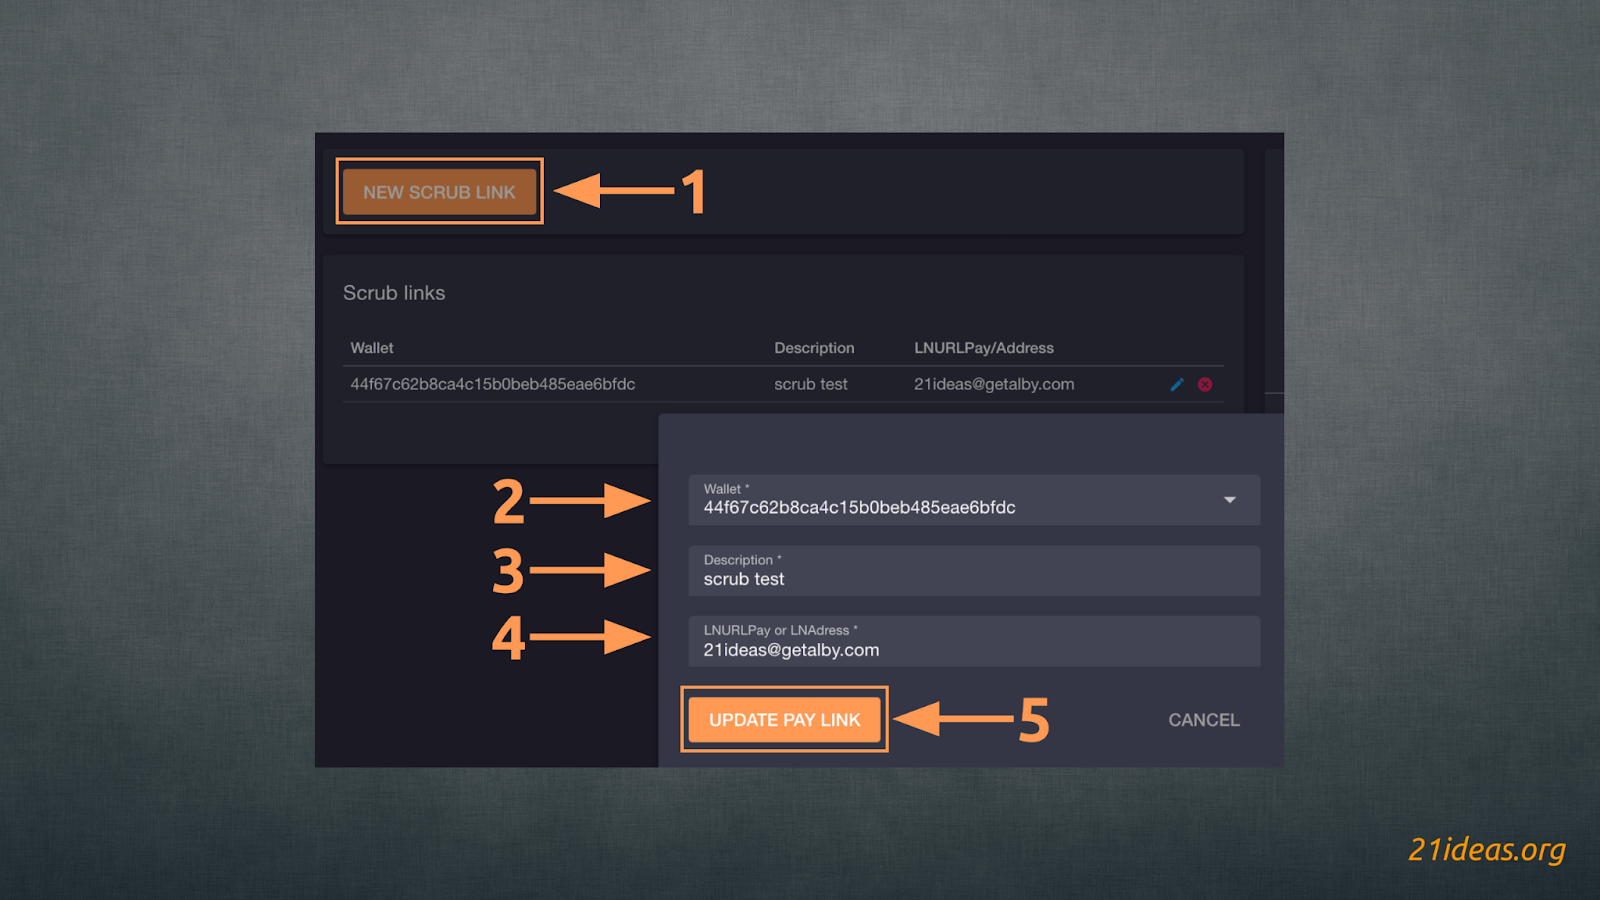
Choose a wallet (2), add a scrub description (3) and specify the recipient wallet’s LNURL or Lightning address (4). You can learn more about Lightning addresses from this article. If you are running your own Lightning node, you can connect, for example, the Alby app to it and thus automatically send sats to your own node and store them in a non-custodial manner. For less tech-savvy users, a good and convenient practice would be to create a new wallet in the Alby extension for your browser and specify the address you received. In my case it is 21ideas@getalby.com. Done, click on CREATE PAY LINK (5) and the scrub is ready.
It’s important to pay attention to two details about scrubs:
- Only one scrub can be created per wallet
- If there are no funds in the wallet, scrubbing will not be done – you need to have a couple sats in your wallet to pay the scrub/transfer fee.
In the near future, I plan to release a guide to the Blixt non-castodial Lightning wallet, which you can use to start your own mobile Lightning node. Such a wallet can also be connected to LNbits, essentially making you a custodian on the network. Don’t miss out!
LndHub #
Thanks to LndHub you can export your LNbits wallet to Blue Wallet for easy use from the app on your phone. You can use this option either instead of or in addition to scrubs. The cool thing about LndHub is that it gives you 2 types of access to your LNbits wallet – something like admin and user accounts.
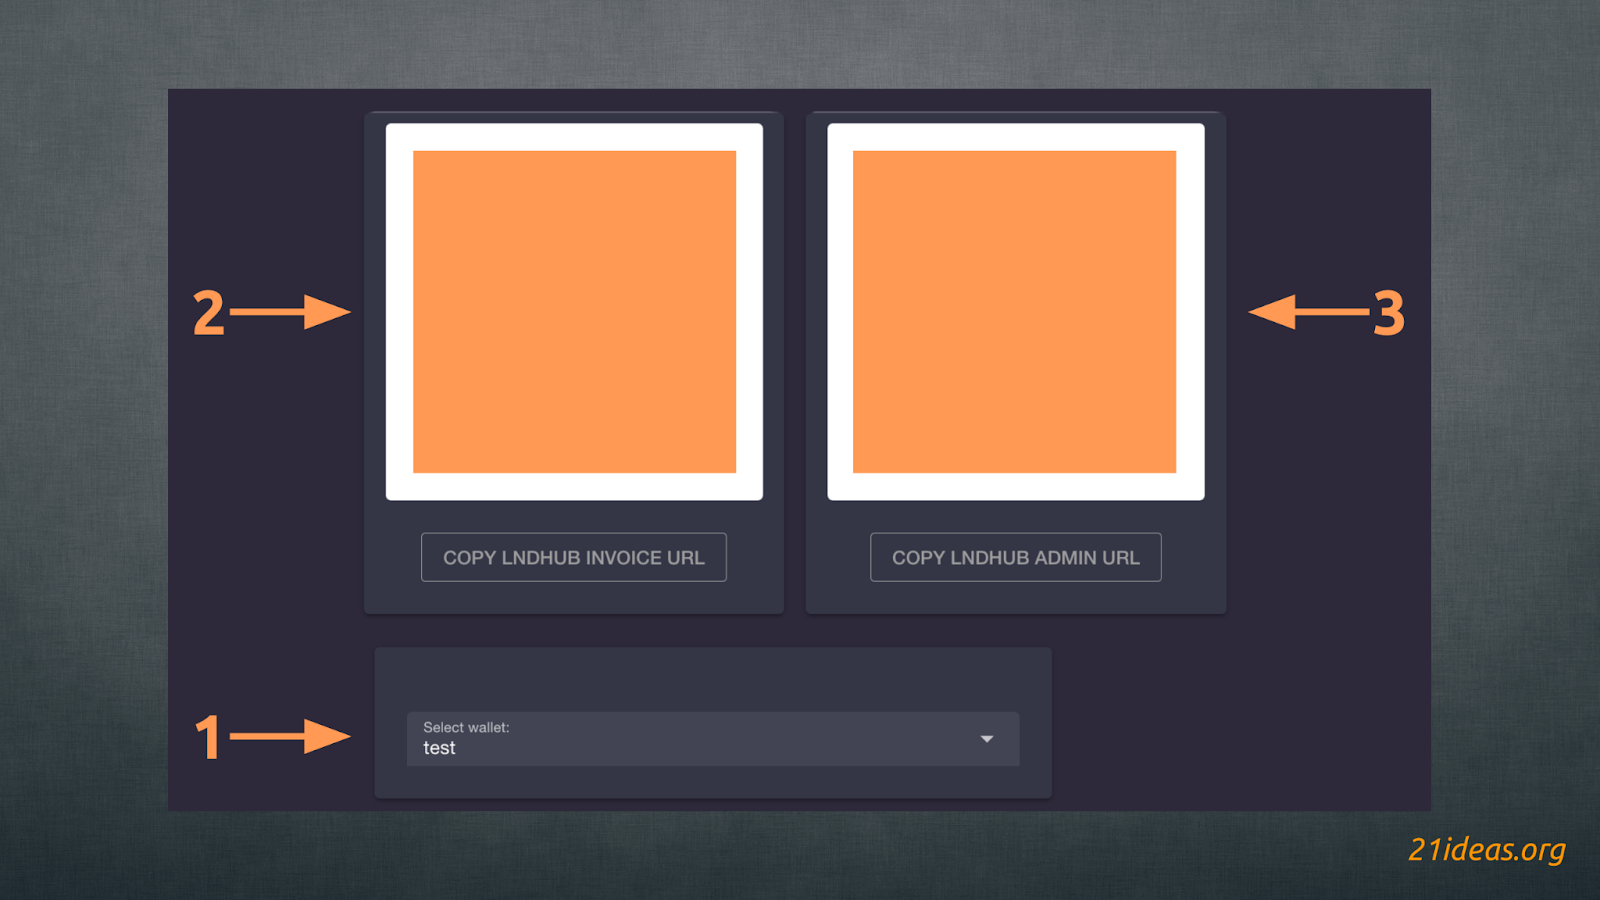
First of all, select the wallet you want to give your Blue Wallet mobile app access to (1). Next, by scanning the QR code (I have hide them for security reasons) on the left (2) you grant Blue Wallet user rights, i.e. you can generate invoices, but not spend funds. The code on the right (3) gives administrator rights and the ability to spend funds from the LNbits wallet.
This approach can be useful, for example, for owners of small coffee shops or bars. You as an administrator can get full access to the wallet and print out QRs with user access for waiters and baristas to generate invoices for interaction with customers.
Events #
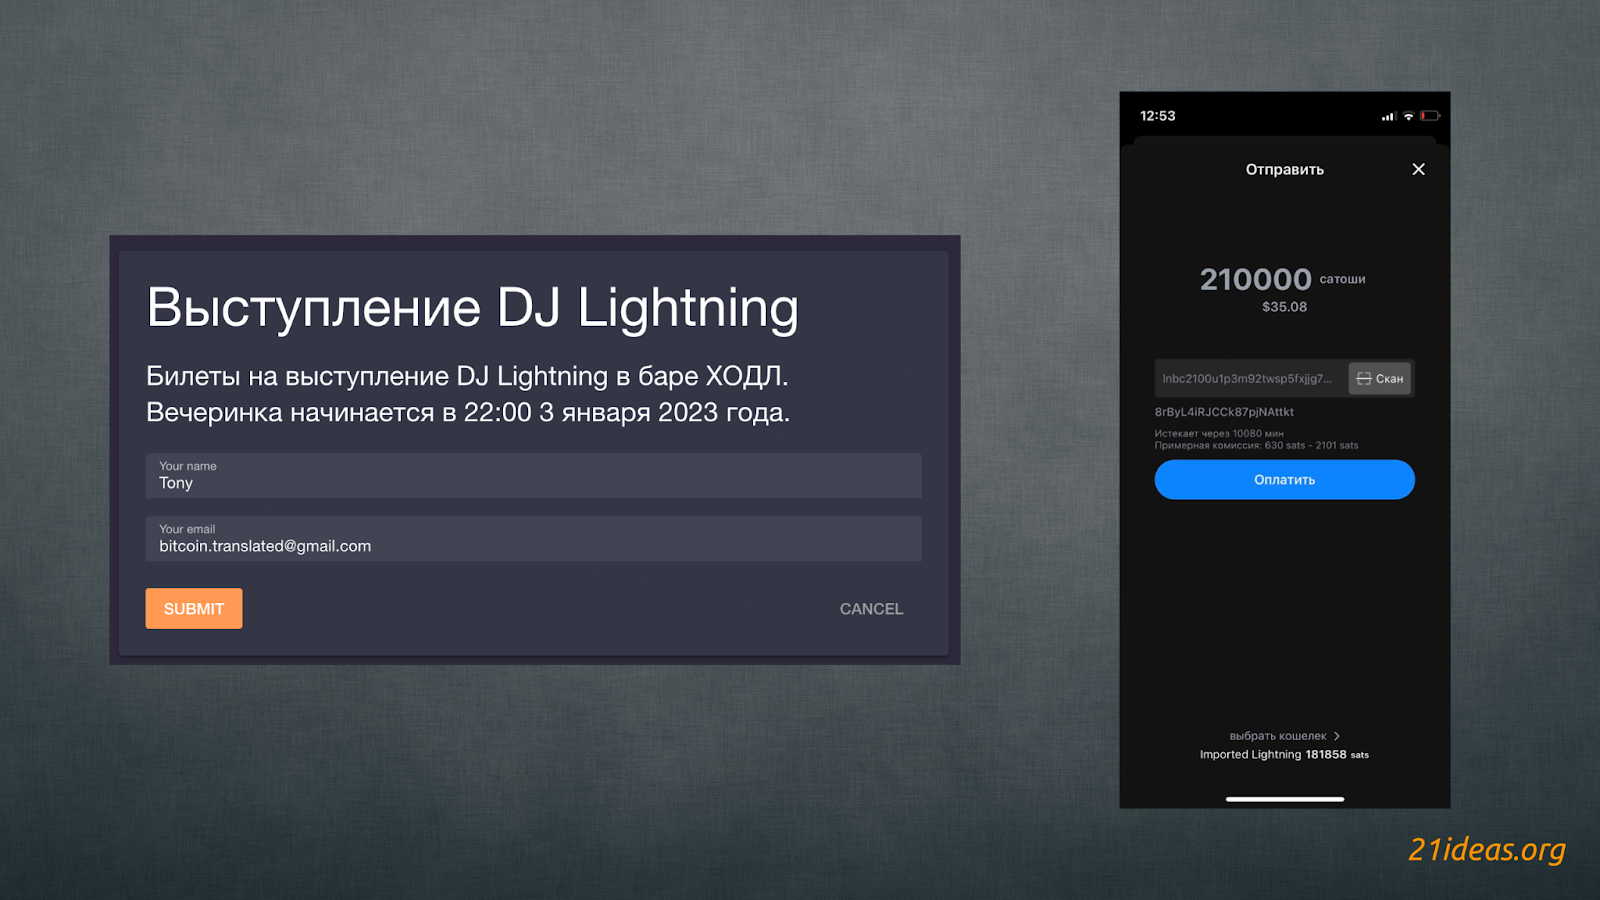
The Events extension allows you to sell tickets for any kind of event – both online seminars and lectures and offline events, such as underground performances by local DJs or a private rooftop show of paintings by local artists in the old town.
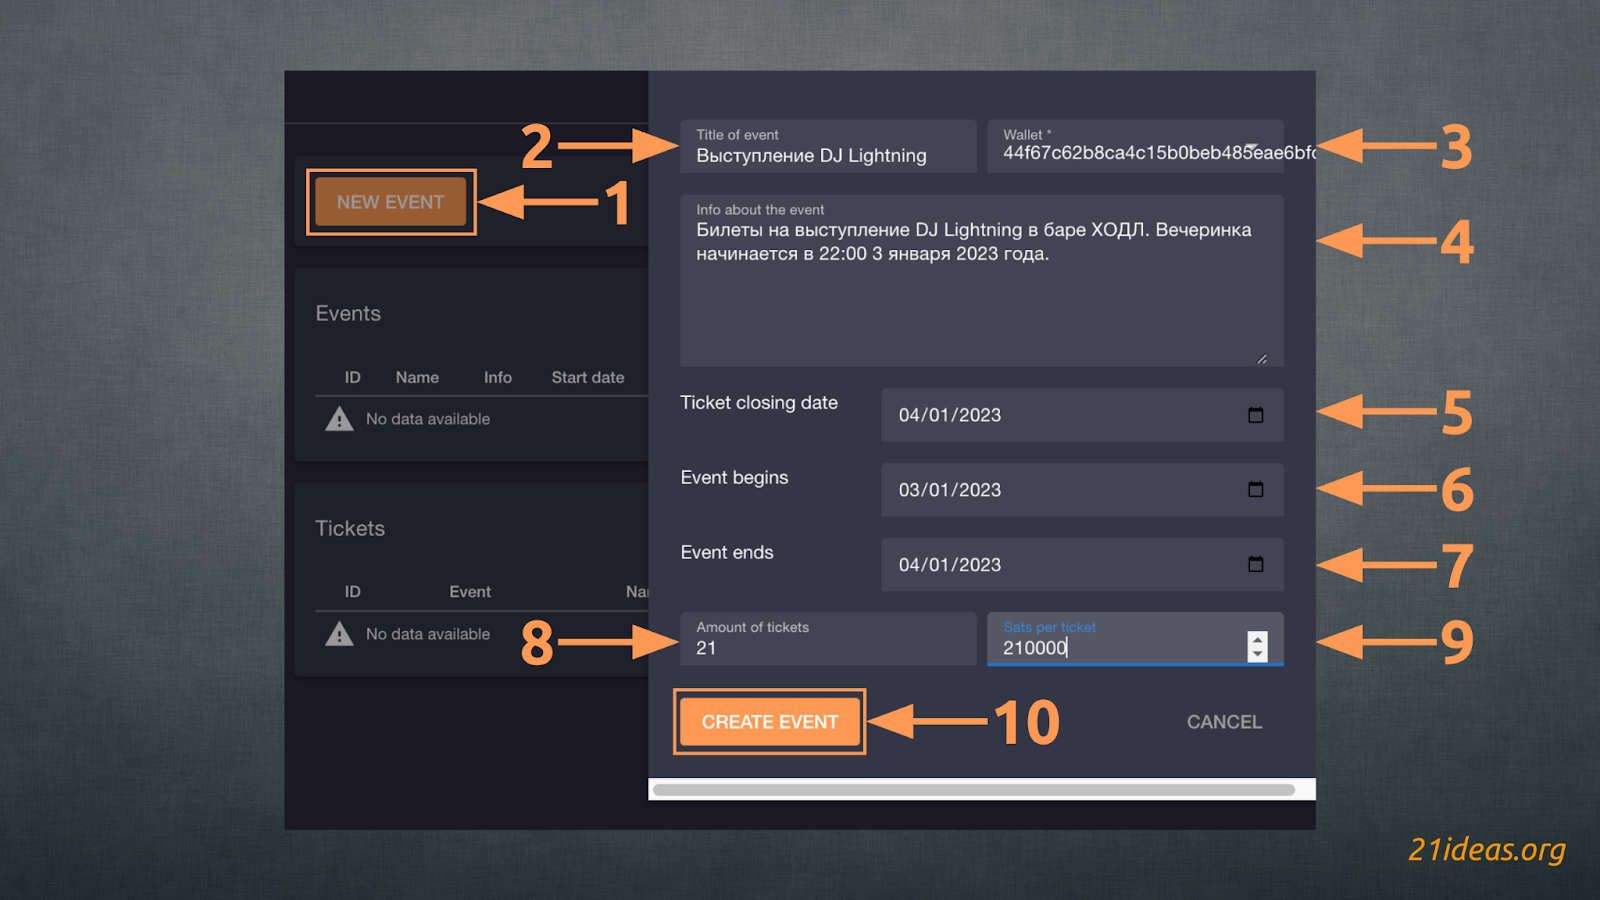
Go to the Events extension and click on NEW EVENT (1). Enter the name of the event (2), select a wallet (3), add a description (4), specify the date until which tickets will be sold (5), as well as the start (6) and end (7) dates of the event. Next, specify the number of available tickets (8) and the price per ticket (9). Click CREATE EVENT (10) and all done – our event with 21 available tickets has been created. You can share the link to the event and get paid for entry in sats via the Lightning Network. This is how the ticket payment page looks like in the browser (left) and Blue Wallet (right) when scanning the code appeared after filling necessary data:
With each ticket bought, you will see the status update (1) of the sale (scroll the widget to the right). Both the number of tickets remaining (a) and the number of tickets sold (b) will be updated.
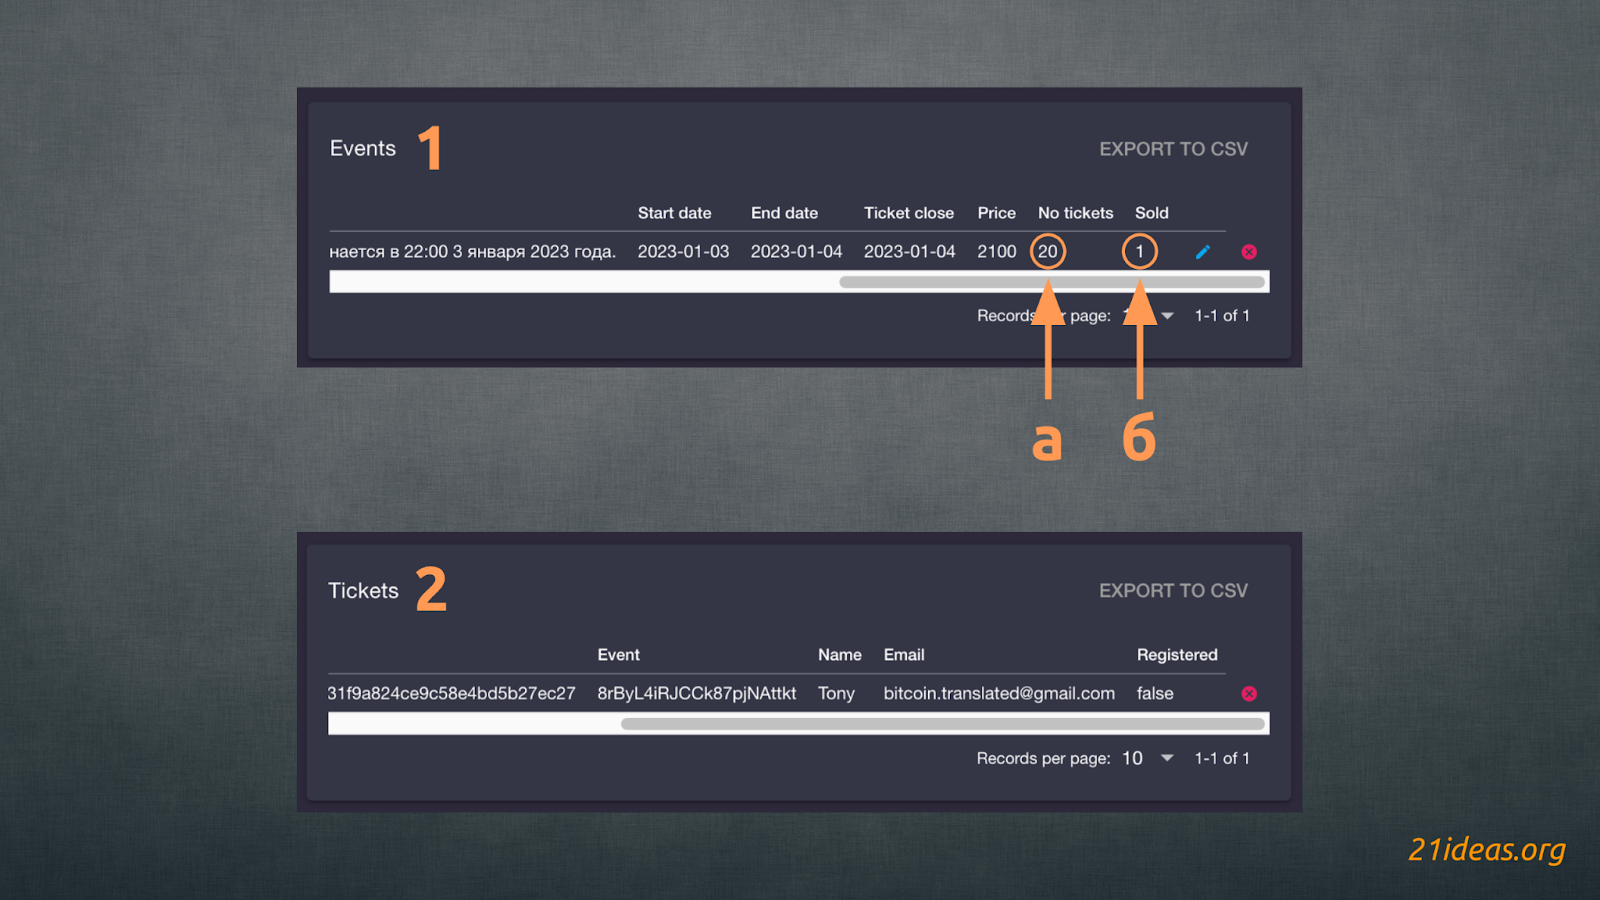
Below will be a second window (2) displaying the number of tickets bought and payment details.
Paywall #
The Paywall extension allows you to “hide” your content – articles, videos or any other valuable digital items – behind paywalls. Similar to how the Financial Times won’t let you read an article until you subscribe. But here, users pay per individual piece of content rather than per month of subscription regardless of how many articles they read.
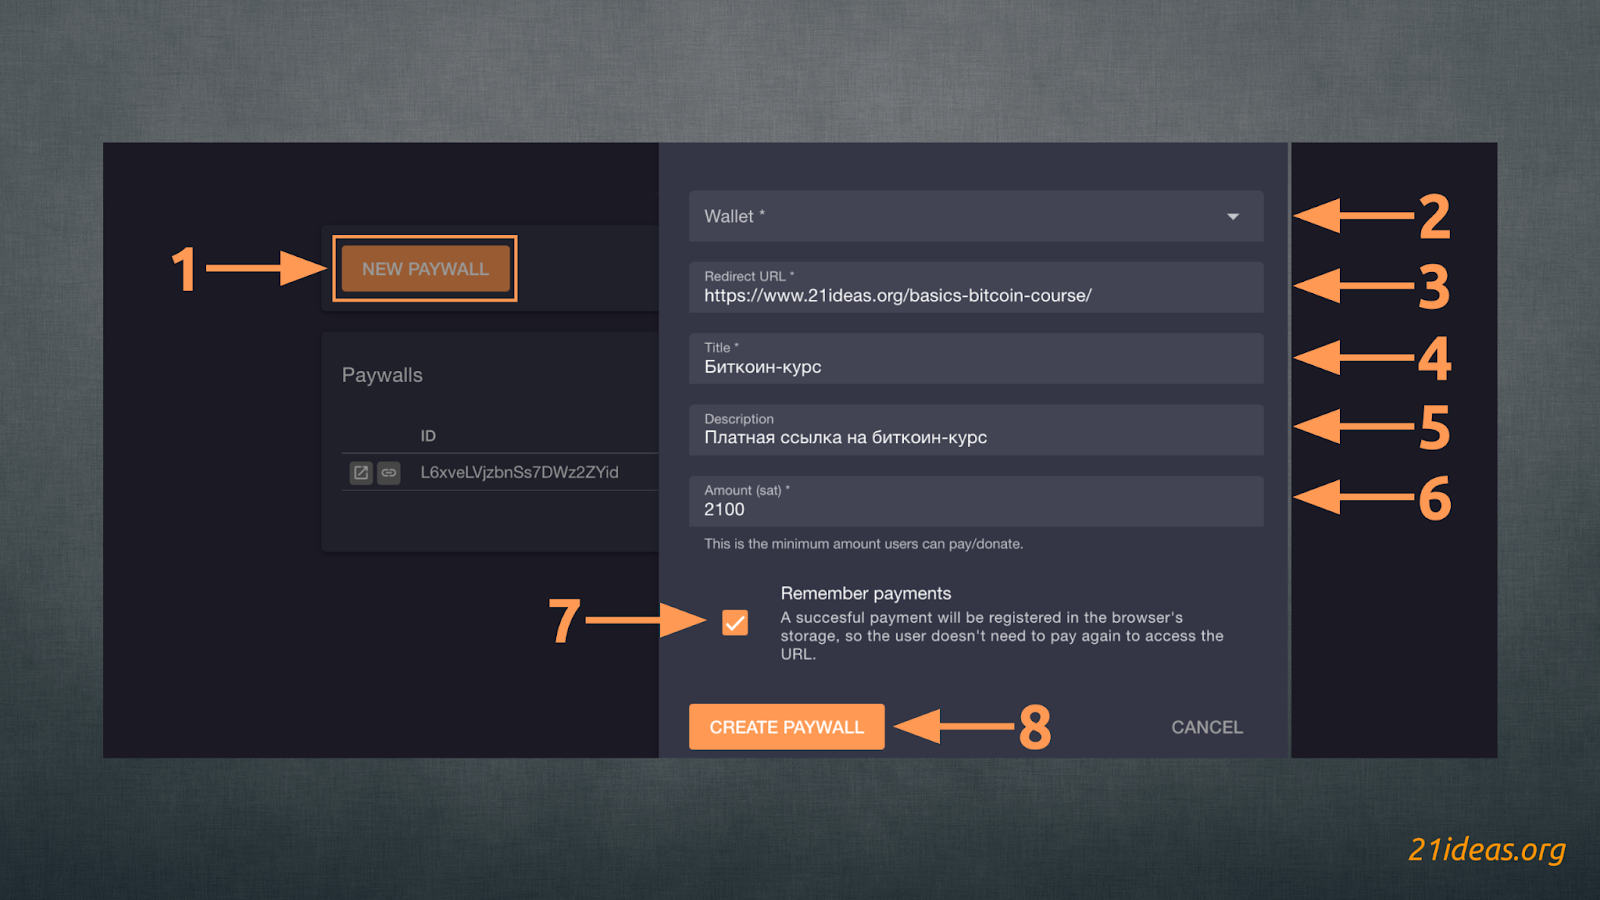
Click on NEW PAYWALL (1), choose a wallet (2), specify a link to which the sender should be redirected when paying (3). Specify the title (4) and description (5) of the material to be paid, specify the minimum amount of payment (6) – if desired, the sender can specify an amount higher than the one specified by you, thus leaving you a tip. By checking the Remember payments (7) box you indicate that each user who has paid for the material can click on the specified link again, without having to pay for it.
Notice how I (pretending to be the sender) specified an amount of 2200 sat when the minimum is 2100. The minimum payment amount is automatically displayed for the sender:
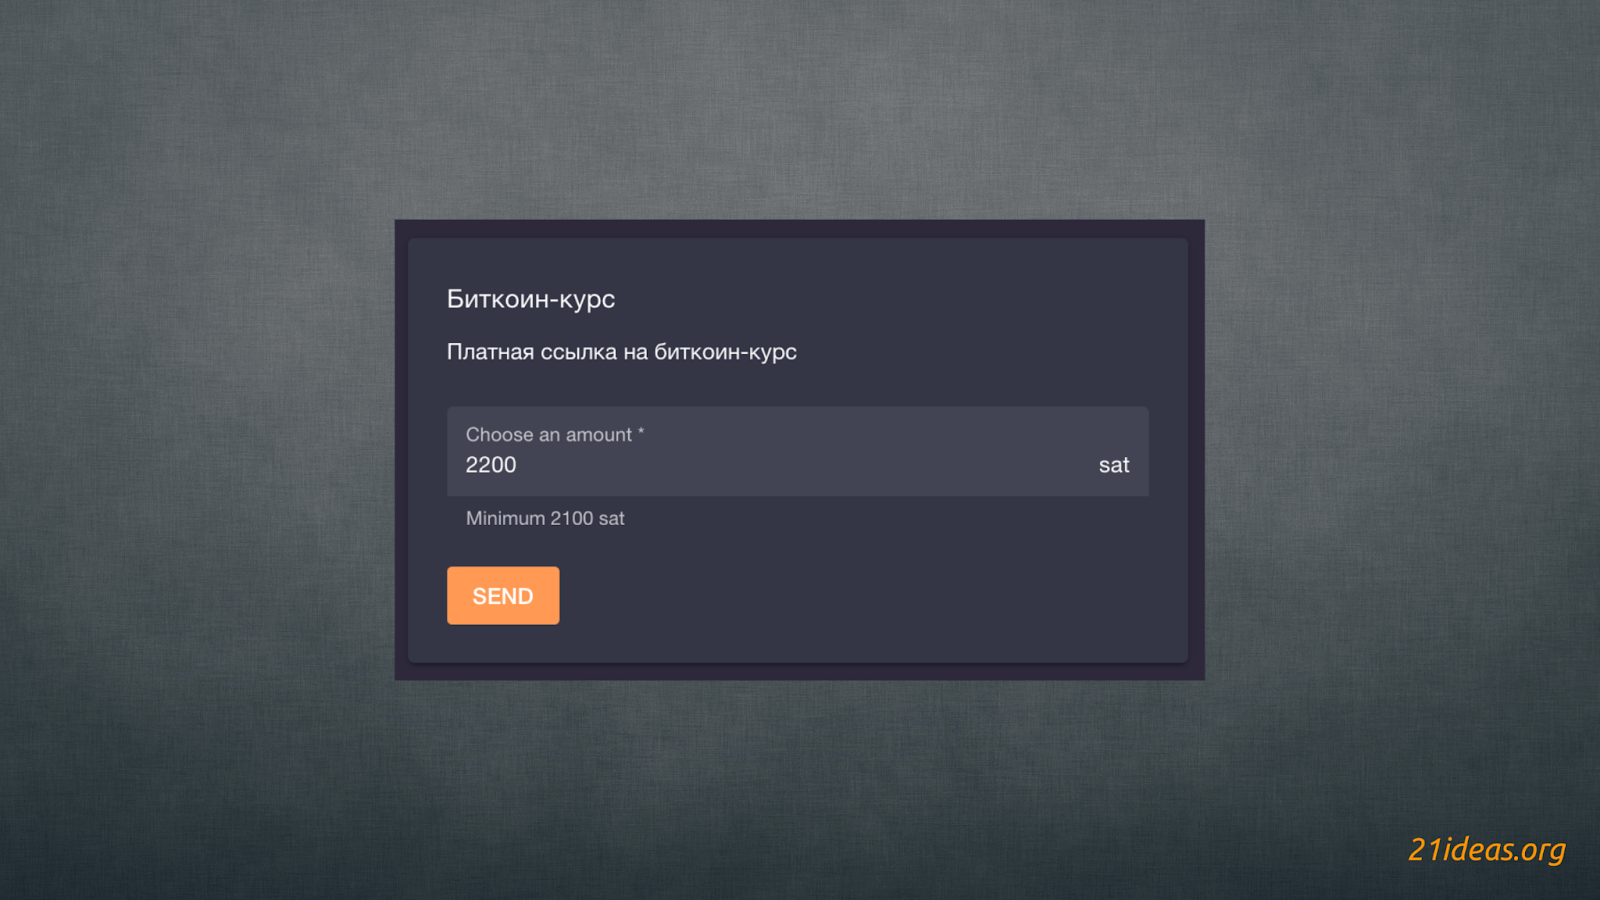
After successful payment of the invoice, the sender is redirected to a page with a link to the article:

Boltz #
The Boltz extension allows atomic swaps of onchain-offchain sats, i.e. “sending” sats from the Lightning Network to the main Bitcoin network and back again. All you have to do is choose the direction of the swap:
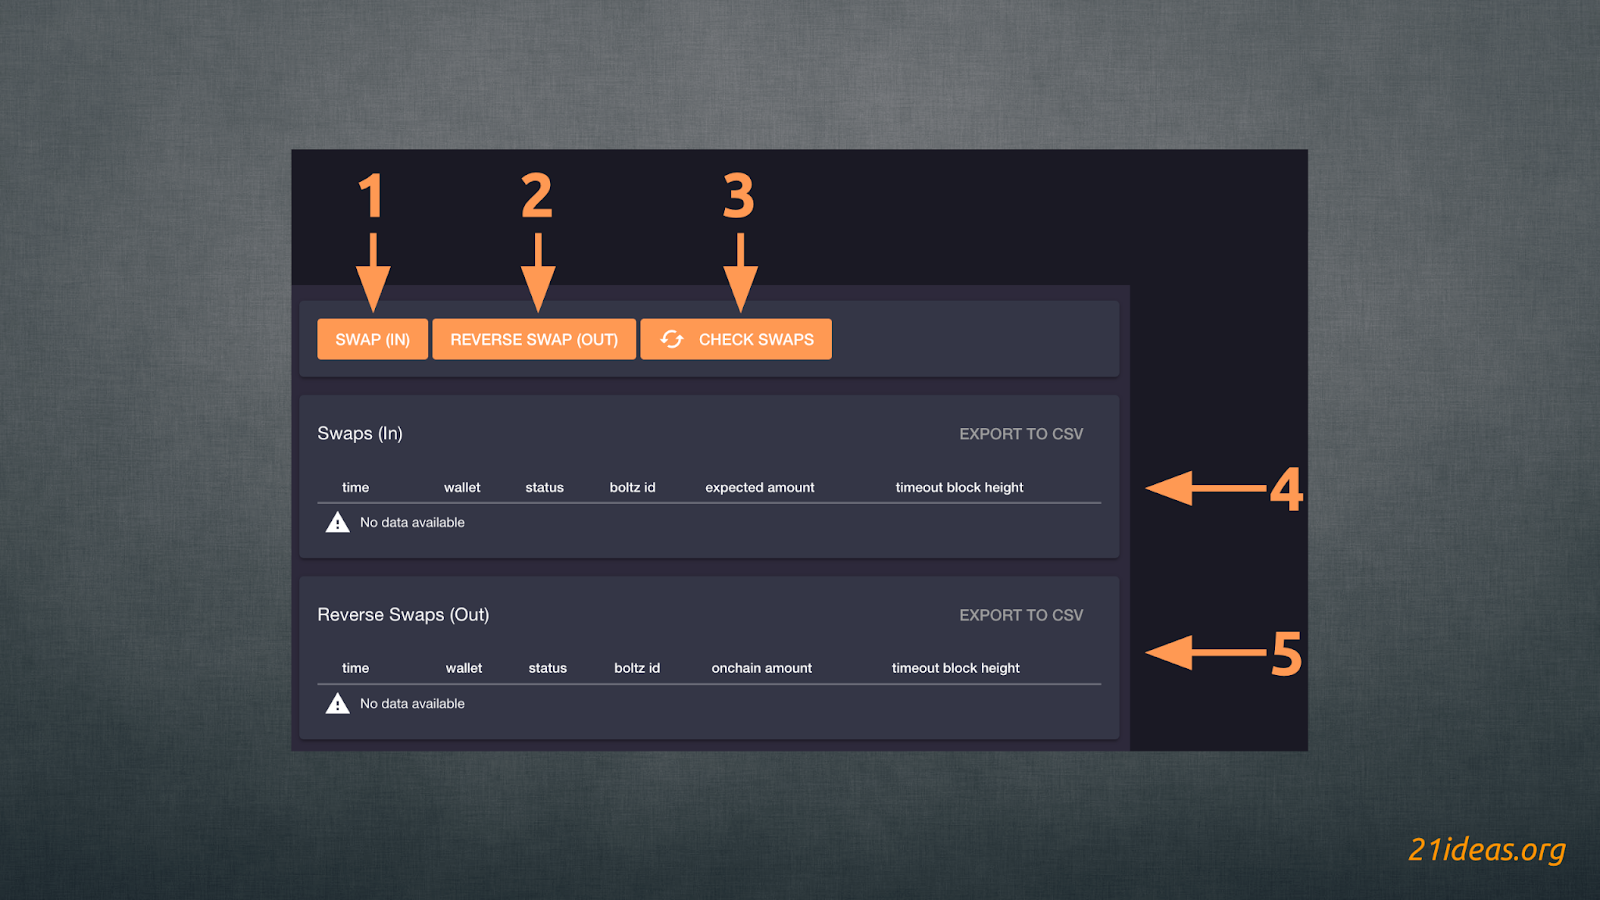
SWAP (IN) means sending sats from the Lightning Network (1), REVERSE SWAP (OUT) – vice versa (2). The CHECK SWAPS button (3) updates the widget status. As swaps are performed, the lists below (4), (5) will display the completed swaps.
Don’t forget that if you choose to do SWAP (OUT), it is important to disable the Scrub extension, otherwise Lightning sats sent to LNbits will by default be redirected further to the specified recipient wallet.
Once you have received sats on your LNbits wallet, click SWAP (OUT) and fill in the required fields:
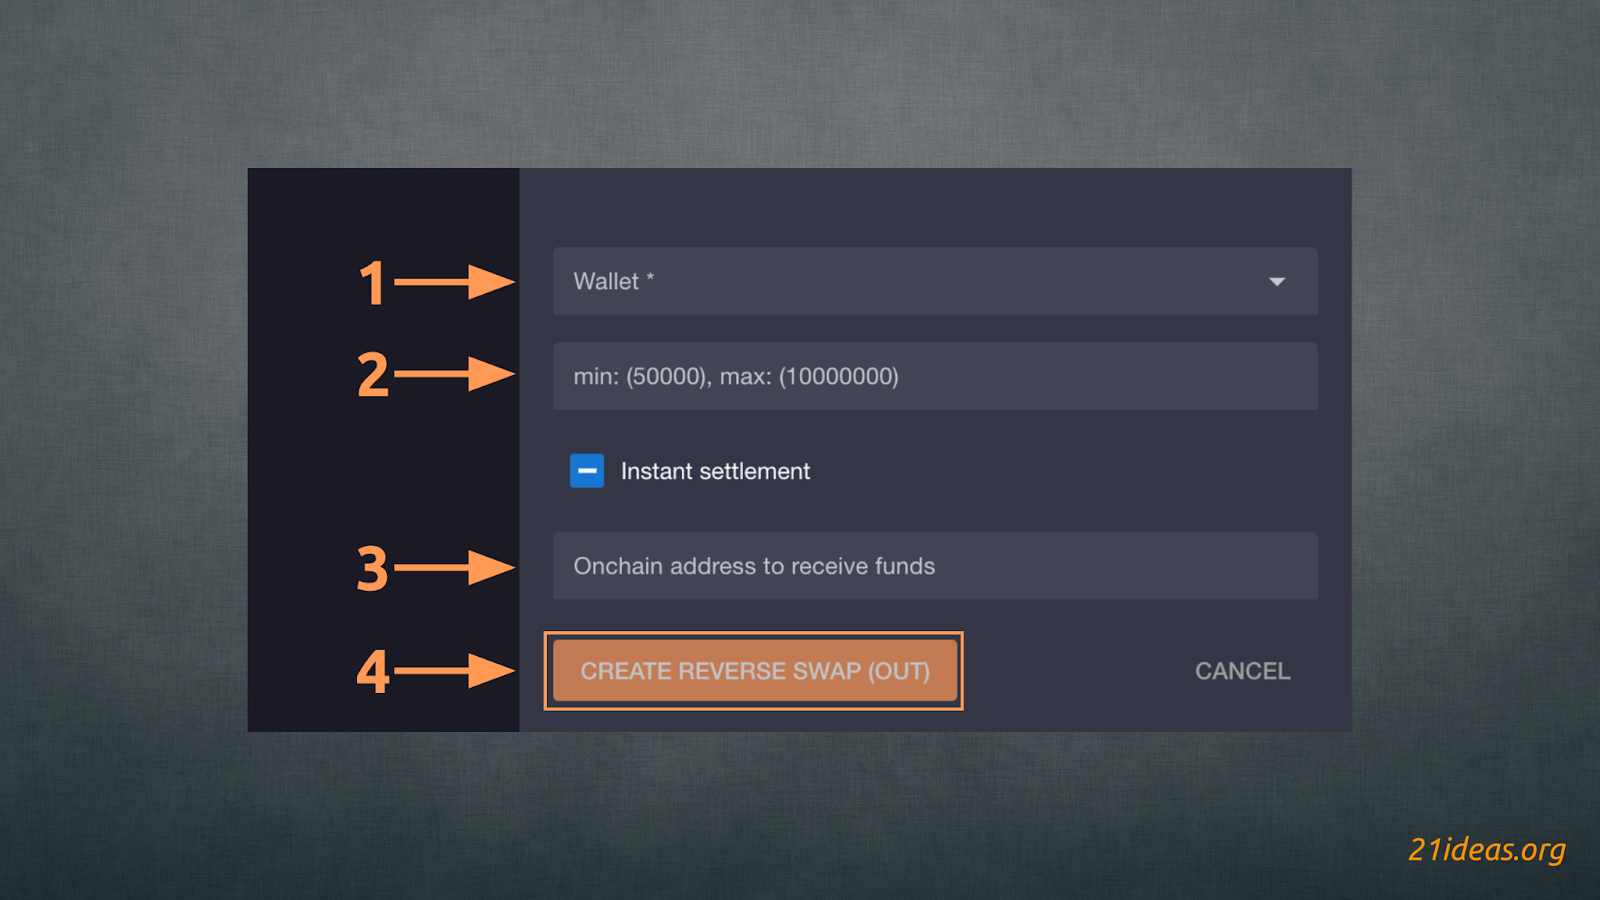
- Specify the wallet from which LN sats will be sent to the onchain address
- Specify the amount (from 50 thousand to 10 million sats)
- Specify the onchain address to receive sats
- Confirm the swap by clicking the button CREATE REVERSE SWAP (OUT).
The initiated swap is immediately displayed in the history:
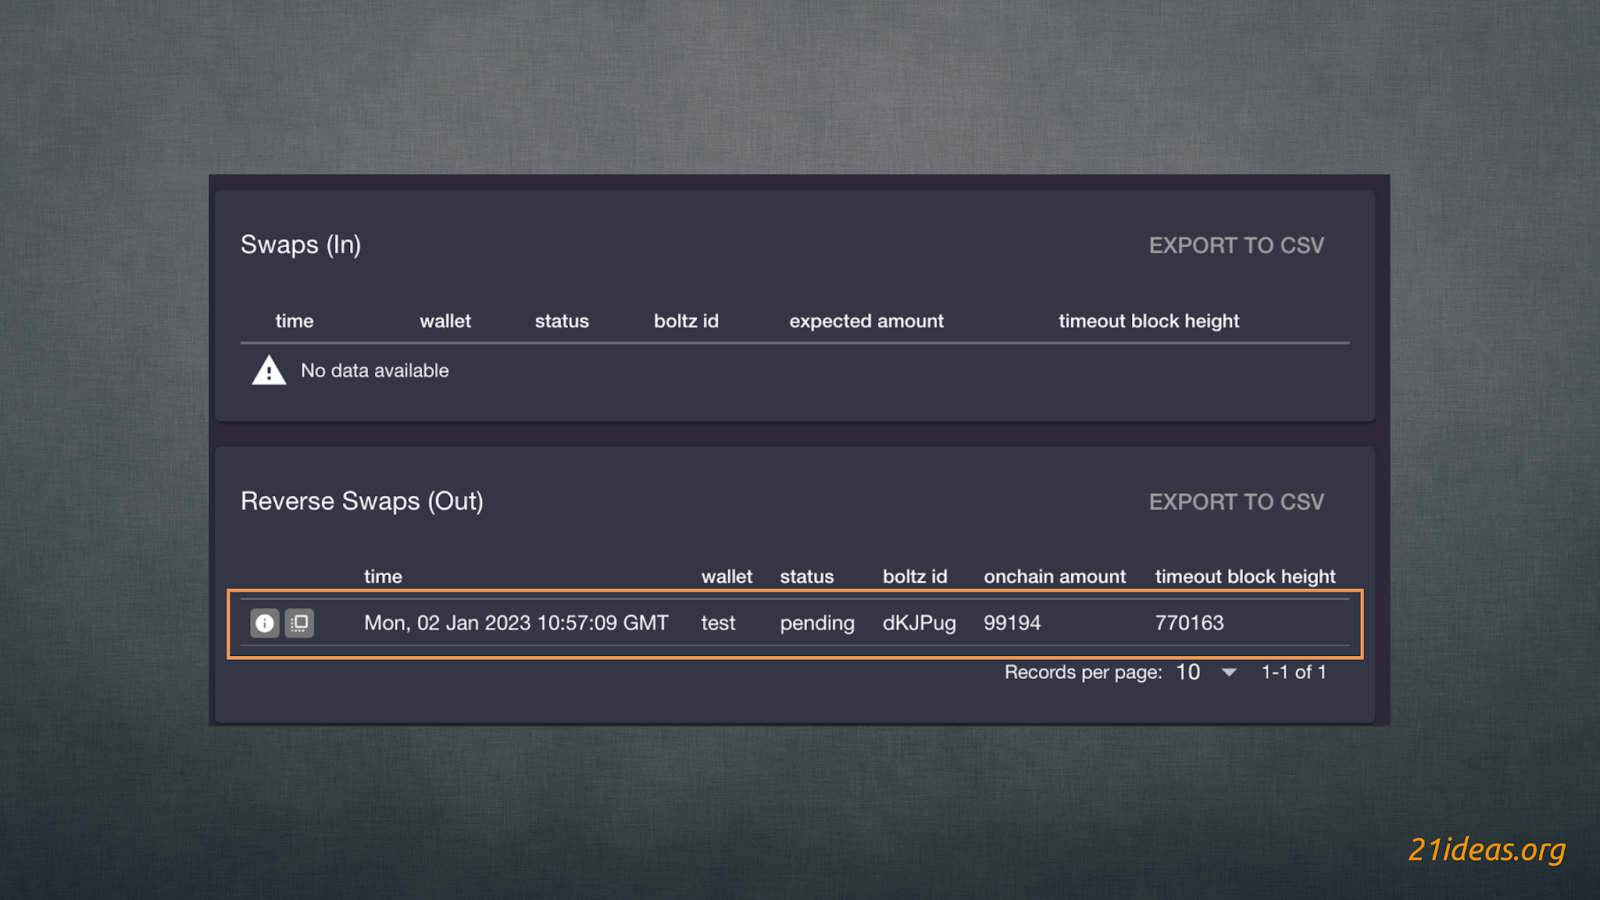
The swap cost about 1,000 sat, which is a very good result for an amount over $15.
LNURLw #
This extension allows you to create QR codes that users can scan to receive sats (rather than sending them, as most people are used to). This is a great way to introduce newcomers to the LN network or to thank your subscribers for feedback or, for example, participation in a survey.
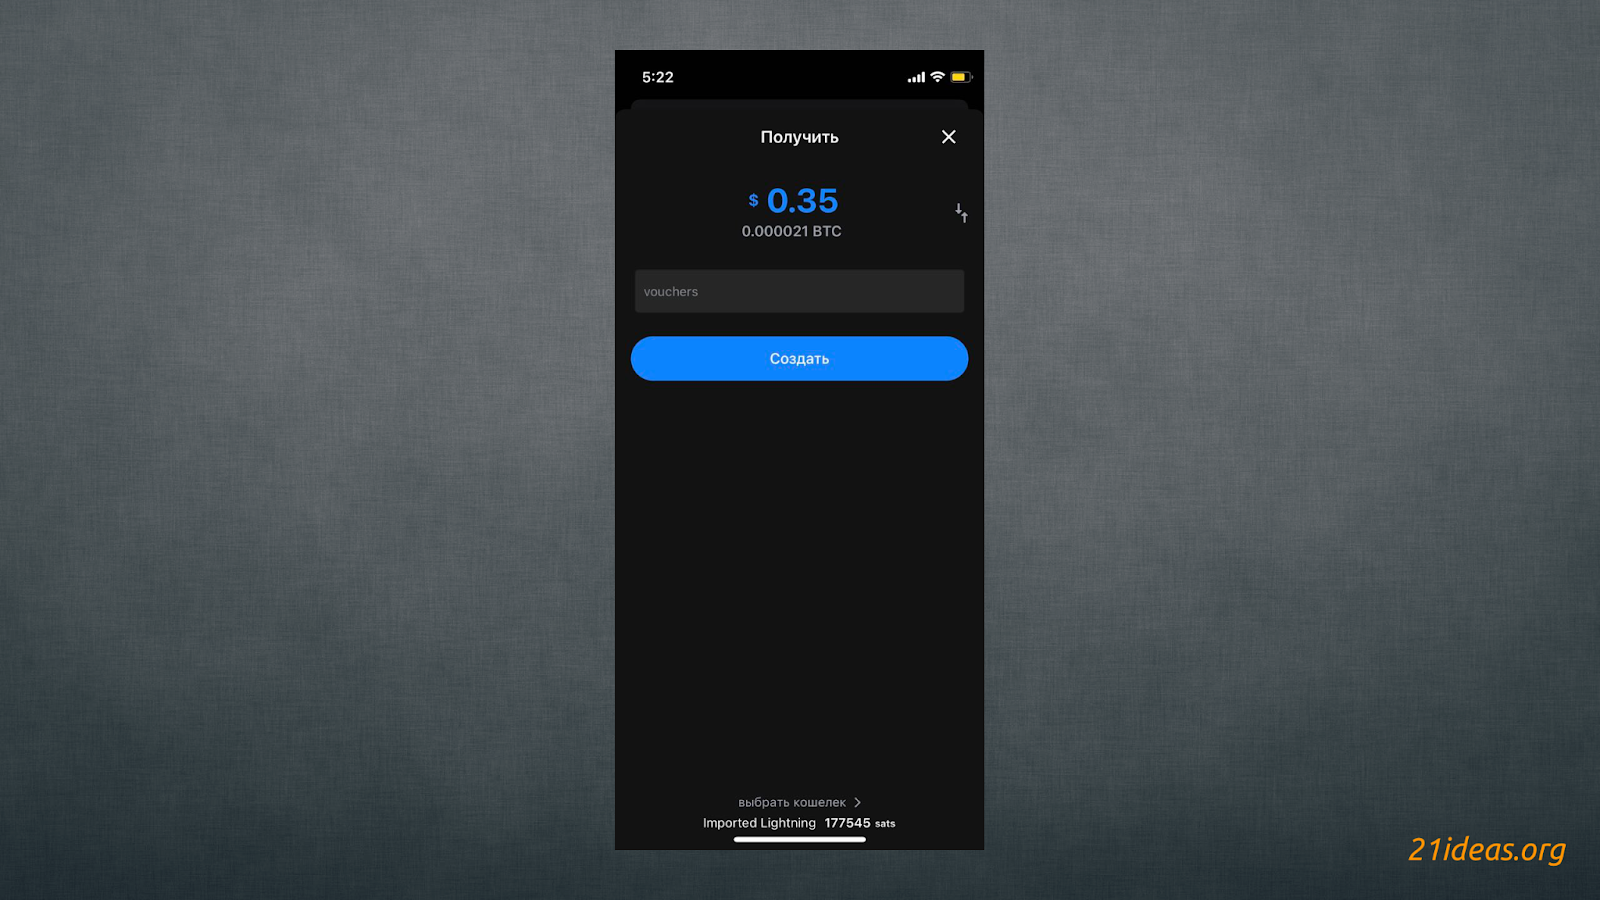
Opening the extension we see 2 options – QUICK VOUCHERS and ADVANCED WITHDRAW LINK(S). The first option will create a quick and simple voucher, while the second option will create more flexible vouchers with many variables. Let’s consider the second option:
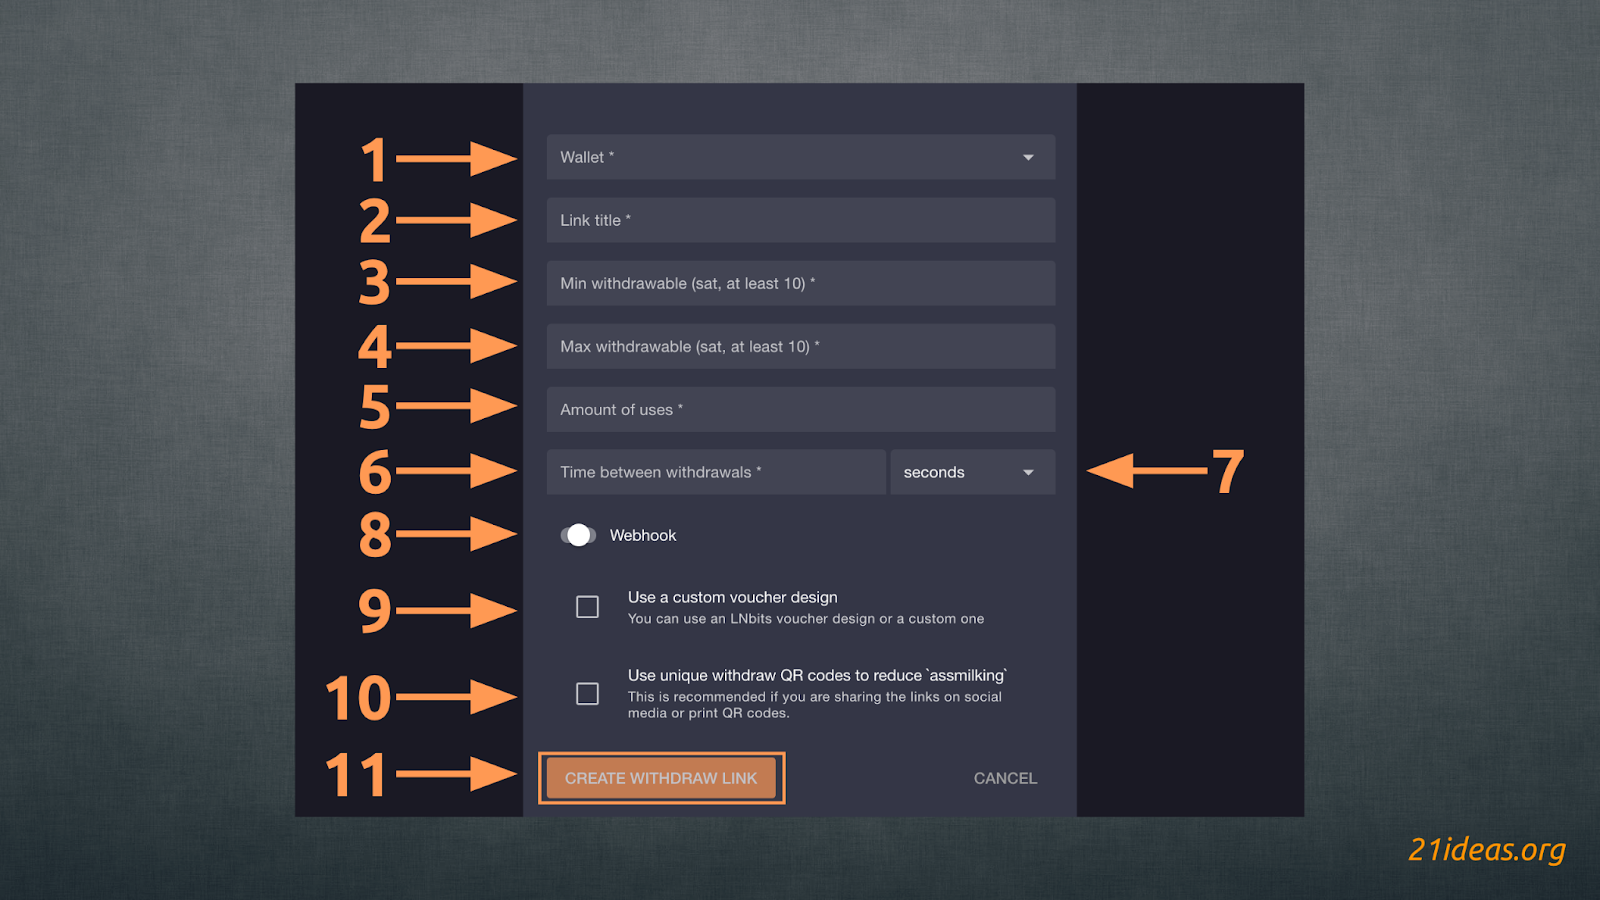
Choose the wallet (1), link title (2), the minimum (3) and maximum (4) amount available for withdrawal, the number of available “vouchers” (5), the delay between withdrawals (6) – this will not allow users to quickly withdraw funds again. Menu (7) allows you to select the units of waiting - seconds / minutes / hours. A webhook (8) can also be added. Checking the box (9) will allow you to add a link to your own LNURLw voucher design. Check box (10) will stop subscribers from withdrawing again. This is achieved by generating a new QR code for each withdrawal. Having filled in all the fields click on CREATE WITHDRAW LINK (11), and the link is ready. Users who follow the link will be able to scan the QR code with any wallet that supports LNURL and withdraw some sats. Here’s how it looks in Blue Wallet:
Other LNbits features #
LNbits offers many other features in addition to those listed above, but they are beyond the scope of this guide due to additional requirements that are unlikely to be easy for beginners and average users. Nevertheless, I will list them to give you a general overview of the tool’s features – perhaps some of them will interest you and you will decide to do your own research or purchase the necessary hardware:
- Bleskomat. This extension allows you to connect Bleskomat ATM to LNbits wallet. Requires additional hardware in the form of a small ATM. Details: https://www.bleskomat.com/.
- Bolt cards. Allows you to make an analog of credit/debit cards with NFC capable of spending sats. Requires special NFC-enabled cards for programming (regular cards sold on AliExpress will work).
- Cashu. Allows you to create mint and private tokens based on sats in the Lightning network. Tokens can be used in closed communities or chat rooms.
- DJ Livestream. Allows you to run live streams accepting payments in sats.
- Lightning Address. Allows you to sell Lightning addresses on your own domain. Requires your own domain and needs to be set up requiring web tech-savvy.
- Offline Shop. Allows you to enter a list of local store items and generate an LNURL for each item. Visitors can pay for items as they take them off the shelf and show paid receipts to the merchant on the way out.
- Split Payments. Split payments coming to your LNbits wallet between multiple users.
- Spotify Jukebox. Create a playlist in Spotify and collect a few sats from listeners for each song.
- Subdomains. Sell subdomains of your own domain (e.g. plebs.21ideas.org).
- User Management. Useful option for operators of LN nodes. You can create wallets for your less tech-savvy friends and family. This way they trust you rather than an unfamiliar third party like Blue Wallet or Wallet Of Satoshi.
Well, it looks like this information will be more than enough for the first time. I plan to prepare a video guide on this topic soon, so subscribe to 21ideas YouTube channel and click the bell😉.
See you on the other side of the rabbit hole,
Tony.